Dollar store baskets are the unsung heroes of home organization: cheap, lightweight, and always ready to hold
something you swore you’d “put away later.” The only problem? Many of them look like… well… dollar store baskets.
The good news: a “basket makeover” is basically a glow-up with glue. With a few simple upgradesrope, paint, fabric,
vinyl, labels, and the occasional wooden beadyou can turn bargain bins into storage that looks boutique.
In this guide, you’ll get 16 easy dollar store basket makeover DIY ideas that work for wire baskets, plastic bins,
woven styles, and even those flexible laundry baskets that somehow multiply in closets. Each idea includes practical
steps, budget-friendly materials, and styling tips so your finished baskets look intentionalnot like a craft table
had a small accident.
Before You Start: Quick Basket Makeover Rules (So Your DIY Lasts)
- Clean first. Wash plastic and wipe wire with rubbing alcohol so paint and glue stick better.
- Scuff glossy surfaces. A light sanding (fine grit) helps paint grip slick plastic.
- Pick the right adhesive. Hot glue is fast; E6000 or a strong craft adhesive is sturdier (but needs curing time).
- Seal when needed. A clear sealer helps paint and decoupage survive real-life use.
- Safety matters. Use spray paint outdoors or in a well-ventilated area. Be careful with hot glue and sharp wire ends.
Materials You’ll See Often (Mix-and-Match What You Have)
- Jute rope or cotton rope (nautical rope works great)
- Acrylic paint or spray paint + primer (for tricky plastics)
- Hot glue gun + glue sticks (and/or strong craft adhesive)
- Contact paper, peel-and-stick wallpaper, or vinyl
- Fabric scraps, felt, bandanas, or dish towels (for liners)
- Mod Podge (or decoupage medium) + decorative napkins
- Wood beads, leather/faux leather strips, ribbon, twine
- Label holder clips, chalkboard tags, or printable labels
16 Easy Dollar Store Basket Makeover DIY Ideas
1) Rope-Wrapped “High-End” Basket (The Classic Glow-Up)
This is the makeover that makes people say, “Wait, that’s from the dollar store?” Rope instantly adds texture and
warmthperfect for farmhouse, coastal, boho, or modern neutral homes.
- Start with a plastic or wire basket. If it’s wire, line it with paper first so glue doesn’t drip through.
- Hot glue the rope end to the bottom edge and wrap around the basket in tight rows.
- Glue every few inches (or continuously for heavy-use baskets).
- Finish the top edge neatly: fold rope end under or tuck into the last row with glue.
Pro tip: Add two small rope “handles” (loops) or faux leather pulls for a designer look.
2) “Anthro-Inspired” Rope Basket Using a Plastic Bin as the Base
Want the look of expensive coiled baskets without actually paying expensive coiled basket prices? Use a cheap
plastic bin or small trash can as the hidden structure.
- Choose a tall plastic container (mesh or solid). Clean and dry thoroughly.
- Wrap rope from the bottom upward, gluing as you go.
- At the top, create a finished rim by wrapping one extra row and gluing firmly.
- Add handles with braided rope, twine, or faux leather straps.
Style twist: Paint-dip the bottom third of the rope (after wrapping) for a modern color-block vibe.
3) Decoupage Napkin Basket (Instant Pattern Without Sewing)
Decorative napkins are basically wallpaper for people who love crafts. Decoupage lets you add florals, stripes,
holiday prints, or vintage patterns fast.
- Separate the napkin layers and use only the top printed layer.
- Brush decoupage medium onto the basket surface (best on smooth areas).
- Lay the napkin gently, smoothing from center outward. Don’t bully itit will tear if you glare too hard.
- Brush a thin coat on top to seal. Let dry fully, then add a second coat if needed.
Pro tip: For woven baskets, decoupage works best on flatter areas or by applying in smaller sections.
4) Peel-and-Stick Wallpaper Liner (The “No One Will Know” Hack)
If your basket’s outside is fine but the inside screams “utility bin,” line it with peel-and-stick wallpaper or
contact paper for a polished finish.
- Measure the base and sides (or use the basket as a tracing template).
- Cut wallpaper/contact paper pieces and stick them inside.
- Smooth out bubbles with a gift card (finally, a use for that store card you never remember).
- Seal edges with a thin line of clear-drying glue if the basket gets heavy use.
5) No-Sew Fabric Liner With a Fold-Over Cuff
Wire baskets look expensive when they have a tailored fabric linerlike they’re wearing a tiny sweater. You can do
it without sewing by using fabric glue or iron-on hemming tape.
- Measure the basket bottom and sides; add extra for a cuff that folds over the rim.
- Cut fabric in a “plus sign” pattern (bottom in the center, sides extending out).
- Fold corners, glue seams, and test fit.
- Fold the top edge over the rim and secure with glue dots, clips, or hidden stitches if you want extra strength.
Pro tip: Use canvas or denim for durability in kids’ rooms or laundry areas.
6) Faux Leather Strap Handles (Small Detail, Big Upgrade)
Adding handles instantly makes a basket look intentionallike it belongs in a catalog instead of the “random storage”
aisle.
- Cut two faux leather strips (or upcycle an old belt).
- Punch holes with an awl/nail (carefully) or use pre-punched craft straps.
- Attach to the basket with small bolts, brads, or zip ties (hidden on the inside).
- Add a small wood bead or knot detail for extra style points.
7) Spray-Painted Wire Basket (Modern, Minimal, Clean)
Wire baskets are great for pantry and closet storage, but the default finish can feel “office supply closet.” A matte
spray paint refresh makes them look sleek.
- Clean wire thoroughly and let dry.
- Spray in light coats (don’t flood it) and rotate for full coverage.
- Let cure fully before loading with items (patience = fewer fingerprints).
Pro tip: Add a label holder clip and a simple tag for a pantry-worthy finish.
8) “Galvanized” Look Basket (Farmhouse Without the Price Tag)
Want that rustic metal vibe? Use textured or hammered-finish spray paint on a plastic basket or bin.
- Lightly sand glossy plastic and wipe clean.
- Use a plastic-friendly primer if needed.
- Spray with hammered/metallic paint in thin layers.
- Optional: add a twine wrap around the rim for warmth.
9) Wood-Bead + Twine Trim Basket (Soft, Neutral, Trendy)
This one is for the “I love neutrals, but I also love texture” crowd. A simple bead garland and twine wrap makes a
basket look curated.
- Wrap twine around the basket rim and glue the ends underneath.
- String wood beads onto twine (or buy a bead garland and cut to size).
- Attach garland to the basket front with tiny glue dots or a thin line of hot glue.
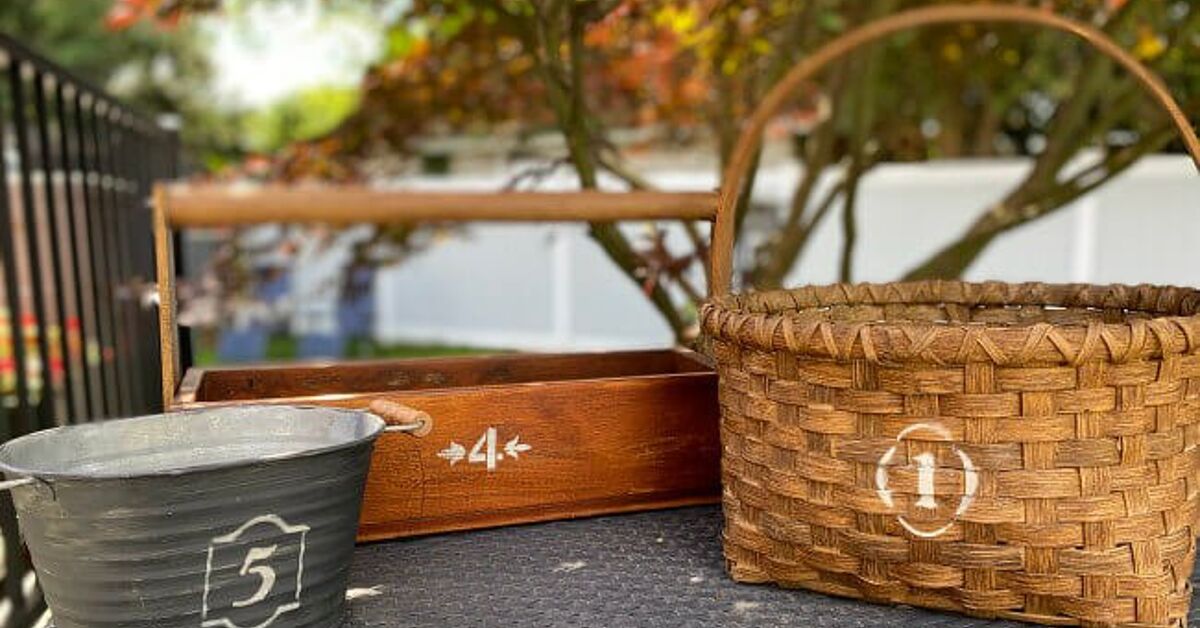
10) Chalkboard Label Basket (Pantry & Homework-Safe Organization)
Labels are the difference between “organized” and “I have a pile system.” Chalkboard labels let you change categories
as life changes.
- Paint a small rectangle with chalkboard paint (or stick on a chalkboard label).
- Let paint cure fully before writing.
- Use a chalk marker for cleaner, less dusty labeling.
11) “Woven” Look Plastic Basket Using Ribbon Weaving
If your basket has holes or an open design, weave ribbon or fabric strips through it for a custom pattern.
- Choose wide ribbon, fabric strips, or yarn (two complementary colors look great).
- Weave over-under through the openings in horizontal rows.
- Secure ends inside the basket with glue or knots.
Style twist: Use burlap ribbon for rustic, satin ribbon for glam, or cotton tape for modern.
12) “Linen Closet” Basket With a Bandana Wrap
Bandanas are an underrated DIY supply: cheap, colorful, and already hemmed. Wrap one around a plain basket to make it
look like a boutique storage bin.
- Fold bandana into a long strip and wrap around the basket exterior.
- Secure with fabric glue, double-sided tape, or a few hidden stitches.
- Finish with a twine bow or a small tag.
13) Ombre Painted Basket (Color With a Grown-Up Finish)
Ombre works beautifully on plastic baskets with texture. It’s also forgivingtiny imperfections just look artistic.
- Prime if needed, then apply the lightest color as the base.
- Blend medium shade in the center area with a sponge or dry brush.
- Deepen the bottom with the darkest shade, blending upward.
- Seal with a clear topcoat for durability.
14) Labeled “Gift Basket” That Becomes Storage Later
Make a gift basket that doesn’t become clutter the moment the gifts are opened. Upgrade the basket first, then fill
it with goodies.
- Choose a sturdy basket and add rope trim or a fabric liner.
- Add a tag like “Snacks,” “Self-Care,” or “Coffee Bar.”
- Fill with themed items and wrap in cellophane or tie with ribbon.
Bonus: The receiver keeps the basket as stylish storage (and silently appreciates you forever).
15) Bee Skep-Inspired Basket (Cozy Cottage Texture)
Bee skep baskets have that charming, old-world look. You can recreate the vibe by shaping and wrapping rope in a
tapered form, then adding simple details like a small handle.
- Start with a small basket base or form; wrap rope in tight rows, gluing as you go.
- Gradually taper toward the top by slightly angling each row inward.
- Add a small loop handle with rope or twine.
- Optional: dry brush with light paint to highlight texture.
16) Lighted Basket Accent (Soft Glow for Shelves or Seasonal Decor)
A basket doesn’t have to be only storageit can be decor. Add a small battery light set inside a lined basket for a
cozy shelf accent (especially for holidays or nursery shelves).
- Line the basket with fabric or burlap to soften the look.
- Tuck a small battery-operated light string inside (avoid heat-producing lights).
- Hide the battery pack behind the liner fold or in a small attached pocket.
- Add greenery, pinecones, or faux florals for seasonal styling.
How to Choose the Best Makeover for Your Space
The secret to baskets that look “expensive” isn’t spending moreit’s matching the makeover to the job. A rope-wrapped
basket is great for blankets and living rooms. A wipeable wallpaper liner makes sense for pantry snacks and kids’
supplies. A fabric liner shines in closets where the look matters, and your hands aren’t constantly tugging heavy
items in and out.
- High-traffic zones (pantry, mudroom): paint + labels + durable liners
- Living room styling: rope wrap, bead trim, neutral fabric cuff
- Kids’ rooms: bright ombre paint, woven ribbon, big readable labels
- Bathroom: wipeable liners, minimal trim, moisture-friendly sealers
Common Basket Makeover Mistakes (And How to Avoid Them)
- Too much glue. Use small amounts frequently instead of giant blobs that ooze and harden.
- Skipping cure time. Paint and adhesive need time to fully harden, especially on plastic.
- Overloading weak baskets. Some dollar store baskets are better for light itemsupgrade structure if needed.
- Ignoring the inside. A pretty outside with a messy inside is like dressing up and forgetting your shoes.
Extra: Real-World Experiences That Make Basket Makeovers Easier (About )
People who get really into basket makeovers usually start with one simple goal“I just want the pantry to stop
looking like a snack tornado”and then suddenly they’re labeling bins like a professional organizer with a clipboard
and a dream. If you’re heading down that path (welcome), a few real-world lessons show up again and again.
First: the basket you choose matters more than the craft trend. In real homes, the prettiest basket
isn’t always the best basket. A rope-wrapped basket looks amazing in a living room, but in a pantry it can catch
crumbs and dust. That’s why wipeable liners (contact paper or peel-and-stick wallpaper) are secretly the MVP for
kitchens and kids’ art supplies. You’ll thank yourself the first time a granola bar explodes and cleanup takes ten
seconds instead of ten minutes and a motivational speech.
Second: labels prevent “organizational amnesia.” At first, it’s easy to remember which basket holds
batteries, which one holds chargers, and which one holds mystery cords from 2017. But fast-forward two weeks and
suddenly everything becomes “misc.” A tiny label holder or chalkboard tag keeps baskets functional. The best labels
are short, specific, and written like a promise: “SUNSCREEN,” not “BEACH STUFF AND SUMMER THINGS AND ALSO HOPE.”
Third: handles change how often you actually use the basket. This sounds small, but it’s huge.
Baskets without handles get shoved to the back of a shelf. Baskets with handles get pulled out, carried, and put
backlike they’re part of the household team. Faux leather straps, rope loops, even sturdy ribbon pulls can turn a
“pretty container” into something you’ll grab daily. It’s the difference between storage and storage you’ll
actually maintain.
Fourth: makeovers work best when they match your house style. If your space is modern, keep it
simple: matte paint, clean labels, minimal trim. If your home leans cozy or farmhouse, rope, twine, and wood beads
will look natural. If you love color, ombre paint or patterned napkin decoupage adds personality without needing a
total room makeover. The basket becomes a tiny style “accent” that’s also usefuldecor that earns its keep.
Finally: the “best” basket makeover is the one you’ll repeat. When a DIY is too complicated, you do
it once and then avoid it like an awkward neighbor encounter. The sweet spot is a makeover you can do assembly-line
stylewrap three baskets while listening to a podcast, label them all at once, and suddenly your shelves look
organized on purpose. That’s when dollar store basket makeovers stop being a craft and start being a system.
Conclusion
A dollar store basket makeover is one of the fastest ways to make your home feel more organized and more “you”
without spending a fortune. Whether you go full rope-wrapped farmhouse, sleek spray-painted modern, or patterned
decoupage fun, the goal is the same: baskets that look good, work hard, and don’t make you sigh every time you open a
closet. Pick one idea, try it today, and be warnedbaskets are contagious once they start looking this cute.