Floating shelves are basically the wall’s version of “I woke up like this.” No visible brackets. No obvious support.
Just a clean slab of wood casually holding your cookbooks, plants, and the ceramic mug collection you swear is “curated.”
The secret, of course, is that floating shelves aren’t magicalthey’re engineering with good PR.
If your shelves have ever leaned like they’re listening to gossip, or (worse) peeled off the wall in slow motion while you watched
helplessly like it was a nature documentary, don’t worry. The fix is almost always the same: choose the right hanging method for your wall
and your shelf load, then install it with the patience of a saint and the accuracy of a laser… or at least a decent level.
Below are three reliable, real-world ways to hang floating shelves. Each one workswhen used in the right situation.
I’ll break down when to use which method, exactly how to do it, what can go wrong, and how to avoid “Shelfageddon.”
Quick Decision Guide: Which Hanging Method Should You Use?
- Method 1 (Stud-Mounted Hidden Brackets/Rods): Best for heavy loads and everyday confidence. If you can hit studs, this is usually the winner.
- Method 2 (Drywall Anchors & Toggle Bolts): Best when studs don’t line up with the shelf placement and you’re hanging light to moderate loads (or you’re in a rental and can’t open the wall).
- Method 3 (French Cleat / Wall Cleat System): Best for long shelves, wide “mantel-style” builds, and situations where you want strong support plus easy leveling.
Before You Drill: 6 Rules That Keep Floating Shelves from Failing
1) Know what your wall is made of
Drywall over studs? Great. Plaster? Also workable, but it can crack and needs careful drilling. Masonry? Different hardware entirely.
The method you choose depends on the wall material, not your mood.
2) Decide what the shelf will actually hold
“Just a few little things” is how many shelf disasters begin. If it’s holding books, dishes, or anything that clinks when you pick it up,
assume it’s heavier than you think. Plan for more capacity than you need.
3) Wider shelves need better support
Deeper shelves create more leveragemeaning the same weight can cause more sag and pull-out force. If your shelf is deep (think 10–12 inches),
or if it’s a thick “box” shelf, you’ll want a method designed for strength (studs or cleats).
4) Level is not optional
Even a tiny tilt will look obvious once objects are on the shelf. Use a level at every stage: layout lines, bracket mounting, and final shelf placement.
5) Pilot holes prevent splitting and stripped screws
Pilot holes help screws bite cleanly into studs, reduce the chance of splitting a wooden cleat, and help you avoid that special DIY heartbreak:
the screw that spins forever because the hole is now a sad little crater.
6) Use the hardware the bracket system calls for
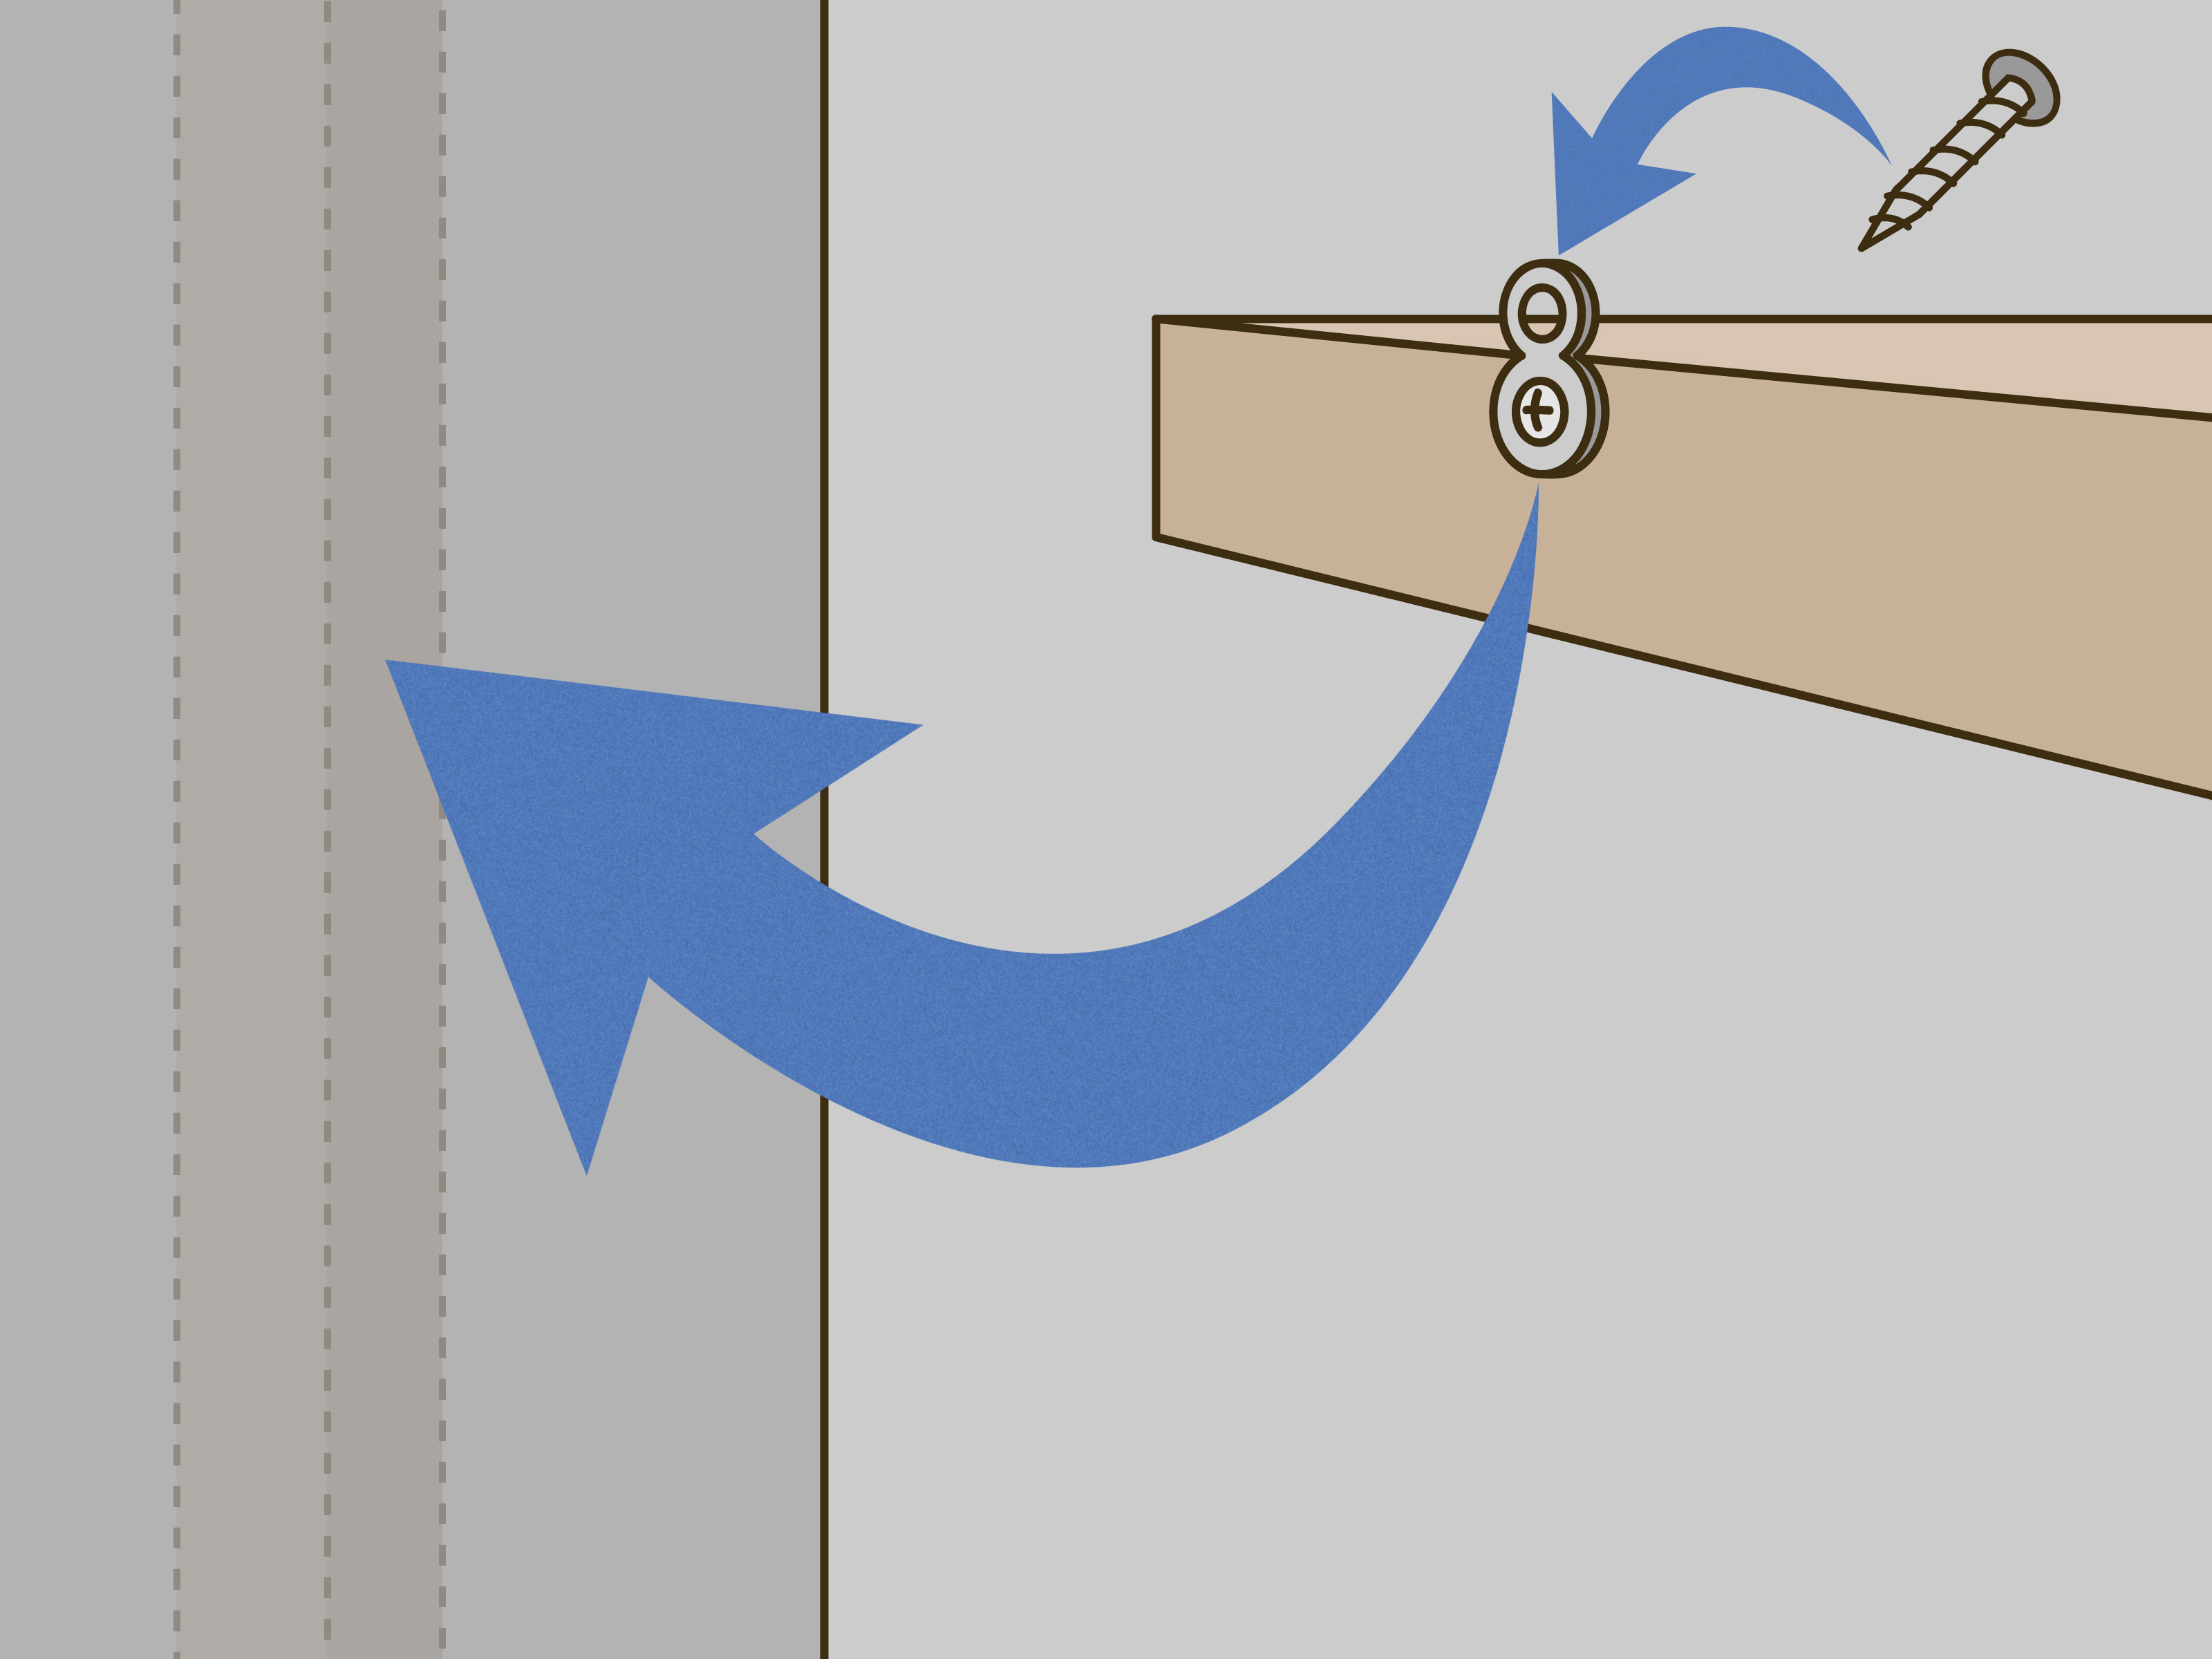
Many floating shelf kits use a backplate with set screws, or a specific bracket pattern. Follow the manufacturer’s spacing and screw sizes.
“Close enough” is how shelves earn a PhD in Wobbling.
Method 1: Mount to Studs with Hidden Brackets or Rod-Style Supports
If you want the strongest, most universally reliable floating shelf install, anchor into studs. This is the method that lets you
place real weight on the shelf without constantly wondering if gravity is plotting against you.
Best for
- Kitchen shelves holding dishes, glasses, mugs, spices, or small appliances
- Living-room shelves with books, framed photos, and décor
- Bathrooms (use proper sealing/finish on wood)
- Any shelf where you care about strength more than perfect placement freedom
How it works
Hidden shelf brackets come in two common styles:
(1) a backplate with projecting arms/rods that slide into holes or channels in the shelf,
or (2) a cleat/backer system that the shelf slides over and locks in place.
Either way, the “secret sauce” is screws driven solidly into wall studs.
Tools & materials
- Stud finder (with AC warning is a nice bonus)
- Level (2-foot is great; longer for long shelves)
- Drill/driver + bits
- Tape measure, pencil, painter’s tape
- Floating shelf bracket kit (rated for your shelf size)
- Appropriate screws (often included; if not, use quality structural screws for studs)
- Optional: shims (thin wood/plastic), for fussy walls
Step-by-step installation
-
Mark your shelf height. Put painter’s tape on the wall and draw a level reference line where the shelf will sit.
(Tape is easier to see and less likely to leave “oops” marks.) -
Find and mark studs. Run the stud finder and mark stud centers on the tape. Confirm if possible by checking for consistent
16- or 24-inch spacing and/or using a small finish nail test in an inconspicuous spot. - Hold the bracket/backplate to the wall. Align it to your reference line. Use the level again. Yes, again.
- Drill pilot holes into studs. Pilot holes reduce splitting and make it easier to drive screws straight.
- Fasten the bracket into studs. Drive screws firmly. The bracket should feel like part of the wall nownot like it’s asking permission.
-
Dry fit the shelf. Slide the shelf onto the bracket. If it won’t slide, don’t force it like you’re starting a lawnmower.
Pull it off and check alignment, debris, or slightly off-angle screws. - Lock the shelf in place. Many systems use set screws underneath. Tighten them to prevent drift or lift.
- Final level check. Put the level on top of the shelf and confirm. If it’s slightly off, thin shims behind the bracket (or behind a cleat) can correct it.
Example: A 36-inch kitchen shelf that won’t sag
For a 3-foot shelf holding daily-use items, position it so the bracket hits at least two studs. Use a bracket system sized for the shelf length,
and don’t cheap out on fasteners. The result should feel rigid before you ever put a plate on it.
Common mistakes (and fixes)
- Missing the stud center: If the screw bites weakly or spins, move to the true center. Patch the hole neatly and try again.
- Bracket not level: Loosen screws slightly, re-level, then retighten. Or shim behind the bracket if the wall bows.
- Shelf won’t slide on: Double-check bracket spacing, protruding screw heads, and shelf hole alignment.
Method 2: Hang Floating Shelves on Drywall Using Heavy-Duty Anchors (When Studs Aren’t Where You Need Them)
Sometimes studs are exactly where you don’t want the shelf. Or you’re working with a narrow shelf and a wide stud gap.
Or your wall layout was designed by someone who hated shelves. In those cases, you can use anchorsif you choose the right type
and keep expectations realistic.
Best for
- Light décor shelves (small plants, picture frames, candles)
- Small bathroom shelves (toiletriesnothing too heavy)
- Rentals where you can’t open the wall
- Situations where the shelf is narrow and the load is controlled
The anchor hierarchy (a.k.a. “Choose Your Fighter”)
- Toggle bolts / strap toggles: Typically the strongest option for drywall when studs aren’t available.
- Molly bolts: Expand behind the wall; good holding power if installed correctly.
- Self-drilling anchors: Convenient for lighter loads; not ideal for heavy floating shelves.
- Plastic ribbed anchors: Best for light-duty hanging; generally not the hero you want for a floating shelf.
How to keep anchor installs from turning into wall confetti
The main reason anchor-mounted floating shelves fail is not “bad luck.” It’s usually one of these:
(1) the wrong anchor for the load, (2) holes drilled too large, (3) bracket leverage pulling the anchor outward,
or (4) overconfidence.
Step-by-step installation with toggle-style anchors
-
Pick a shelf system that supports anchors. Some floating shelf kits assume stud mounting only. If the backplate is tiny and flimsy,
don’t try to “upgrade it” with anchors and hope. - Mark the shelf line and bracket holes. Level the reference line. Hold the bracket/backplate up and mark hole locations carefully.
-
Drill the correct hole size. Toggle systems require a specific diameter. Use the size recommended for the hardware.
Too small and it won’t fit; too big and it won’t grip. - Install the toggles. Insert toggles through the drywall and set them per the manufacturer’s instructions. Make sure the toggle fully opens behind the wall.
- Fasten the bracket/backplate. Tighten the screws until the bracket is snug and doesn’t shiftbut don’t crank so hard you crush the drywall.
- Mount and secure the shelf. Slide the shelf on, then tighten set screws or underside screws to keep it from creeping.
- Load-test gently. Apply light downward pressure by hand first. If it flexes or clicks, stop and fix it before adding items.
Smart ways to increase strength (without pretending drywall is a stud)
- Use more anchor points if the bracket system allows it (more fasteners = better distribution).
- Keep the load closer to the wall. Heavy items on the front edge increase leverage.
- Choose smaller shelves for anchor-only installs (shorter, shallower shelves are safer).
- Mix studs + anchors when possible: hit one stud, use anchors for the rest.
Example: “I need a shelf right here, but the studs are miles away”
If you’re installing a 24-inch shelf in a spot where no studs align, use a bracket rated for anchor installation and opt for heavy-duty toggle anchors.
Then treat the shelf like a display shelf, not a library branch.
Reality check: Even strong anchors have limits, and floating shelf leverage is real. If you want to store stacks of textbooks,
switch to Method 1 or Method 3.
Method 3: Use a French Cleat (Wall Cleat System) for Long, Strong, Easily-Leveled Floating Shelves
A French cleat sounds fancy, like it should come with a beret and strong opinions about baguettes. But it’s actually a brilliantly simple system:
two matching 45-degree beveled strips that hook together. One strip goes on the wall. The other goes on the shelf (or shelf box).
Gravity does the restand it does it enthusiastically.
Best for
- Long shelves (especially 4 feet and up)
- Thicker “box” shelves or mantel-style shelves
- High confidence installs where you want strong support across a longer span
- Situations where you want easier leveling and a cleaner mount
How it works (in plain English)
You cut a board (often plywood) lengthwise at a 45-degree angle, creating two mirrored pieces. The wall cleat is mounted with the bevel facing up and out.
The shelf cleat is mounted on the shelf with the bevel facing down and in. When you drop the shelf onto the wall cleat, the bevels interlock and pull tight.
Tools & materials
- Plywood or straight lumber for cleats (often 3/4-inch)
- Table saw or circular saw with a guide (for the 45-degree rip)
- Stud finder, level, drill/driver
- Wood screws (long enough to bite into studs)
- Optional: a second lower “anti-tilt” strip or spacer
Step-by-step installation
- Build the cleat pair. Rip a straight board at 45 degrees to make two matching cleats. Sand the edges so they seat cleanly.
-
Mount the wall cleat into studs. Mark stud locations, level the cleat, drill pilot holes, and drive screws into studs along the cleat length.
(Long shelves often benefit from multiple stud hits.) - Attach the matching cleat to the shelf. Secure it to the back of the shelf box/shelf structure. Keep it straight and well-fastened.
- Hang the shelf. Lift and hook the shelf cleat onto the wall cleat. Lower gently until fully seated.
-
Prevent lift-off (optional but recommended). Add small screws from underneath or inside the shelf into the wall cleat, or use a discreet stop strip,
especially in homes with kids, pets, or frequent accidental bumps. - Check level and fit. The cleat system makes tiny adjustments easier, but confirm with a level before calling it done.
Pro tip: Add a hidden lower spacer
If the shelf box sits away from the wall at the bottom, add a thin spacer strip (same thickness as the wall cleat) lower on the wall so the shelf stays parallel.
This keeps the shelf from “tilting in” at the top like it’s doing a polite bow.
Example: Mantel-style floating shelf
For a thick mantel shelf, a cleat system shines because the cleat can run almost the full shelf length, spreading load and helping the shelf resist rotation.
Done right, it feels rock solidand looks like it’s defying physics on purpose.
Common Problems (and How to Fix Them Without Crying)
Problem: The shelf sags over time
- Cause: Not enough support points, weak anchors, or too much weight.
- Fix: Move to a stud-based mount, add more support points, reduce load, or switch to a cleat system for long shelves.
Problem: The shelf pulls away from the wall
- Cause: Anchors failing, screws not in studs, or too much leverage (deep shelf + weight near the front).
- Fix: Reinstall into studs, upgrade to toggles if studs are impossible, or shorten/shallow the shelf.
Problem: Shelf won’t sit flush
- Cause: Wall isn’t flat, bracket isn’t square, or the shelf holes don’t match the bracket exactly.
- Fix: Shim behind bracket/cleat, re-check level, and confirm bracket alignment before tightening everything down.
Problem: You hit something in the wall
If you suspect wiring or plumbing, stop. This is the moment where you switch from “DIY hero” to “cautious adult.”
Use a stud finder with AC detection, look for outlets/switches near your drill point, and avoid drilling above/below plumbing fixtures where lines may run.
of Real-World Floating Shelf Experience (a.k.a. Lessons From the Wall)
The first time I installed floating shelves, I was feeling unstoppable. I had a drill, a fresh level, and the kind of optimism that only exists before you’ve met
drywall in an emotionally vulnerable state. I measured carefully, marked a crisp line, and thenbecause I wanted the shelves exactly centered
I ignored the studs. “Anchors will be fine,” I told myself, like a person narrating their own cautionary tale.
The shelves looked incredible for about two days. Then the wall began to whisper its disappointment. First came the tiny wobble when I placed a book on the edge.
Then the shelf started to tilt forward just enough to make every frame look like it was sliding into the future. I tried to blame the level.
I tried to blame the house. I even blamed the book for being “unreasonably book-shaped.” But the truth was simple: leverage always wins if you invite it to the party.
Attempt number two was a stud-mount install, and the difference was immediate. When screws bite into a stud, the whole experience changes.
The bracket doesn’t feel like it’s hanging on by vibes. It feels like it’s welded to the building. That install taught me my favorite floating shelf rule:
if you want to store heavy stuff, your shelf must be married to the studs. Dating is not enough.
The biggest “aha” moment, though, was learning to expect imperfect walls. In my head, walls were flat planes like in geometry class.
In reality, walls have opinions. Some bulge. Some dip. Some are so uneven that your bracket will be level, but your shelf will still look off because the wall line
is doing interpretive dance. Shims became my quiet best friend. A tiny shim behind one side of a bracket can turn “why does this look crooked?” into “wow, that’s clean.”
I also learned that shelf depth changes everything. A shallow shelf can get away with more because the weight sits close to the wall.
A deep shelf is basically a pry bar. Put a heavy bowl near the front of a deep shelf and you’ve created a physics experiment called “how fast can my anchors regret this?”
If you want deep shelves, go studs or go cleats.
Finally, I started using the French cleat method for longer shelves and mantel builds, and it’s now my “company’s coming over” solution.
Cleats spread out the load, make leveling easier, and give the shelf that snug, intentional fit. The first time a cleat-mounted shelf clicked into place,
I understood why woodworkers get emotionally attached to 45-degree bevels.
So if you’re about to hang floating shelves, here’s the honest takeaway: your shelf will only be as confident as the hardware behind it.
Choose the method that matches your wall and your load, take your time with layout and leveling, and you’ll end up with shelves that look effortless
because the effort happened where it shouldbehind the scenes.
Conclusion
Floating shelves look simple, but they reward good planning. If you can hit studs, do ityour future self will thank you every time you set down something heavy
without flinching. If you can’t hit studs, use the right anchors and keep loads sensible. And if you’re building something long, thick, or “mantel-ish,”
a French cleat is one of the cleanest ways to get strength and a crisp, bracket-free look.
No matter which method you choose: measure twice, level three times, and remember that gravity is patient. Build like it’s waiting.