If your makeup drawer could talk, it would probably cough. Between powders, creams, and tools that live in the same little space, you’ve basically built a tiny theme park for bacteria. The good news? You don’t have to toss everything and start over. A smart cleaning routine can rescue most of your favorites, help protect your skin, and make your makeup apply so much better.
Let’s walk through eight things in your makeup drawer that desperately need a spa day, how often to clean them, and how to do it without destroying your products or tools.
Why a Clean Makeup Drawer Actually Matters
Makeup isn’t just pigment and pretty packaging. Once you start dipping brushes, fingers, and applicators into products, you introduce oil, dead skin cells, and environmental germs. Add warmth and humidity (hello, bathroom storage) and you’ve got a perfect little laboratory for bacteria and yeast.
That can lead to all kinds of drama: clogged pores, breakouts, eye irritation, styes, and in rare cases more serious infections. Eye products like mascara and eyeliner are especially risky because they sit right next to your eyeball, which is not the place you want bacteria setting up camp.
On the bright side, a little regular cleaning goes a long way. You’ll not only cut down on germs but also get smoother blending, truer color, and fewer streaks. Clean tools = better makeup and happier skin.
1. Makeup Brushes (Face and Eye)
Let’s start with the usual suspects. Makeup brushes collect just about everything: leftover product, facial oils, dead skin, dust, and whatever was floating around on your vanity. If you’ve noticed your foundation looking patchy or your bronzer going on muddy, dirty brushes are probably to blame.
How often to clean makeup brushes
As a general rule:
- Foundation and concealer brushes: about once a week.
- Eye brushes: once or twice a week, especially if you’re switching colors often.
- Powder brushes: every one to two weeks.
How to clean them without ruining them
- Wet the bristles with lukewarm water, pointing the brush downward so water doesn’t run into the ferrule (the metal part that holds the bristles).
- Massage in a gentle cleanser (a brush shampoo or a mild face cleanser works well) at the tips of the bristles.
- Rinse until the water runs clear, again keeping the brush angled downward.
- Gently squeeze out excess water with a clean towel.
- Lay brushes flat on a towel with the bristles hanging slightly off the edge of a counter to dry completely.
Avoid soaking the whole brush in waterthis can loosen the glue and cause shedding, which nobody wants on their face.
2. Makeup Sponges and Beauty Blenders
Makeup sponges give a gorgeous, airbrushed finish, but they’re like little petri dishes when they’re damp and coated in foundation. Because the foam is porous, product and moisture settle deep inside, and if you don’t wash them often, they can harbor a lot of microbes.
How often to clean makeup sponges
Ideally, give them a quick clean after every use or at least several times per week if you use them daily. If a sponge smells weird, is torn, stained even after washing, or has been hanging around for months, it’s time to replace it.
The easiest way to deep clean a sponge
- Fully saturate the sponge with warm water until it expands.
- Apply a dedicated sponge cleanser or a gentle liquid soap directly to the sponge.
- Squeeze and massage the sponge under running water until the suds run clear.
- Gently squeeze out the excess waterdon’t twist or wring it.
- Let it air-dry on a clean towel in a well-ventilated area (not zipped up in a bag).
For a deep clean, you can also soak sponges in warm soapy water for a few minutes before rinsing. Just make sure they dry completely between uses to keep mold and bacteria at bay.
3. Mascara Wands and Tubes
Technically, you don’t “clean” mascara so much as “break up with it on schedule.” Mascara is wet, stored in a dark tube, and used near your waterlinebasically bacteria’s dream home. Once microbes get in (which happens every time you use it), they can multiply quickly.
When to replace your mascara
- Every 3 months is the standard recommendation.
- Sooner if you’ve had an eye infection or irritation.
- Immediately if it smells odd, looks clumpy, or the formula has changed.
What you shouldn’t do: add water or, worse, saliva to “revive” dried mascara. That just dilutes preservatives and introduces extra bacteria. If your favorite mascara is drying out, it’s trying to tell you goodbye.
How to keep mascara a bit cleaner while you have it
- Always cap it tightly after use.
- Avoid pumping the wandthis pushes air into the tube and speeds up drying.
- Don’t share mascara, even with your best friend. You’re also sharing microbes.
If you use disposable spoolies for hygiene, toss them after each use, especially if you’re doing someone else’s makeup.
4. Eyelash Curlers
Eyelash curlers are the unsung heroes of the makeup drawer, but they live dangerously close to the eye and lash line. Over time, the rubber pad and metal clamp collect mascara buildup, skin oils, and dust.
How often to clean your eyelash curler
Give it a quick wipe every few uses and a deeper clean at least once a week if you curl your lashes regularly.
How to clean an eyelash curler safely
- Use a cotton pad with a bit of micellar water or gentle cleanser to wipe the metal and rubber pad.
- If there’s dried mascara, soften it with warm water first, then gently scrape it away with a cotton swab.
- Disinfect by wiping the surfaces with a 70% alcohol wipe, then let it air-dry completely.
- Replace the rubber pad every few months or according to the manufacturer’s instructions.
Skip harsh scrubbing or soaking that could damage the hinge or loosen the pad. And if the metal is rusted or warped, it’s time for an upgrade.
5. Tweezers, Brow Tools, and Lash Accessories
Tweezers, brow razors, and lash applicators might not touch makeup directly, but they absolutely touch skin and hair. That means oils, dead skin, and bacteria can build up on their surfaces.
Basic cleaning routine for metal tools
- After each use, wipe tweezers or metal tools with a tissue to remove hair and debris.
- Wash occasionally with soap and warm water, then dry thoroughly.
- Disinfect with an alcohol wipe or a cotton pad soaked in 70% rubbing alcohol, especially if the tool is used near the eyes.
If your tweezers start to feel dull, you can gently sharpen them using a fine nail file or sharpening stonejust remember that any tool that’s rusty, bent, or won’t grab hair even after tuning should be replaced.
6. Pencil Sharpeners and Built-In Sharpeners
Those little cosmetic pencil sharpeners and built-in sharpeners on eyeliners and brow products are often the most neglected items in the drawer. Tiny shavings of wood, wax, and pigment collect inside, creating a dusty mess that can transfer back onto your products.
How to clean cosmetic sharpeners
- Open the sharpener and tap out all shavings into the trash.
- Use a clean, dry cotton swab to loosen any stuck debris.
- Wipe the blades and interior with a slightly damp cotton swab dipped in gentle cleanser or micellar water.
- Finish with a quick swipe of alcohol on the blades, then let them air-dry completely before closing.
Cleaning your sharpener keeps your eyeliner and brow pencils smoother when you apply them and reduces the chances of dragging unwanted debris across your skin.
7. Lipsticks, Lip Gloss Wands, and Balm Pots
Lip products get a lot of contact with saliva, food particles, and the general chaos of everyday life. Every swipe back and forth is a nice little deposit of whatever’s happening in (and around) your mouth.
Cleaning stick lipsticks and balms
- Stick lipsticks: You can gently wipe the surface with a clean tissue, then quickly mist or wipe the top layer with alcohol and let it dry.
- Balm sticks: Same conceptwipe and lightly sanitize the exposed part if needed.
Cleaning gloss wands and pots
- Gloss wands: These are harder to truly sanitize because the wand goes back into the tube. The best hygiene is not sharing them and replacing them periodically.
- Potted balms: Always use clean fingers or a spatula. If the surface looks grimy, you can gently scrape off the top layer.
As a rule of thumb, if a lip product smells off, feels different, or has changed color, it’s time to let it go, no matter how much you loved it.
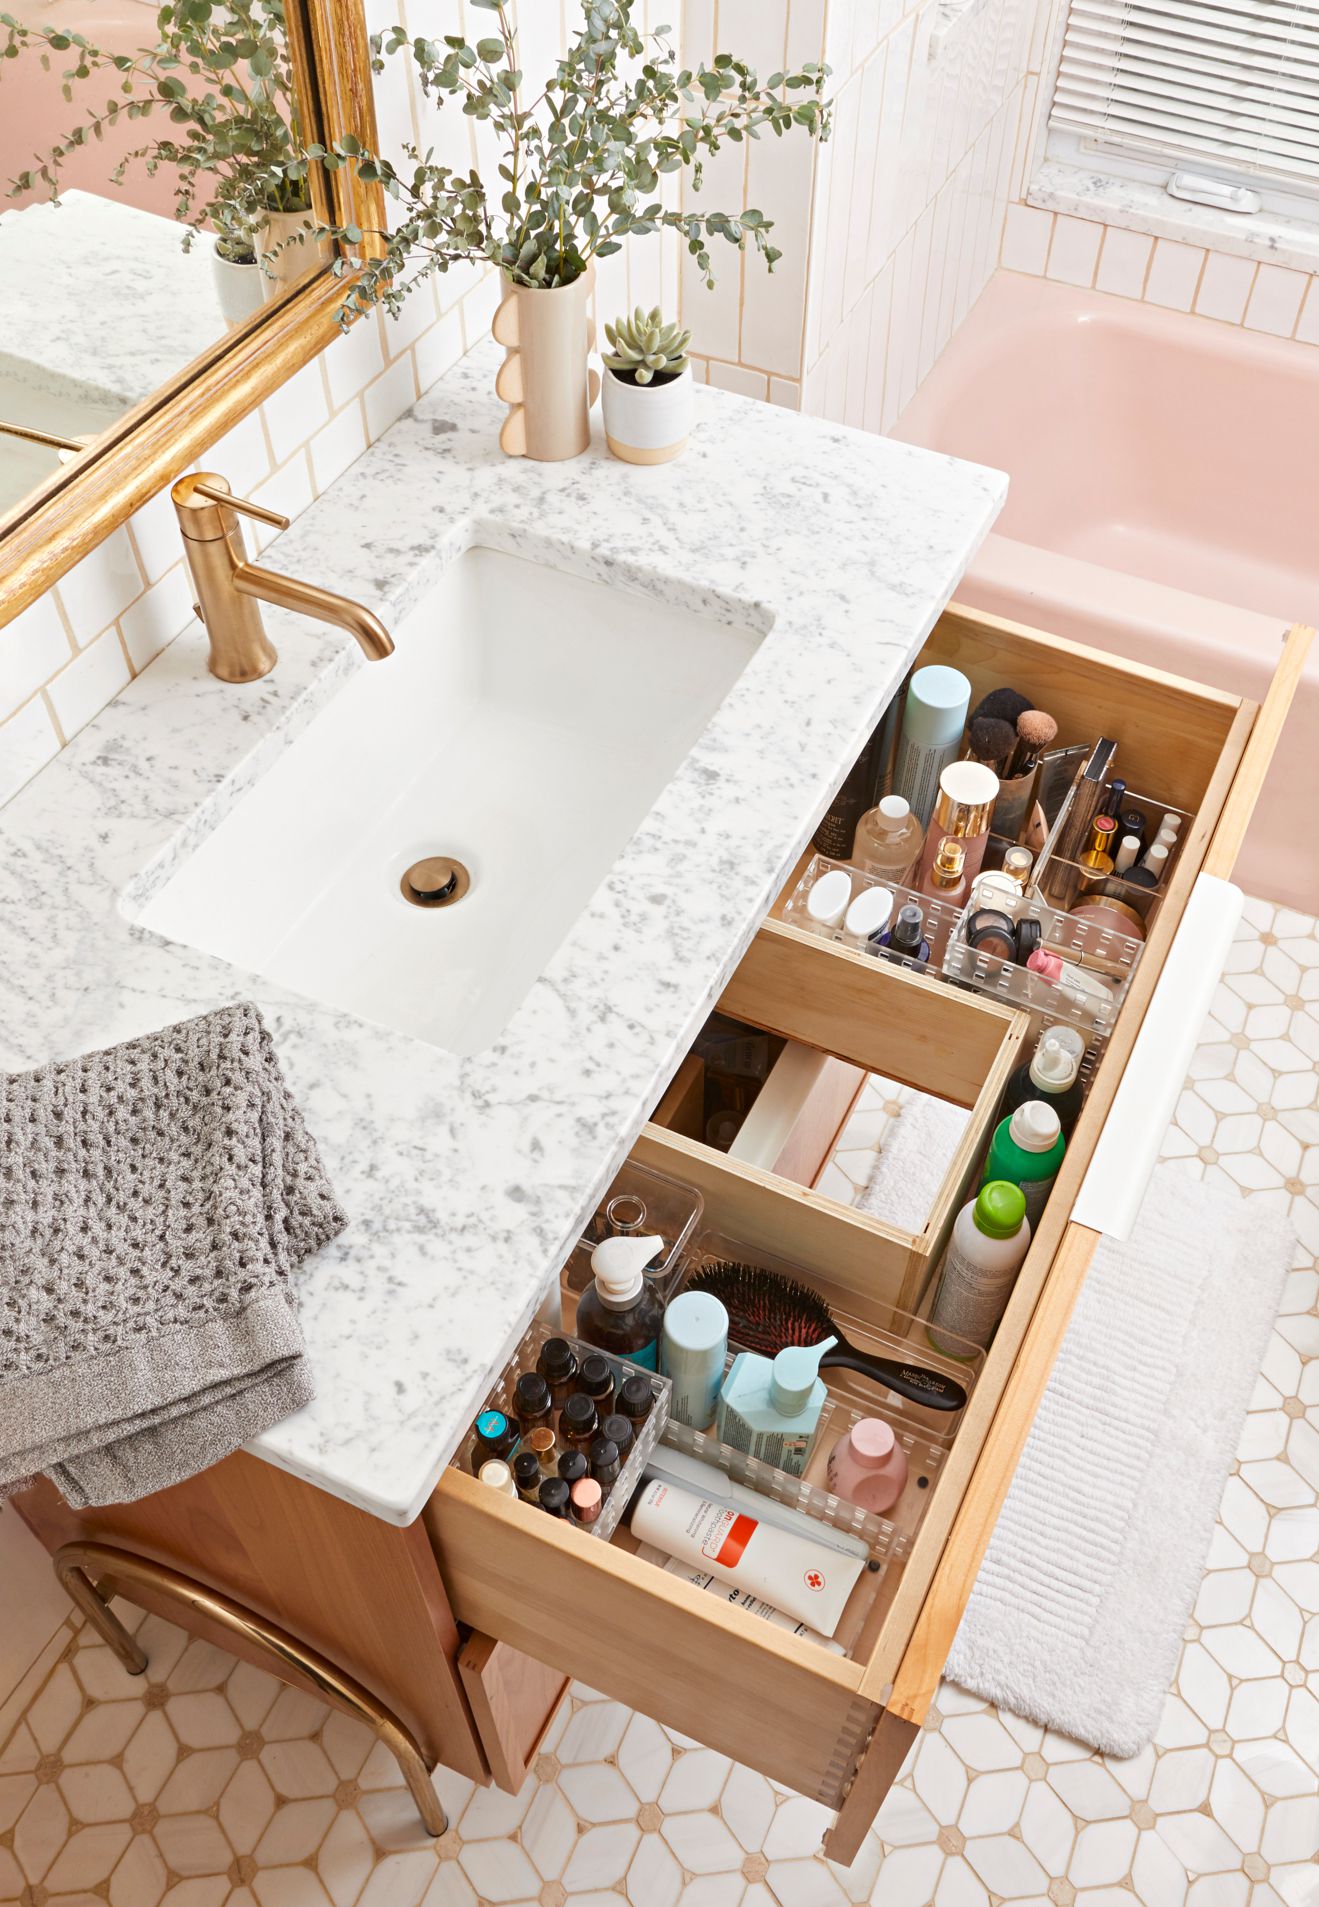
8. The Drawer, Organizers, and Cosmetic Bags Themselves
You can have spotless brushes and perfectly cleaned tools, but if you toss them back into a dusty drawer or crumb-filled makeup bag, you’re undoing half your hard work. The space your makeup lives in matters.
How to clean your makeup drawer and organizers
- Take everything out. Yes, everything. This is your chance to declutter old or expired products.
- Wipe down the inside of the drawer, trays, and organizers with a damp cloth and a mild cleaner. Avoid harsh chemicals that could damage plastic or acrylic.
- Dry everything thoroughly before putting items back.
- Sort products into categories (face, eyes, lips, tools) to keep it easy to find and maintain.
Don’t forget your makeup bag
Fabric bags can often be turned inside out and wiped down or even gently washed (check the care label). Vinyl and plastic bags can be cleaned with soap and water, then disinfected with an alcohol wipe.
Doing this every month or two keeps dust, crumbs, and stray powder from getting all over your freshly cleaned tools.
How to Build a Low-Maintenance Cleaning Habit
If all of this sounds like a lot, don’t panic. You don’t have to spend your entire Sunday scrubbing brushes. The trick is to break it up:
- Pick one day per week for brushes and sponges.
- Check mascara and eye products every month and note when you opened them.
- Do a quick drawer and bag reset every month or so to wipe things down and toss expired products.
Set a reminder on your phone if you need to. Your future self (and your pores) will be very grateful.
Real-Life Experiences: What Happens When You Actually Keep Things Clean
All of the above is great in theory, but what does it look like in real life when you actually commit to cleaning the things in your makeup drawer? Here are a few common experiences people report when they finally get serious about makeup hygiene.
1. Breakouts quietly calm down
Many people assume their skin is “just sensitive” or that they’re reacting to a foundation, when the real culprit is a months-old brush that hasn’t seen soap since last year. Once they start washing brushes weekly and cleaning sponges frequently, they notice fewer mysterious breakouts along the cheeks and jawline where foundation is heavily applied.
It’s not that skincare doesn’t matterit absolutely doesbut putting skincare on and then swirling a dirty brush over it is like washing your face and drying it with a used gym towel. When tools are fresh, skincare and makeup can actually do their jobs.
2. Makeup suddenly looks more “expensive”
A funny thing happens when your brushes are clean: your existing products suddenly perform better. Foundation looks smoother, powders blend more easily, and eye shadow transitions look more professional. A dirty brush drags old pigment and oil across your face, which makes blending harder and can muddy colors.
People often assume they need to buy a new foundation or eye shadow palette to “fix” patchy makeup, but in many cases, washing the tools they already own gives them that upgraded, airbrushed finish they were searching for in a new product.
3. Your eyes feel less irritated
If your eyes water, itch, or feel gritty after you apply mascara or eyeliner, sometimes the product itself is not the villainits age is. Once you get into the habit of replacing mascara every three months and resisting the urge to “revive” dried tubes, eye irritation tends to settle down.
Keeping eyelash curlers and eye brushes clean also makes a difference. Even a light layer of dried mascara on the rubber pad of a curler can tug or flake into the eye area. Wiping it down regularly and replacing the pad when it’s worn gives you a safer, smoother curl.
4. You feel less overwhelmed by your collection
Doing a deep clean of your drawer forces you to look at everything you own, including all those “maybe I’ll wear this” lipsticks and the glitter liner you bought for a party three summers ago. As you wipe down organizers and bags, you naturally start tossing things that are expired, separated, or just not your style anymore.
The result is a smaller, more curated collection that’s easier to manage and maintain. It feels more like a personal beauty boutique than a chaotic junk drawer. When everything has a place and that place is clean, your daily routine becomes faster and more satisfying.
5. Cleaning becomes less of a chore and more of a ritual
Once you’ve done one big cleanup, the maintenance phase is surprisingly easy. You might make a little ritual out of itwashing brushes while you watch a show, or doing a quick drawer wipe-down at the end of each month. Over time, it starts to feel less like scrubbing and more like self-care for your tools.
There’s also something mentally refreshing about knowing that the things you use on your face every day are actually clean. It adds a subtle sense of confidence to your routinelike putting on a freshly washed favorite sweater instead of something pulled from the bottom of the laundry basket.
6. You save money by using what you already have
When products and tools are maintained, they tend to last longer and perform better. That means fewer emergency runs to buy a replacement brush because the old one is shedding like a cat, or tossing a half-full eyeliner because it looks weird from sitting in a dusty bag.
Regular cleaning also helps you see what you genuinely use versus what just takes up space. That awareness can curb impulse buys and help you invest in fewer, better products that you’ll actually finish.
7. Sharing becomes more intentional (or stops altogether)
Once you understand how quickly bacteria can move from one person to another via mascara, lip gloss, and brushes, you become much more careful about sharing. If you do someone else’s makeup, you’re more likely to use disposable applicators, sanitize tools between faces, and avoid sharing eye or lip products directly.
For many people, this is a positive mindset shift: you can still have fun doing makeup with friends, but you do it with more awareness and safer habits. Cleanliness becomes a form of carenot just for yourself, but for the people you love.
The Bottom Line
Your makeup drawer doesn’t have to be a sterile laboratory, but it also shouldn’t be a science experiment. Regularly cleaning brushes, sponges, tools, and the drawer itself keeps your skin happier, your eyes safer, and your products working the way they’re supposed to.
If you start with these eight things and build a simple, sustainable routine, you’ll quickly notice the difference in how your makeup looksand how your skin feels. Clean tools, clear conscience, better glam. That’s a routine upgrade worth making.