If you’ve ever opened a Word document someone “reviewed” and thought, “Wow, this looks like a neon crime scene,”
congratulationsyou’ve met annotations. In Microsoft Word, annotations are the notes, comments, and markups that help people
collaborate without rewriting the whole document in a panicked email thread.
The good news: adding annotations in Word is easy once you know where Microsoft hid the buttons (spoiler: the Review tab is
basically the control room). The better news: when you annotate correctly, your feedback becomes clearer, faster to act on, and way less
likely to start a passive-aggressive office legend.
What Counts as an “Annotation” in Microsoft Word?
People use “annotation” as a catch-all term. In Word, it usually means one (or more) of these:
- Comments (notes in the margin tied to specific text)
- Track Changes (a visible history of editsinsertions, deletions, formatting)
- Ink annotations (drawing, circling, highlighting with digital pen tools)
- Footnotes/endnotes (formal notes used in academic or professional writing)
- Highlights (visual emphasisuseful, but easy to overdo)
The “right” type depends on your situation. If you’re suggesting a rewrite, Track Changes is king. If you’re asking a question,
Comments are perfect. If you’re marking up a PDF-style draft with circles and arrows like a sports analyst, you want
Ink. And if you’re writing something scholarly or legal-ish, Footnotes/Endnotes bring the serious energy.
How to Add Annotations in Word: 7 Steps
These steps work for most recent versions of Word (Windows, Mac, and Word for the web). The labels may vary slightly, but the workflow is the same:
choose your markup tool → attach it to the right spot → keep it readable → manage it cleanly.
Step 1: Open the Review Tools and Decide Your Annotation Style
Start by opening your document and clicking the Review tab on the ribbon. This is where Word keeps the annotation toolbox:
comments, Track Changes, and the settings that control what you see.
Before you add anything, answer one question:
Are you leaving a note, or are you changing the text?
- Leaving a note? Use Comments.
- Changing the text? Turn on Track Changes first.
- Marking up visually? Use the Draw tab (inking tools) or highlighting.
- Adding formal references? Use Footnotes/Endnotes.
Pro tip: if you’re reviewing someone else’s work, it’s usually best to combine Track Changes + Comments.
Track Changes shows what you changed; comments explain why you changed it. That combo is basically the peanut butter and jelly of editing.
Step 2: Add a Comment (Classic Annotation, Minimal Drama)
Comments are the fastest way to annotate without altering the original wording. Here’s the clean way to do it:
- Select the text you want to comment on (or place your cursor where the comment should attach).
- Go to Review → New Comment.
- Type your note in the comment box that appears in the margin.
Example: You’re reviewing a resume and see: “Responsible for many tasks.” Highlight it and comment:
“Can you swap this for a measurable achievement? Example: ‘Managed weekly inventory audits, reducing stockouts by 15%.’”
Shortcut lovers: on Windows, many setups support a keyboard shortcut to insert a new comment quickly. If your brain runs on shortcuts like caffeine,
it’s worth learning one and using it consistently.
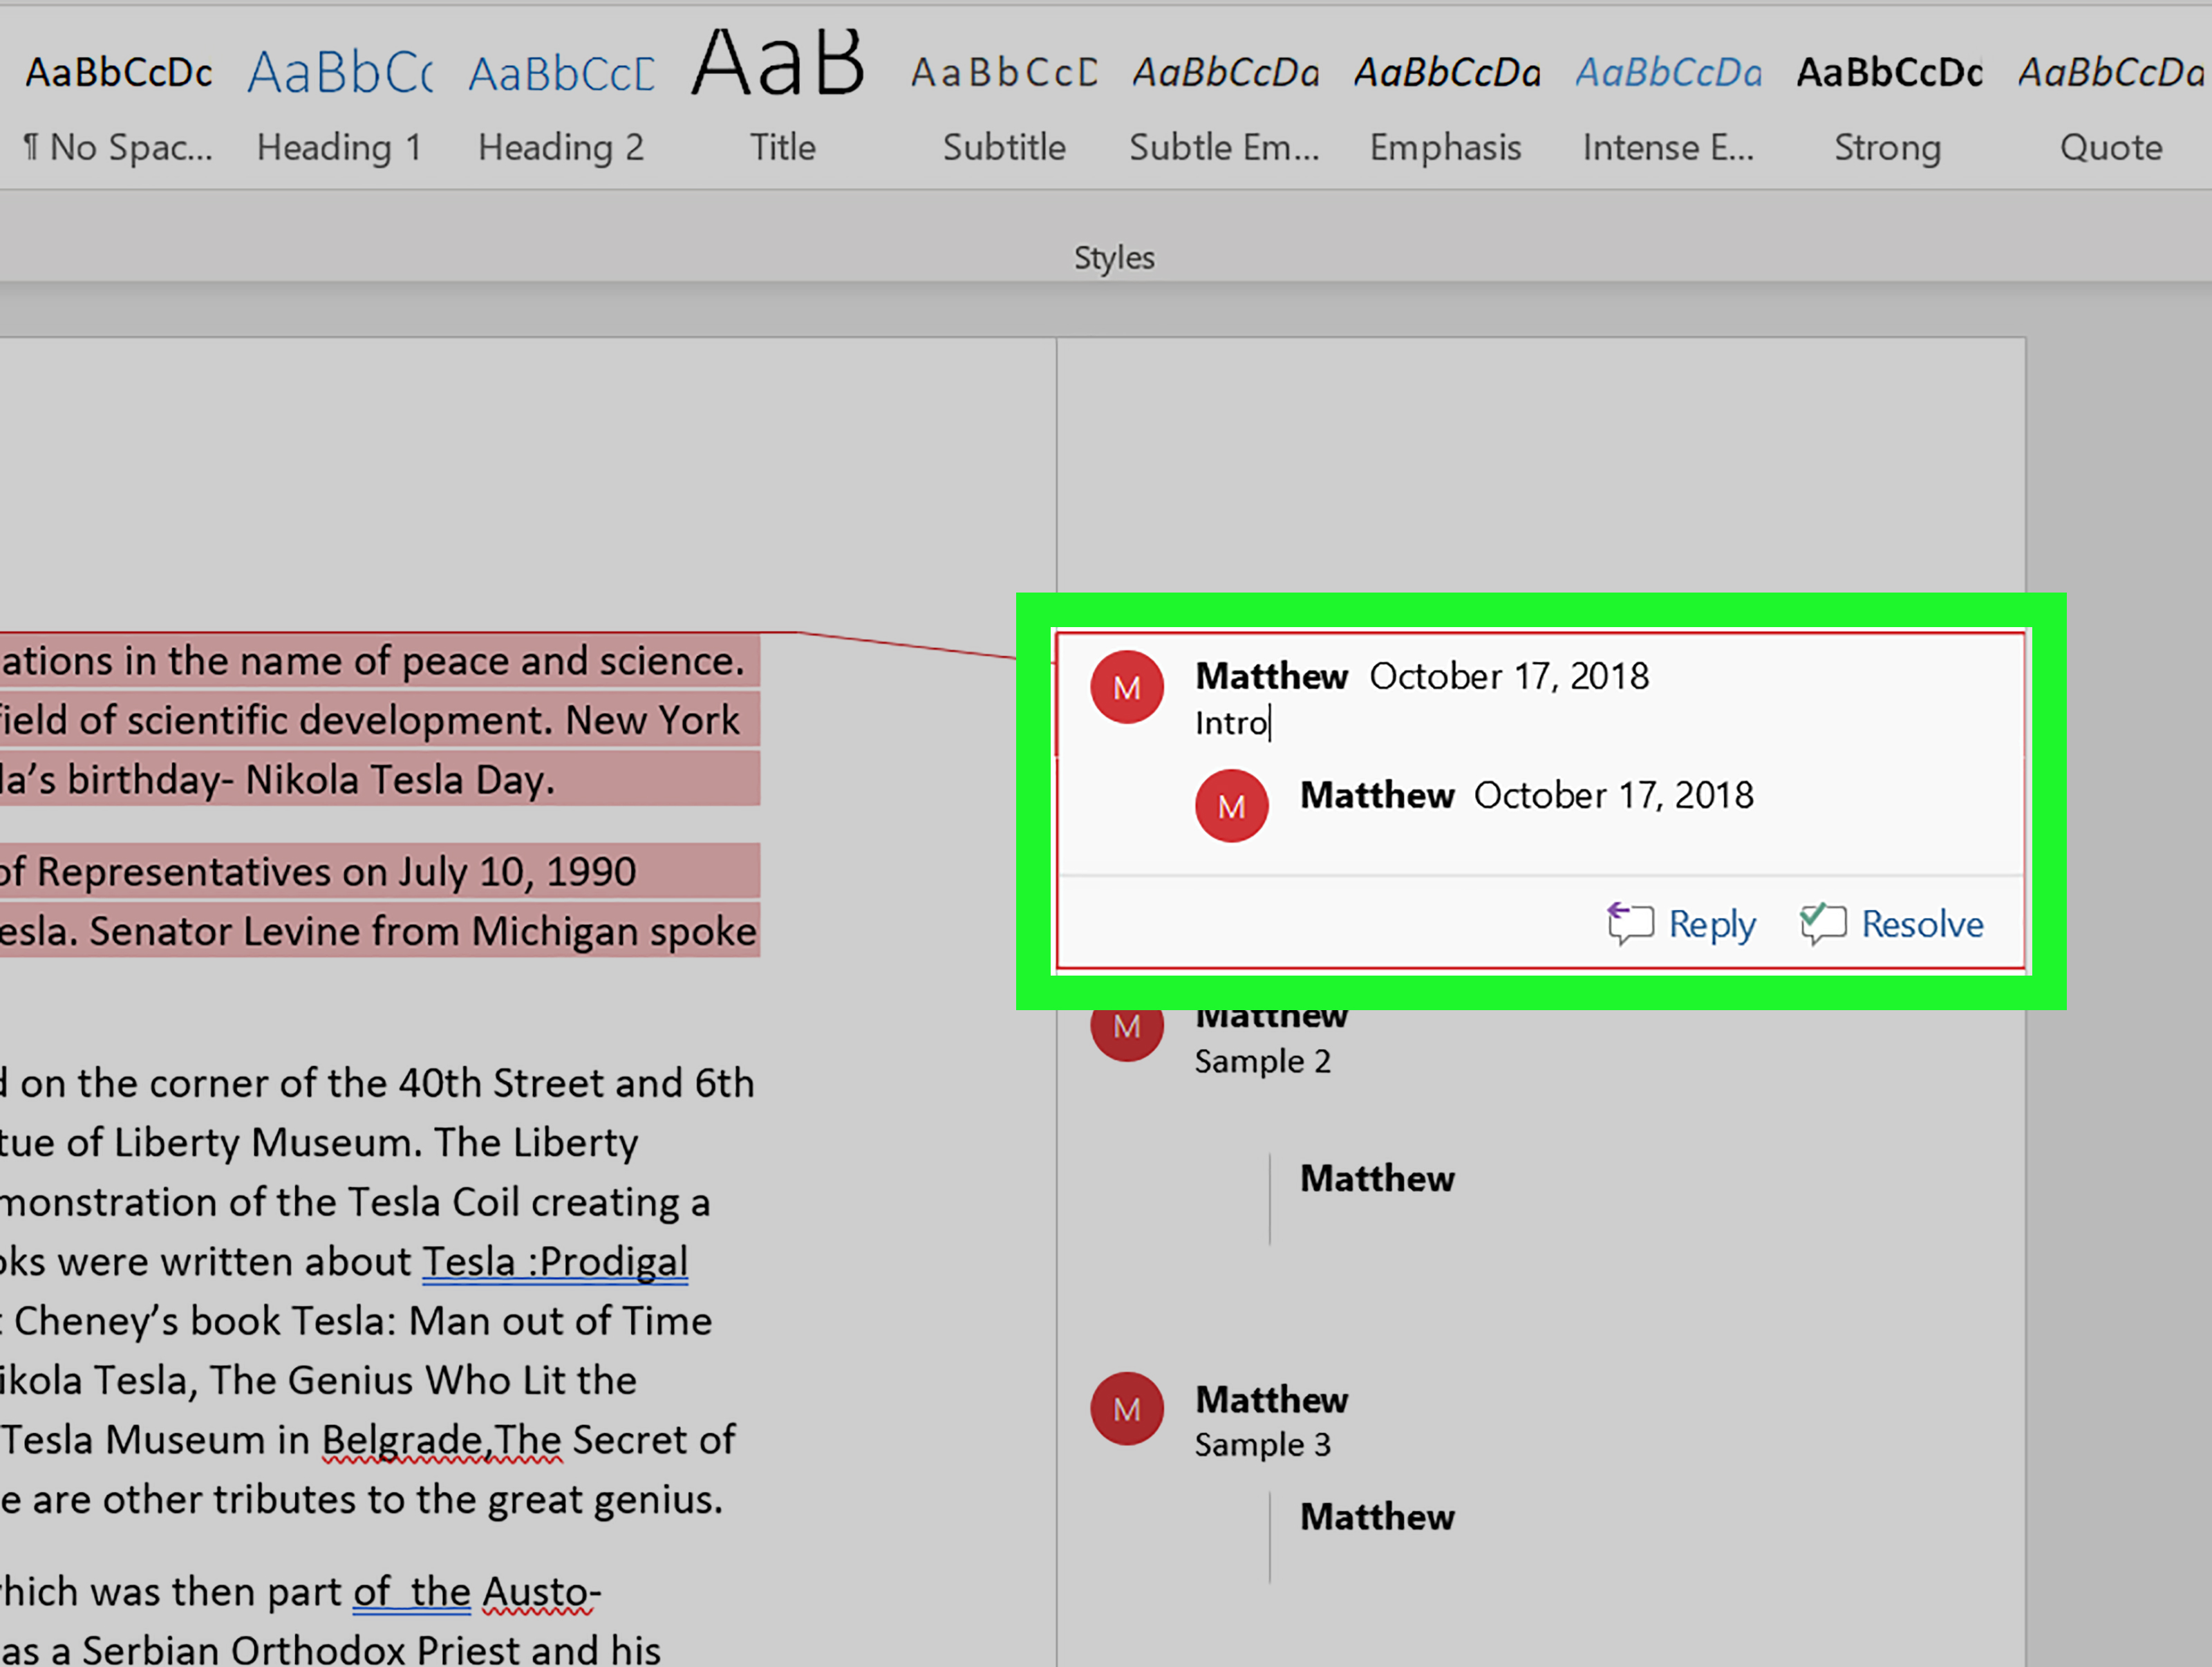
Step 3: Make Comments Easy to Act On (Reply, Resolve, and @Mention)
Modern Word comments are built for collaboration, not just sticky notes. To keep a comment thread from turning into an archaeological dig:
- Reply inside the comment thread to keep context in one place.
- Resolve a comment when the issue is handled (so your margin doesn’t look like a to-do list from 2014).
- @Mention teammates when you need their inputuseful for multi-person reviews.
Write comments like mini work orders:
What’s the issue? What do you recommend? What’s the next action?
Better comment: “This paragraph repeats the intro. Suggest trimming lines 2–4 and adding one new supporting example.”
Less helpful comment: “Hmm. Not sure about this.” (This is the editorial version of shrugging in slow motion.)
Step 4: Turn On Track Changes (So Your Edits Don’t Vanish Into the Void)
If you’re going to edit textanything from replacing one word to rewriting a pageturn on Track Changes first. Otherwise,
your edits may look like you quietly took over the document like a polite villain.
- Go to Review → Track Changes (toggle it on).
- Start editing normally (type, delete, format). Word will mark everything.
- Use Display for Review / All Markup options if you need to see every change clearly.
What you’ll see: insertions usually show as underlined or colored text; deletions often appear with strikethrough.
Formatting changes can also be tracked depending on your settingsuseful in moderation, chaotic in excess.
Example: You change “The data is good” to “The data supports the conclusion.”
With Track Changes on, the author can accept your improvement or reject it if you accidentally changed the tone.
Step 5: Use the Draw Tab for Ink Annotations (Circle, Arrow, Highlight Like a Pro)
If you’re using a touchscreen, stylus, or you just think with diagrams, Word’s Draw tab lets you annotate visually.
This is great for:
- Marking up layouts (flyers, brochures, reports)
- Circling confusing areas in a draft
- Highlighting sections during a live review
- Adding handwritten notes when typing feels too formal
Basic workflow:
- Open the Draw tab (or enable it in ribbon settings if you don’t see it).
- Pick a pen/highlighter tool and annotate directly on the page.
- Use the eraser tool to clean up accidental “art.”
Realistic use case: You’re reviewing a one-page marketing flyer. You circle the headline and draw an arrow with a note:
“Bigger font + stronger promise.” It’s faster than writing three paragraphs explaining typography.
Step 6: Add Footnotes or Endnotes for Formal Annotations
Comments are conversational. Footnotes and endnotes are the “I brought receipts” version of annotationperfect for research papers,
reports, and documents that need references or clarifying notes without cluttering the main text.
- Click where the reference should appear (usually after a sentence).
- Go to References → Insert Footnote or Insert Endnote.
- Type your note in the footnote/endnote area Word creates.
Example: In a business report, you write: “Customer churn decreased 8% quarter-over-quarter.1”
Then the footnote explains: “Churn measured as account cancellations / total accounts, excluding one-time promotional trials.”
This keeps the main writing clean while still giving readers the context they need. It’s like putting the “fine print” where it belongsorganized and intentional.
Step 7: Review, Manage, and Share Your Annotations (Without Creating Markup Mayhem)
Annotations are only helpful if someone can understand them and finish the review process. Here’s how to wrap it up cleanly:
Manage what you see
- Use All Markup when you’re actively reviewing.
- Switch to Simple Markup or No Markup when you need to read the document normally.
- Open the Comments pane if you want to scan comments in one list instead of hunting margins.
Accept or reject changes
If you’re the document owner (or the final decision-maker), go through changes one by one:
- Start at the top of the document.
- Use Accept or Reject in the Review tools.
- Repeat until the document is clean and accurate.
Resolve and clean up comments
- Resolve comments that have been addressed.
- Delete “done” comments if your workflow requires a spotless margin.
- Keep important decision comments if you need an audit trail (“We changed this because Legal asked.”).
Share the document responsibly
Before sending your file out into the world, decide whether your recipient should see annotations:
- Sending to a collaborator? Keep markup visible.
- Sending to a client or submitting final work? Consider removing markup or exporting a clean version.
- Printing? Choose whether to print with markup (helpful for reviewers) or without markup (clean final).
Common Annotation Mistakes (And How to Avoid Them)
1) “I can’t see comments!”
This often happens when Word is set to show fewer markups (or resolved comments are hidden). Switch your view to show markup,
and open the comments pane to confirm they’re not just hiding politely.
2) Track Changes is on… but nothing looks different
Check your display mode. If you’re in a simplified view, changes might be minimized. Switch to a full markup view so edits are obvious.
3) Too many highlights (aka “the document is now a highlighter factory explosion”)
Highlighting is useful, but it doesn’t explain why something matters. Pair highlights with a short comment like
“Key claimneeds source” or “Great linekeep this tone.”
4) Comments that are vague or emotional
If your comment could be replaced with a sigh, rewrite it. The best annotations are specific, actionable, and kind.
Word doesn’t have a “Tone Translator” button (yet), so we have to do it manually.
Quick Best Practices for Clear, Helpful Annotations
- Anchor your comment to the exact word or sentence it refers to.
- Use a consistent format (e.g., “Suggestion: …” “Question: …” “Fix: …”).
- Explain the reason for major edits, especially if tone or meaning changes.
- Resolve comments so collaborators know what’s still open.
- Don’t rewrite everything unless you’re asked tobig rewrites are best done with clear permission.
Extra: of Real-World “Annotation Experiences” (What People Actually Run Into)
In theory, annotations are simple: you leave notes, make edits, and everyone smiles while teamwork music plays in the background.
In real life, annotations are where communication styles collidepolitely, of course, in a document margin.
One of the most common experiences is the “three reviewers, three philosophies” situation. You’ll see it in school group projects,
marketing approvals, grant proposals, and yesfamily holiday newsletters. Reviewer #1 uses Track Changes for everything, including adding a comma.
Reviewer #2 writes comments like a coach: “Good effort! Consider revising this entire paragraph!” Reviewer #3 highlights half the page and says nothing,
like they’re leaving you a treasure map with no legend.
The fix isn’t fancyit’s agreeing on a lightweight system. Many teams do something as simple as:
Track Changes for actual edits, Comments for questions or reasoning, and Highlights only for “look here” moments.
Once everyone follows the same rules, Word stops feeling like a battlefield and starts feeling like a workspace.
Another real-world classic is the “markup panic” moment: someone opens the file and sees red lines everywhere,
assumes the document is ruined, and considers moving to a remote cabin. Usually, the document is fineTrack Changes just makes every edit visible.
The best response is not to panic-delete anything. Instead, switch the view between All Markup and a cleaner reading view.
That simple flip often turns “This is chaos” into “Oh, these are manageable edits.”
People also run into the “comment thread spiral”. A single sentence gets a comment, then a reply, then a reply to the reply,
and suddenly you have a mini podcast episode happening in the margin. The experience is especially common in legal and policy documents.
The best habit here is to resolve comments decisively: once a decision is made (keep, change, rewrite, delete), mark it resolved.
Unresolved comments are like open browser tabsthey quietly eat your brain power.
On the practical side, many users discover how helpful annotations are for self-editing. Turning on Track Changes while revising your own draft
creates a “before and after” record. You start noticing patterns: maybe you overuse “really,” maybe your intros are too long, maybe you love semicolons
a little too much (no judgment). Seeing your edits makes you a better writer because it shows your habits in plain sight.
Finally, there’s the surprisingly emotional experience of receiving annotations. Even gentle feedback can feel intense when it’s attached to your words.
The most successful collaborators treat comments like problem-solving, not criticism. The goal isn’t to “win” the documentit’s to make it clearer,
more accurate, and more useful to the reader. And if you can do that while keeping the margin free of sarcasm? You’ve basically achieved Word nirvana.
Conclusion
Adding annotations in Word is less about clicking the right buttons and more about communicating clearly. Once you know the 7-step workflowchoose the right
tool, attach it properly, keep notes actionable, and manage markupyou can review documents faster and collaborate without confusion.
Whether you’re editing a contract, giving feedback on a school paper, or polishing a resume, Word annotations help you say:
“Here’s what I’m seeing, here’s what I suggest, and here’s how we fix it”all without turning your document into a confusing mystery novel.