If you’ve ever fallen for a gorgeous “designer” mirror wall piece and then looked at the price tag like it personally insulted you,
welcome. There’s a wildly clever workaround that looks high-end, costs low-end, and has one of the funniest origin stories in DIY:
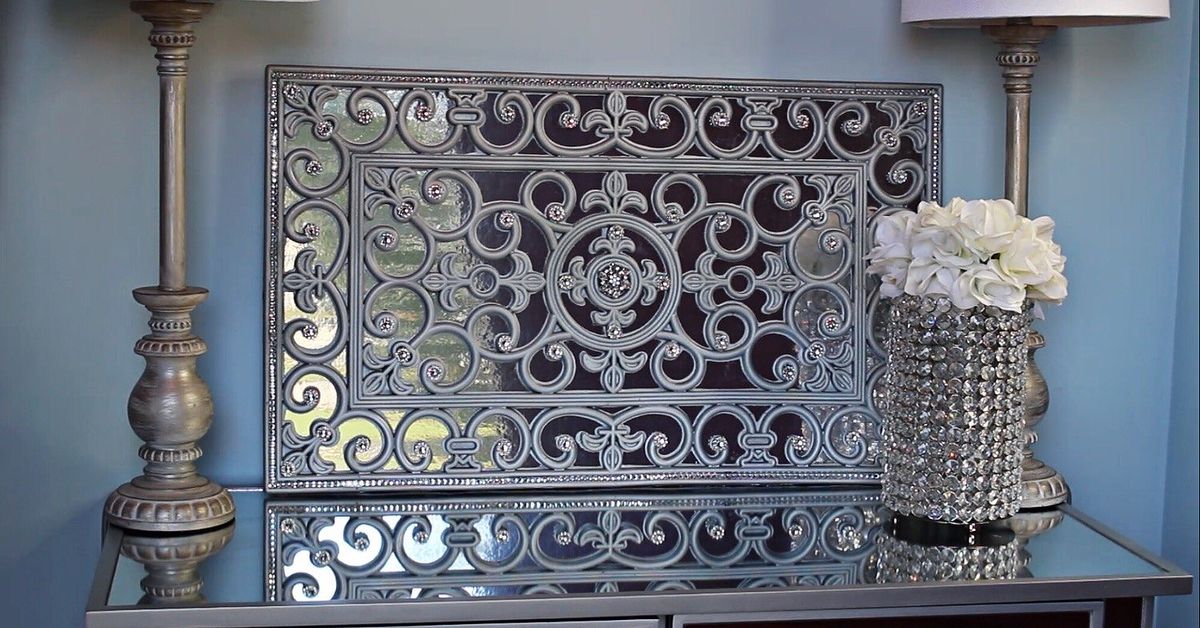
turning a doormat into faux mirror wall art.
Yesan actual doormat. The thing that’s usually busy catching crumbs, leaves, and the evidence of your “quick run outside” in slippers.
But certain doormats (especially rubber scrollwork ones) have ornate cutouts that mimic wrought iron. Add a reflective center, a bit of paint,
and some smart mounting, and suddenly it looks like you scored a statement mirror from a boutique.
Why a Doormat Works Shockingly Well as “Fancy Mirror” Decor
The secret is the pattern. Many rubber doormats come with scrolling, lattice, or medallion-style cutouts that resemble metal grilles.
When you paint them in a uniform finishmatte black, warm bronze, antique gold, crisp whitethe texture reads like ironwork from a distance.
Your guests won’t think “front porch,” they’ll think “wow, where did you find that?”
What you’re really building
- A decorative overlay (the doormat) that acts like an ornate frame or grille
- A reflective panel behind it that suggests “mirror” without needing real glass
- A stable backing that keeps everything flat, hangable, and not dramatically falling off the wall at 2 a.m.
Materials and Tools
You can keep this project super budget-friendly, or you can go “extra” in the fun way (bling, bevel illusion, layered frames).
Either route works. Here’s a practical list with options.
Base materials
- 1 rubber scrollwork doormat (best for the “wrought iron” look) or a stiff coir mat with a bold pattern
- Backing board (thin plywood, MDF, foam board, or a sturdy canvas panel)
- Reflective surface (choose one):
- Mirror film applied to acrylic or a smooth plastic sheet
- Acrylic mirror sheet (lightweight “mirror plastic”)
- Mirror-finish craft foil / “faux mirror” sheets for a vintage, slightly imperfect reflection
Paint + finishing
- Spray paint (matte black, metallic gold, brushed bronze, or white)
- Optional primer (helpful if the doormat is slick or you want the paint to grip better)
- Optional clear topcoat (for durability and easier dusting)
Assembly + hanging
- Strong adhesive suitable for mixed materials (construction-style adhesive, heavy-duty craft adhesive, or mirror-safe adhesive where needed)
- Painter’s tape
- Scissors (for mesh wrap) or utility knife (for cutting board/filmcarefully)
- Measuring tape + marker
- Hanging hardware: D-rings + wire, sawtooth hangers, or a cleat system for extra security
- Optional: rhinestone/diamond mesh wrap for a glam border
Step-by-Step: Doormat Faux Mirror Wall Art
Step 1: Pick the “right” doormat
Look for a rubber doormat with open scrollwork, medallions, or a repeating lattice. The more “ornate,” the more it sells the illusion.
If your doormat has a strong border and a detailed center, even betterit already looks like a frame.
If you’re using a coir mat (the bristly natural fiber kind), choose one with a bold graphic pattern and plan to seal it well.
Coir is more textured, so it tends to read more like carved relief than “ironwork,” but it can still look fantastic.
Step 2: Clean it like you mean it
Rubber doormats often come with dust or a factory residue. Brush it off, wipe it down, and let it dry completely.
Paint sticks better when it’s not fighting invisible grime.
Step 3: Paint for the “metalwork” illusion
Lay the mat flat on a protected surface. Spray paint in light passes (don’t flood itdrips are not part of the antique aesthetic).
Two to three thin coats usually look smoother than one heavy coat. Let it dry fully between coats.
Want it to look more expensive? Try one of these finishes:
- Matte black: modern, classic, looks like wrought iron instantly
- Antique gold: dramatic and glam, especially with warm lighting
- Bronze + black wash: brush bronze, then lightly dab black into corners for depth
- White + soft distressing: cottage/farmhouse vibe, pretty in airy rooms
Step 4: Build the backing panel
Measure your doormat and cut a backing board slightly smaller than the outer edges so it won’t show from the front.
If your mat has a decorative border, you can size the board to sit behind the center area, leaving the border “floating” visually.
If you want a more mirror-like effect, the backing should be as flat and smooth as possiblebumps show up as weird ripples in reflective film.
Step 5: Choose your “mirror” method
Option A: Mirror film (best for a clean, glassy look)
Apply mirror film to a smooth acrylic sheet or thin clear plastic panel rather than directly to a rough board. Many films apply more easily
with a light mist of soapy water and a squeegee-like tool to push bubbles out. Trim the excess neatly once it’s positioned.
Option B: Acrylic mirror sheet (best for a true reflection without glass)
Acrylic mirror sheets are lightweight and shatter-resistant, which makes them friendlier for wall art than real glass.
Cut to size carefully (follow the product’s cutting guidance) and keep the protective film on until the end to avoid scratches.
Option C: Faux mirror foil (best for a vintage, “antique mirror” vibe)
If you actually like a slightly imperfect, softly distorted reflection (very old-world), faux mirror foil sheets are a fun choice.
They can look intentionally “aged,” especially paired with antique gold or distressed white.
Step 6: Assemble the layers
- Attach the reflective surface to the backing board first (so the back stays neat).
- Dry-fit the doormat on top to confirm alignment and coverage.
- Glue the doormat overlay around the edges and key contact points (don’t glue every tiny swirljust enough to keep it secure and flat).
- Press and weight the piece while it cures so nothing lifts or bows.
Pro tip: If your doormat has areas that want to curl, use painter’s tape to hold them down while the adhesive sets.
It’s basically a DIY babysitter.
Step 7: Add optional “designer” details
This is where the project goes from “cool” to “how is that a doormat?”:
- Diamond/rhinestone mesh wrap: frame the perimeter for a glam, Pier 1-inspired look
- “Pane” lines: add thin trim strips behind the mat to mimic window panes
- Layered frame: mount the whole piece onto a larger painted board for a thicker, more expensive silhouette
- Rub-on aging: lightly dry-brush dark paint into corners to fake patina
Step 8: Seal (optional, but helpful)
If the piece will live in a high-traffic area (entryway, hallway) or you plan to dust it often, a clear topcoat can make it more resilient.
Keep spray coats light so you don’t cloud reflective surfacesmask the “mirror” area if needed.
Step 9: Hang it safely
Even though this project can be lighter than a real mirror, treat it like wall art that deserves secure hardware.
If you’re using a heavier backing board, aim for wall anchors rated for the weight or mount into studs.
For a polished look, hang the center of the piece around eye level. In many homes, that’s roughly “gallery height,” but adjust for your space
especially if it’s above a console table or in an entryway vignette.
Style Ideas: Make It Match Your Home
Modern black “ironwork”
Pair matte black with a crisp reflective panel and hang it where it can bounce natural lightacross from a window or near a lamp.
It’s an instant “bigger room” trick without remodeling.
Warm antique glam
Go gold or champagne paint, add diamond mesh around the edge, and style it with candlelight and warm bulbs. The reflection will glow, not glare.
Farmhouse window illusion
Use a doormat with a grid-like pattern (or add strips behind it) to mimic window panes. Choose distressed white or soft charcoal.
It gives “architectural salvage” energy without the salvage-yard tetanus risk.
Troubleshooting (Because DIY Is a Comedy)
“My paint is beading up.”
That usually means the surface is too slick or dusty. Clean again, let it dry, and consider a primer designed to help paint grip.
“My mirror film has bubbles.”
Work from the center outward with firm, even pressure. Tiny bubbles can sometimes settle as the adhesive cures,
but big ones need to be pressed out. A smoother base makes this much easier.
“The doormat won’t lie flat.”
Use adhesive at strategic points and weight it while curing. If it still lifts, add a few discreet fasteners from the back through the board
(only if your materials allow it) or reinforce with extra bonding points.
“It looks more ‘plastic’ than ‘metal.’”
Add depth: a dark wash in crevices, a dry-brush highlight on raised edges, or a slightly matte topcoat. Real metal has variation.
Perfectly uniform paint can look costume-y.
Time and Cost Reality Check
Most versions of this project can be finished in an afternoon, plus drying/curing time.
Budget-wise, it’s often a fraction of a retail decorative mirrorespecially if you already have paint or a spare backing board.
The reflective surface is usually the “splurge,” but it’s still far cheaper than oversized wall mirrors.
of Real-Life “Experience” (What It’s Like to Actually Do This Project)
Here’s the part tutorials don’t always say out loud: this DIY feels a little ridiculous at first. You’re holding a doormat up to your wall,
squinting like an art dealer, and thinking, “I’m either a genius or I’ve officially lost it.” That’s normal. Almost every clever upcycle starts
with a moment that sounds like a dare.
The most common “aha” moment tends to happen right after the first coat of paint dries. Before paint, the doormat reads as… well, a doormat.
After paint, the pattern suddenly looks architecturallike ironwork, a fancy grille, or decorative metal trim. It’s the transformation step
that convinces you the idea is going to work. If you want maximum satisfaction, pick a paint color that contrasts with your wall so the details pop.
Another very real experience: alignment drama. Even if you measure carefully, the doormat’s pattern can trick your eyes. A swirl that’s slightly
off-center can make the whole piece feel crooked, even when it’s perfectly level. The fix is simpleuse the backing board as your “true”
reference and center the doormat based on its outer edges, not the pattern. If your pattern is asymmetrical (some are!), lean into it and make it
look intentional by styling it with other asymmetrical décor nearby.
Reflective surfaces also teach patience. Mirror film looks amazing when it’s smooth, but it rewards slow, methodical work. People who rush tend to
end up with bubbles, wrinkles, or that one stubborn corner that lifts like it’s trying to escape. The good news? Even a slightly imperfect mirror
can still look expensive once the doormat overlay is on topyour eye focuses on the “frame,” and the reflection becomes a supporting actor, not the
lead. If you prefer a softer, vintage look anyway, faux mirror foil can actually feel more forgiving and more “designer” in a moody room.
Then there’s the styling payoff, which is honestly the best part. Hung opposite a window, this piece can bounce light the way a real mirror does,
making an entryway feel bigger and brighter. Hung above a console, it becomes a statement backdrop for a lamp, a plant, or a small stack of books.
The funniest “experience” people report is watching guests walk closer, realize what they’re looking at, and then immediately demand the backstory.
It’s a conversation piece with a punchlineand the punchline is “It used to live by my front door.”
Finally, the most practical lesson: hang it securely. Even if it’s lightweight, it’s still large wall décor, and you want it stable. When it’s up
and level, it stops being a craft project and starts being a believable décor upgrade. That’s the magic of this doormat faux mirror wall art:
it’s playful, clever, and genuinely prettythree things that rarely show up together without a pricey receipt.
Conclusion
A doormat-turned-faux-mirror is proof that “budget décor” doesn’t have to look budget. With the right pattern, a solid backing, and a reflective
surface that fits your style, you can create wall art that reads like designer ironworkwithout paying designer prices.
Bonus: it’s the rare DIY that looks classy and comes with a story.