About two years ago, I picked up a new hobby of making flower herbariums, and I can confidently say this: few hobbies make you feel more like a botanist, an artist, and a person who owns too many tiny envelopes at the same time. What began as a simple attempt to save a few pretty blooms turned into a full-blown ritual of pressing petals, labeling stems, arranging dried leaves, and whispering, “Please don’t mold,” at flowers like they were tiny dramatic celebrities.
A flower herbarium is more than a pile of dried plants tucked inside a book. At its most traditional, an herbarium is a preserved collection of plant specimens, usually pressed, dried, mounted, and labeled. In the world of creative flower preservation, the idea becomes more personal: a pressed flower frame, a botanical journal, a glass display, a handmade card, or a page that captures a season before it disappears. It is science wearing a linen apron. It is art with roots.
In this article, I will walk through what flower herbariums are, how I make them, what materials work best, what mistakes taught me the most, and which recent works have made me proud enough to stare at them like a parent at a school recital.
What Is a Flower Herbarium?
A flower herbarium is a collection of preserved flowers, leaves, stems, and sometimes seed pods arranged for study, decoration, memory, or artistic display. Traditional herbarium specimens are often mounted on archival paper with labels that record the plant name, date, location, and notes about its appearance or habitat. Creative herbariums borrow that careful spirit but allow more room for design.
That means a flower herbarium can be formal and educational, with neat labels and botanical accuracy, or soft and decorative, with pansies, ferns, lavender, and tiny petals arranged in a frame. Some people preserve wedding bouquets. Some press wildflowers from a favorite walk. Some make bookmarks, greeting cards, resin pieces, ornaments, or wall art. I make a little of everything, because apparently my personality is “organized chaos, but floral.”
The beauty of a flower herbarium is that it captures what fresh flowers cannot keep forever: a moment. A bloom that would normally last a few days can become a keepsake that lasts for years when dried properly and protected from moisture, insects, and direct sunlight.
Why I Started Making Flower Herbariums
My hobby started quietly. I had a few flowers that were too pretty to throw away, and I thought, “What if I press these?” That innocent thought led to a stack of heavy books, a growing collection of paper scraps, and a suspicious number of conversations that began with, “Do you mind if I keep that leaf?”
At first, I only wanted to preserve color. Then I became fascinated by shape: the veins of a leaf, the curve of a petal, the way a tiny stem can look elegant when arranged at just the right angle. Over time, making flower herbariums became a calming practice. It forced me to slow down. Fresh flowers demand attention immediately, but pressed flowers teach patience. You prepare them, tuck them away, and wait. No instant gratification. No fast-forward button. Just nature, pressure, and time.
And when the reveal goes well? It feels like opening a tiny botanical treasure chest.
The Basic Materials I Use
You do not need a professional studio to make flower herbariums. My first setup was wonderfully simple: paper, books, scissors, and hope. As the hobby grew, I added better supplies, but the basic toolkit remains approachable.
1. Fresh Flowers and Foliage
The best results come from flowers that are fresh, dry, and not already wilting. Thin, flat flowers usually press better than thick, fleshy blooms. Pansies, daisies, cosmos, small zinnias, violets, fern leaves, herbs, and delicate foliage are beginner-friendly choices. Larger blooms such as roses, peonies, and hydrangeas can work, but they often need special preparation or a different drying method.
2. Absorbent Paper
Plain paper, blotting paper, newspaper, or untextured absorbent sheets help draw moisture out of the plant. I avoid paper towels for delicate petals because textured surfaces can leave little waffle-pattern marks. Unless the goal is “flower with bathroom tissue cosplay,” smooth paper is usually better.
3. A Press or Heavy Books
A wooden flower press is useful, but heavy books work surprisingly well. The important part is even pressure. Flowers need to lie flat, with petals arranged carefully before the weight is added. Once pressed, they should be left undisturbed until fully dry.
4. Tweezers and Small Scissors
Tweezers are helpful for moving fragile petals after drying. Small scissors let me trim stems, separate petals, and clean up the shape before mounting.
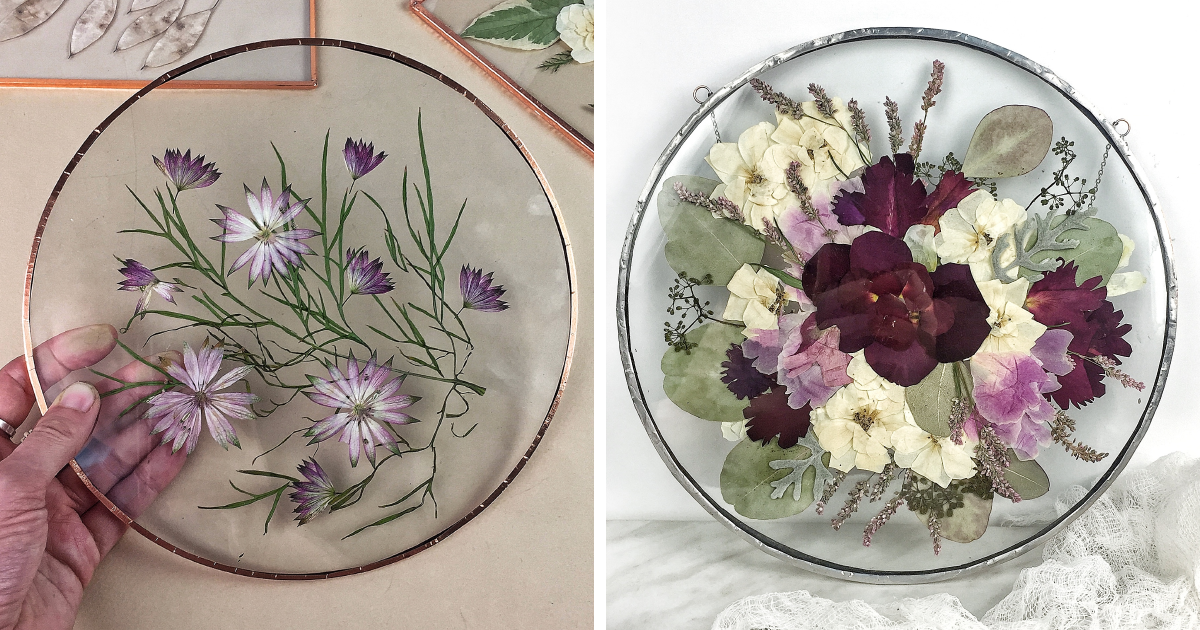
5. Archival Paper, Frames, or Glass Displays
For finished pieces, I like acid-free paper, simple frames, glass floating frames, and neutral backgrounds. The cleaner the display, the more the flowers get to show off. And trust me, they are already dramatic enough.
How I Make a Flower Herbarium Step by Step
Step 1: Choose the Right Flowers
I look for blooms that are near their best condition: colorful, dry, undamaged, and not too mature. Flowers that are already bruised or wilted usually preserve exactly that way. Pressing does not magically turn a tired flower into a runway model. It preserves the truth, and sometimes the truth has brown edges.
Step 2: Remove Extra Moisture
Moisture is the villain in flower preservation. If flowers are wet from rain, dew, or a vase, I let them air-dry briefly or gently blot them before pressing. Too much moisture can slow drying and increase the chance of mold.
Step 3: Arrange Before Pressing
This is where the final look begins. I spread petals, straighten stems, and decide whether the flower should be pressed face-up, sideways, or separated into parts. Some flowers look better as whole blooms. Others look more graceful when petals, leaves, and stems are preserved separately and recomposed later.
Step 4: Press and Wait
After placing the flowers between absorbent layers, I add pressure and wait. Small leaves may dry in about a week, while thicker flowers can take two to three weeks or longer. I try not to peek too soon, although I admit I have the patience of a raccoon near an unlocked trash can.
Step 5: Mount the Design
Once the flowers are dry, I arrange them on paper or inside a frame. I may include a label with the flower name, date, season, or a short note. Labels make the piece feel intentional and give it that classic herbarium charm.
Air-Drying vs. Pressing vs. Silica Gel
Different flowers need different preservation methods. Pressing is excellent for flat designs, bookmarks, botanical pages, framed art, and journal-style herbariums. Air-drying is better for flowers that look beautiful in three-dimensional form, such as lavender, statice, strawflower, baby’s breath, yarrow, and some ornamental grasses.
Silica gel is useful when I want flowers to keep more of their natural shape. It works especially well for blooms with layered petals, because it dries them faster while helping support their structure. The tradeoff is that it takes more care, more setup, and a little more cleanup. Silica gel gets everywhere if you are clumsy. I am clumsy. We have reached an understanding.
Glycerin preservation is another method, but it is better suited for foliage than delicate flower petals. Leaves such as magnolia, ivy, camellia, or other sturdy greenery can become soft and leathery when preserved this way, making them useful for arrangements and mixed botanical displays.
My Recent Flower Herbarium Works
Pressed Pansy Mini Frames
One of my favorite recent projects is a small series of pressed pansy frames. Pansies are wonderful because their faces stay expressive even after drying. Each one looks like it has a tiny opinion. I arranged them on cream paper with thin green stems and a few small fern pieces. The result feels cheerful, vintage, and slightly theatrical.
Lavender and Fern Botanical Page
Another recent work combines pressed lavender stems with fern leaves. Lavender keeps a gentle color and a familiar shape, while ferns add movement. I arranged them diagonally, like a breeze had politely walked through the page. The final piece has a soft cottage-garden feeling without becoming too crowded.
Rose Petal Study
Roses are tricky. Whole roses are usually too thick to press successfully, but individual petals can be gorgeous. For one recent work, I pressed rose petals separately, then arranged them in a loose gradient from pale blush to deeper pink. It became less of a traditional specimen and more of a color study. It also taught me that roses are beautiful, stubborn, and apparently very committed to curling at the edges.
Wildflower Memory Sheet
One of the most meaningful pieces is a wildflower-inspired herbarium sheet with small blooms, grass stems, and handwritten notes. I kept the layout simple: plant material on one side, label-style notes on the other. It looks like something between a diary page and a field record. That balance is exactly what I love about herbariums: they can be scientific and emotional at the same time.
Autumn Seed Pod Display
Flowers get most of the attention, but seed pods deserve applause too. I recently made a small display using dried seed heads, slender grasses, and muted leaves. It has less color than my spring pieces, but more texture. The whole thing feels like October in a frame, minus the pumpkin spice candle aggressively entering the room.
What I Learned About Color
Color changes are part of the process. Some flowers dry darker. Some fade. Whites may become cream. Pinks can soften. Reds and purples sometimes deepen so much they look almost black. Blue and yellow flowers often hold their color better than expected, especially when harvested and dried carefully.
I learned not to fight every color change. A preserved flower is not a photocopy of a fresh flower. It becomes something new. The softened colors often give herbarium art its antique, poetic look. A slightly faded petal can feel more nostalgic than a perfectly bright one.
Common Mistakes I Made
Pressing Flowers That Were Too Thick
My early attempts included several flowers that had no business being squeezed into a book. Thick blooms hold too much moisture and may dry unevenly. Now I separate petals, choose smaller flowers, or use silica gel for fuller blooms.
Checking Too Early
Opening the press too soon can disturb the shape and slow the drying process. I learned to label the pressing date and wait longer than I want to. This is character development, but with flowers.
Using Too Much Glue
Pressed flowers are delicate. A tiny amount of adhesive is enough. Too much can stain petals, warp paper, or make the design look heavy. The goal is “held in place,” not “trapped in botanical cement.”
Displaying in Direct Sunlight
Sunlight can fade preserved flowers over time. I now display pieces in bright rooms but away from direct rays. Think soft gallery lighting, not desert survival challenge.
How to Care for Finished Flower Herbariums
Finished flower herbariums should be kept dry, clean, and away from harsh light. Frames help protect delicate petals from dust and handling. If a piece is stored instead of displayed, I keep it in a flat, dry place with protective paper. Moisture is the biggest enemy, followed by insects and accidental elbow attacks.
For long-term projects, acid-free paper and archival-quality materials are worth using. They help prevent yellowing and make the final work feel more polished. Even if the piece is decorative rather than scientific, good materials give the flowers a better chance of lasting.
Why Flower Herbariums Are Worth Trying
Making flower herbariums is affordable, creative, and surprisingly educational. You begin noticing plant shapes more carefully. You learn which flowers hold color, which leaves press flat, which stems look elegant, and which blooms turn into crispy little mysteries. It also turns walks, gardens, bouquets, and seasonal changes into opportunities for observation.
The hobby is also forgiving. Not every flower will turn out perfectly, and that is part of the fun. A failed pressing still teaches something. A curled petal might become useful in another design. A faded bloom might look beautiful next to darker foliage. The more you experiment, the more your style develops.
Extra Experience: Two Years of Petals, Patience, and Tiny Lessons
After two years of making flower herbariums, I have learned that this hobby changes the way you look at ordinary days. A simple walk becomes a scouting trip. A bouquet becomes a future project. Even a fallen leaf on the sidewalk can suddenly seem important, as if it is waiting for its big break in a frame. I used to see flowers mainly as decoration. Now I see them as shapes, textures, patterns, and memories that can be carefully saved.
One of the biggest lessons has been timing. Freshness matters. The best flowers for pressing are not the ones that have already lived a full vase life and are now leaning sadly over the edge like they have unpaid bills. The best candidates are still firm, colorful, and dry. Picking or selecting them at the right moment makes a huge difference in the final result. When I rush, the flowers remind me. When I wait too long, they also remind me, usually by turning brown in a very judgmental way.
I have also become more comfortable with imperfection. In the beginning, I wanted every petal to stay bright and every stem to lie perfectly straight. That was adorable of me. Real flowers shrink, curl, fade, bend, and sometimes surprise you. A petal may wrinkle but still look graceful. A leaf may darken but gain beautiful contrast. A stem may dry at a slight angle and make the whole composition feel more natural. The best pieces often come from working with the material instead of forcing it to behave.
My workspace has evolved too. At first, I pressed flowers in random books and forgot where I put them. This led to the exciting literary experience of opening a book and discovering a flattened daisy from three months earlier. Now I keep a small pressing log with dates, flower names when I know them, and notes about the method. It sounds simple, but it helps me repeat successful results. It also prevents the classic question: “Is this dry, or did I start this yesterday?”
The most satisfying part of the hobby is seeing recent works become little records of time. A spring frame feels different from an autumn seed pod display. Lavender feels calm. Pansies feel playful. Ferns feel elegant. Rose petals feel sentimental. Each piece carries the mood of the season it came from. That is why flower herbariums are so addictive: they do not just preserve plants; they preserve attention. They prove that you paused long enough to notice something beautiful before it vanished.
Two years later, I still feel excited every time I open a press. Sometimes the result is stunning. Sometimes it is compost with confidence. Either way, the process keeps teaching me to be patient, observant, and a little more appreciative of small things. And honestly, any hobby that turns old books, quiet afternoons, and fragile flowers into lasting art deserves a permanent spot on the table.
Conclusion
Making flower herbariums is a peaceful blend of creativity, patience, and botanical curiosity. It can be as simple as pressing a pansy inside a book or as detailed as building labeled archival-style displays. The key is to choose fresh plant material, dry it properly, handle it gently, and display it with care.
About two years ago, I picked up this hobby because I wanted to save a few flowers. Now, it has become a way to save seasons, memories, colors, and quiet moments. My recent works remind me that beauty does not always need to stay fresh to stay meaningful. Sometimes, it just needs pressure, paper, and a little patience.