Bathroom remodels are a special kind of chaos: the room is tiny, the decisions are huge, and water is basically
auditioning for a starring role in every crack you forgot to seal. The good news? If you plan like a pro, shop like
a realist, and design like you actually live there (instead of staging it for an imaginary magazine shoot), you can
end up with a bath that’s beautiful, durable, and surprisingly calm.
This bath remodeling guide blends three worlds that usually don’t hang out together: the practical “do this first”
approach you’d expect from Home Depot, the fixture-and-finish know-how associated with Moen, and the thoughtful,
style-forward, clutter-hating spirit of Remodelista. In other words: your bathroom gets better, and you keep your
sanitymostly.
Start with the Truth: Scope, Budget, and the “No, We’re Not Moving the Toilet” Conversation
Before you fall in love with a tile pattern that costs more than your first car, decide what type of remodel you’re
actually doing. Most projects land in one of these buckets:
Three common remodel scopes
| Scope | What you change | Best for |
|---|---|---|
| Refresh | Paint, lighting, mirror, hardware, maybe faucet | Fast upgrades, rentals, resale polish |
| Mid-level | Vanity, flooring, toilet, fixtures, some tile | Fixing “dated but functional” |
| Gut remodel | Everything: layout, plumbing, waterproofing, tile, ventilation | Solving long-term issues, true transformation |
Costs swing widely based on size, finishes, and how much plumbing/electrical moves. A realistic national range for
many homeowners is roughly $6,600–$16,900, with an average around $11,500.
Treat that as a starting pointnot a prophecy. Your local labor rates, hidden damage, and “Wait, we want heated
floors now” decisions will do their thing.
The money-saving rule nobody wants to hear
Keep the layout if you can. Moving a toilet or tub usually means rerouting plumbing and potentially
opening floors and walls beyond the bathroom. If you want the biggest “wow” for the least structural drama, invest
in surfaces, lighting, storage, and fixtures while keeping the bones in place.
Measure Like You’re Building a Spaceship (Because In a Bathroom, You Kind of Are)
Bathrooms fail in two ways: water gets where it shouldn’t, and people can’t move without bumping into things.
Measuring and layout planning are where you prevent both.
Layout rules that keep your bath from feeling like an airplane lavatory
-
Plan clear space in front of fixtures. A comfortable target is about 30 inches of clear floor
space from the front edge of fixtures to the next obstacle. Minimums can be tighter, but “technically legal”
isn’t the same as “pleasant at 6:45 a.m.” -
Account for doors, drawers, and swing zones. Vanity drawers need room to open without hitting the toilet, and
shower doors need space to swing without clipping your knees. -
If you’re planning for aging-in-place (future you says thanks), consider a wider doorway and space for easier
movementespecially in a primary bath.
Pro tip: sketch your bathroom on graph paper (or a digital planner), then place fixtures to scale. Moen’s planning
mindset is simple and effective: outline the room, mark permanent elements, and measure everythingwindows, doors,
and fixture locationsbefore you buy a single shiny thing.
Home Depot’s Order of Operations: The Timeline That Saves Your Weekend (and Your Drywall)
The fastest way to turn a remodel into a months-long saga is doing steps out of order. Here’s the clean sequence
that keeps the mess contained.
Step-by-step bathroom remodel sequence
-
Plan and budget. Decide what changes, set a timeline, and build in extra time for delays.
If you need permits, apply early. -
Demo. Remove fixtures and finishes safely. Shut off water and power, protect what stays,
and plan debris removal. -
Plumbing rough-in. This is where you set shower pans/tubs, run lines for shower controls,
and reroute pipes if fixtures move. -
Electrical rough-in. Update circuits, place outlets (including GFCI protection where required),
and add wiring for lighting, fans, and any “nice-to-haves.” - Ventilation upgrade. Install/upgrade the exhaust fan while walls/ceiling are accessible.
-
Backer board and moisture protection. Use cement board and appropriate moisture management
in wet areas before tile. -
Paint (then tile). Paint before installing new fixtures to avoid splatters. Tile wet walls,
then floors. Grout, then caulk corners. - Install fixtures and finishes. Tub/shower trim, vanity, toilet, lighting, mirror, accessories.
- Punch list. Adjust doors, seal edges, fix wobbles, and handle the small stuff that makes it feel finished.
If you’re DIY-ing, assume everything takes longer than you think. Not because you’re slowbecause bathrooms are
detail-heavy, and you’ll spend time waiting for thinset to cure, paint to dry, and that one missing valve to arrive.
Moisture Is the Villain: Ventilation and Waterproofing That Actually Work
A beautiful bathroom that traps moisture is like a great outfit worn in a hurricane: impressive for a moment,
then deeply regrettable. Moisture management is non-negotiable.
Ventilation: choose the right fan, not the loudest jet engine
-
Size the fan to the room. A common rule of thumb is 1 CFM per square foot,
with many guidance sources noting a 50 CFM minimum for small bathrooms. -
Look for better performance metrics. ENERGY STAR certified fans publish efficiency and sound
thresholds (quiet matters if you want your bathroom to feel spa-like instead of airport-like). -
Use smart features when they solve real problems. Humidity sensors help forgetful households
who never turn the fan on. Timers help everyone. - Exhaust to the exterior. Not the attic. Not the crawlspace. Outside.
Waterproofing: the part nobody Instagrams (and the part you’ll thank yourself for)
Tile and grout are not waterproofing. They’re a wear layer. Your waterproofing is behind and beneath them:
properly installed shower pans, sealed corners, and the right backer materials in wet zones.
- Use moisture-resistant backer systems in wet areas (cement board and appropriate waterproofing methods).
- Caulk changes of plane (like corners) instead of relying on grout where movement happens.
- Choose finishes that can handle humidity: semi-gloss or satin paint, moisture-rated lights, and hardware that won’t corrode.
Remodelista’s Style Backbone: Storage, Tile, and “Stop Putting Things on the Counter”
Remodelista’s best bathroom advice is secretly a life philosophy: every item needs a home, and visual calm is a form
of self-care. These moves make a bathroom look designed instead of accidentally assembled.
1) Build storage into the plan (not as an afterthought)
- Recessed shower niches keep bottles off corners and ledges.
- Medicine cabinets hide daily clutter in plain sight.
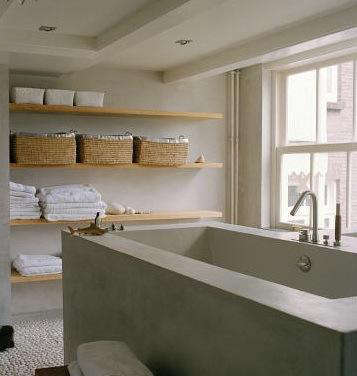
- Open shelving works best when it’s intentional: towels, baskets, and a strict “pretty only” policy.
2) Let tile set the mood
Tile is your bathroom’s main character. Subway tile reads classic and clean. Handmade-look or Moroccan-inspired
tile leans warmer and more artisanal. Large-format tile can feel modern and reduce grout lines (which is basically
cleaning-time reduction, i.e., joy).
3) In small baths, wall-mount what you can
Wall-mounted faucets and accessories reduce countertop clutter and can make tight spaces feel more open. It’s the
design equivalent of pushing a chair in: small action, big improvement.
4) Pedestal sink vs. vanity: pick your priority
A pedestal sink looks airy and elegantbut it gives you almost zero storage. A vanity is the practical workhorse,
especially for shared bathrooms. If you crave the lightness of a pedestal but need function, consider a vanity with
slim legs or a lighter visual footprint.
5) Add spa features that don’t scream “hotel remodel”
The simplest spa upgrades: a handheld shower, a shower seat or ledge, warm lighting, and hardware that feels good
in your hand. The goal is comfort, not turning your bathroom into a gadget showroom.
Fixture Strategy: Where Moen Fits (And How to Choose Without Spiraling)
Fixtures are where bathrooms get personal. You use them daily, you touch them constantly, and if they’re wrong,
you’ll notice forever. Moen’s planning approach helps keep decisions grounded: match faucet type to sink/vanity,
coordinate finishes, and think about accessories as a system.
Pick the faucet type before you fall for the finish
- Single-hole: clean look, simple install, great for modern vanities.
- Centersets: common, budget-friendly, practical for many standard sinks.
- Widespread: higher-end look, more install flexibility, often more countertop real estate.
- Wall-mount: sleek and space-saving, but plan rough plumbing carefully.
Water efficiency that doesn’t feel like punishment
If you’re remodeling anyway, it’s the perfect time to choose fixtures that reduce water use without turning your
shower into a sad drizzle. EPA WaterSense labeled bathroom faucets use a maximum of 1.5 gpm, and
WaterSense showerheads use no more than 2.0 gpm while still meeting performance criteria. That’s
a smarter upgrade than “buying fewer towels and hoping for the best.”
Accessories: the underrated finishing move
Coordinated towel bars, hooks, toilet paper holders, and grab bars (yes, grab bars can be stylish) make the room
feel cohesive. Bonus: installing proper blocking during the remodel makes future grab bar installation easier and
more secureeven if you’re not ready to add them yet.
Lighting: Make Your Face Look Like Your Face (Not a Campfire Story)
Bathrooms need layered lighting: ambient (overall), task (at the mirror), and optional accent (shower niche, toe-kick,
or a soft night light). The mistake to avoid is relying on one ceiling fixture and wondering why you look exhausted.
(It’s not you. It’s the lighting. Probably.)
Lighting tips that work in real homes
- Put task lighting at eye level on both sides of the mirror when possible. It reduces harsh shadows.
- Choose fixtures rated for damp/wet locations where appropriate (especially in shower zones).
- Use warmer color temperatures for a calmer feel, especially in primary baths.
- Add a timer or smart control for fan and lights if your household forgets switches exist.
Materials That Survive Real Life: Floors, Walls, and the Grout Reality Check
Your bathroom finishes should be easy to maintain, slip-resistant where it matters, and able to handle constant
humidity changes. Translation: pretty is great, durable is essential.
Flooring
- Porcelain tile: durable, water-resistant, huge style range, great for bathrooms.
- Natural stone: beautiful, but often needs sealing and mindful maintenance.
- Waterproof vinyl: budget-friendly and comfortable underfoot; choose quality for longevity.
Walls
Tile in wet areas, paint elsewhere with a moisture-friendly finish. Wallpaper can work in bathrooms, but choose
products intended for humid environments and install with caresteam is not a gentle roommate.
Grout and caulk: the small lines that make or break the look
Grout color changes the whole vibe. Light grout feels crisp but shows staining sooner. Dark grout can hide
discoloration but changes the tile’s visual rhythm. In corners and transitions, use caulk to handle movement
(and re-caulk when it’s timefuture mold doesn’t deserve free rent).
Shopping and Procurement: The “Buy It All Before You Demo” Rule
A bathroom remodel doesn’t pause politely while you wait for a backordered valve or special-order tile. Before
demolition, confirm lead times and have the essentials on-site (or at least scheduled): tile, waterproofing system,
shower valve/trim compatibility, vanity dimensions, and lighting.
Compatibility checks that prevent headaches
- Confirm faucet hole configuration (single-hole vs centerset vs widespread) matches your sink/vanity.
- Confirm shower trim matches the valve system you’re installing.
- Measure doorways and hallways for bringing in a vanity or tub. Yes, really.
- Buy extra tile (attic-stock) for repairs laterespecially for special patterns or handmade looks.
When to Call a Pro (And When DIY Makes Sense)
DIY can save money, but bathrooms punish shortcuts. A smart hybrid approach is common: you handle demo, paint,
some installation, and finishing touches, while licensed pros tackle plumbing, electrical, and waterproofing-critical
work. Home Depot-style project guidance often recommends hiring out technical tasks if you’re not experiencedand
that’s not fear-mongering, it’s math: one mistake can cost more than the labor you tried to avoid.
Final Walkthrough: The Punch List That Makes It Feel “Done”
- Run the shower and check for leaks (including behind trim where possible).
- Confirm the fan is venting strongly and runs long enough to clear humidity.
- Check caulk lines and grout sealing (if applicable).
- Adjust cabinet doors/drawers so they don’t bind or rub.
- Install storage systems (hooks, shelves, baskets) so counters stay clear.
Conclusion: A Bathroom That Works Hard and Looks Effortless
A successful bath remodel isn’t just a prettier roomit’s a better routine. Home Depot’s step-by-step sequencing
keeps your project moving. Moen’s fixture planning helps you choose faucets and accessories that feel cohesive and
functional. Remodelista’s design prioritiesstorage, tile, and uncluttered surfacesmake the space feel calm and
intentional. Combine all three, and you get a bathroom that doesn’t just photograph well…it lives well.
Experience Notes: Real-World Lessons Homeowners Learn Mid-Remodel (So You Don’t Have To)
“Experience” in bathroom remodeling usually means one of two things: (1) the satisfaction of a clean, functional,
beautiful bath, or (2) a story that begins with “So, we opened the wall and…” and ends with someone Googling
“emergency plumber near me.” Below are the most common real-world lessons remodelers and homeowners reportbasically
the greatest hits of bath remodel reality.
Lesson #1: The timeline is always longer than the demo. Demo feels fast and dramatic, like you’re
the star of your own makeover show. Then the slow parts arrive: rough-ins, inspections, curing time, and waiting
for materials. Thinset and grout don’t care that you’re excited. Paint dries when it dries. If you plan your project
around a hard deadline (hosting guests, selling the house, visiting relatives), add buffer time and order materials
earlier than feels necessary.
Lesson #2: You don’t really know your storage needs until everything is gone. People often think
a vanity is “plenty of storage”… until they lose the old medicine cabinet, the random shelf behind the door, and the
little ledge that held everyday items. The best real-life remodels build storage in layers: a vanity with drawers,
a medicine cabinet, hooks where towels actually land, and at least one “grab-and-go” spot for daily essentials. That
Remodelista rulegive everything a dedicated homesounds simple, but it’s the difference between “spa calm” and
“countertop explosion.”
Lesson #3: Ventilation is the invisible hero. Homeowners often upgrade the fan only after they’ve
dealt with peeling paint, musty smells, or recurring mildew. A properly sized, properly vented fan changes the whole
bathroom experience: mirrors clear faster, the room smells fresher, and surfaces dry sooner. Real-life tip: a timer
switch is worth it. People forget switches. Timers don’t.
Lesson #4: Fixture “feel” matters as much as style. In showrooms, almost everything looks great.
In real life, you notice how the handle moves, whether the showerhead is easy to aim, and whether the finish stays
clean without constant polishing. Many homeowners end up happiest when they choose fixtures that are comfortable and
reliable first, then stylish second (and luckily, you can get both). Coordinating accessoriestowel bars, hooks,
paper holderalso makes the space feel finished in a way that surprises people.
Lesson #5: Tile choices can either simplify your life or become your new hobby (against your will).
Pattern-heavy tile and light grout are gorgeous, but they’re also more visually demanding and can highlight every
imperfect cut line. Many successful remodels pair one “statement” element (tile, vanity color, or lighting) with
calmer supporting finishes. Real-world strategy: choose one hero, then let everything else be the supporting cast.
Your bathroom doesn’t need five plot twists.
Lesson #6: The best upgrades are the ones you notice every day. People rave about small, practical
touches: a handheld shower for cleaning the tub, a shower niche that stops the bottle pile-up, a vanity with drawers
instead of a cavernous cabinet, and lighting that makes mornings easier. These aren’t flashy upgrades, but they’re
the “daily delight” kindthe kind that makes you think, “Why didn’t we do this sooner?”
If you take anything from these experience notes, let it be this: a bathroom remodel is less about chasing trends
and more about building a space that handles water, storage, and daily routines gracefully. Do the invisible work
well (ventilation, waterproofing, layout), and the visible work (tile, fixtures, styling) will actually stay
beautiful.