If your snack table currently looks like a chaotic dugout (paper plates everywhere, cupcakes wandering off like free agents),
it’s time to call in the big leagues: a DIY tiered baseball snack or cupcake display stand.
It adds height, organizes food like a responsible adult, and instantly screams “baseball party” without you needing to hang
47 pennants from the ceiling.
This guide walks you through a sturdy, party-ready build with multiple material optionsfast and cheap, fancy and durable,
or “Dollar-store MVP.” You’ll also get practical stability tips, food-friendly finishing advice, and snack ideas that look
like they belong at the ballpark (minus the $12 soda).
Why a Tiered Stand Is the MVP of a Baseball Party
1) Height = instant “stadium concession stand” vibes
Tiered displays make desserts and snacks feel special. The same cupcakes that looked “fine” on a tray suddenly look like
they’re starring in a highlight reel when they’re stacked in levels.
2) It’s decoration and organization in one swing
A baseball-themed stand can double as a centerpiece. It keeps the table tidy, makes it easier for guests to grab food,
and frees up space for essentialslike napkins, plates, and someone’s emotional-support bag of sunflower seeds.
3) It’s reusable for future parties
Make it in team colors today, re-skin it for a birthday tomorrow, and turn it into a holiday dessert tower later. A well-built
stand is basically the Swiss Army knife of party hosting.
Choose Your Build Style (Pick Your Difficulty Level)
Option A: “Fast & Lightweight” (Cardboard cake rounds + dowels)
- Best for: Cupcakes, cookies, packaged snacks, and indoor parties
- Pros: Cheap, quick, easy to decorate
- Cons: Not great for heavy bowls or outdoor wind
Option B: “Sturdy & Reusable” (Wood circles + center dowel)
- Best for: Heavier snack bowls, repeated use, pro-looking results
- Pros: Strong, stable, long-lasting
- Cons: Requires drilling and careful finishing
Option C: “Dollar-Store Hybrid” (Plates/pizza pans + candlesticks)
- Best for: Decor displays, wrapped snacks, cupcake liners
- Pros: Budget-friendly, surprisingly cute
- Cons: Needs strong adhesive and cure time
In this article, you’ll learn a baseball-themed version that works with either the cardboard or wood approach,
plus a quick “Dollar-store shortcut” section.
Materials & Tools Checklist
Core parts (choose based on your build option)
- Tiers: 3 round boards (wood circles, cake boards, sturdy cardboard rounds, or plates/pizza pans)
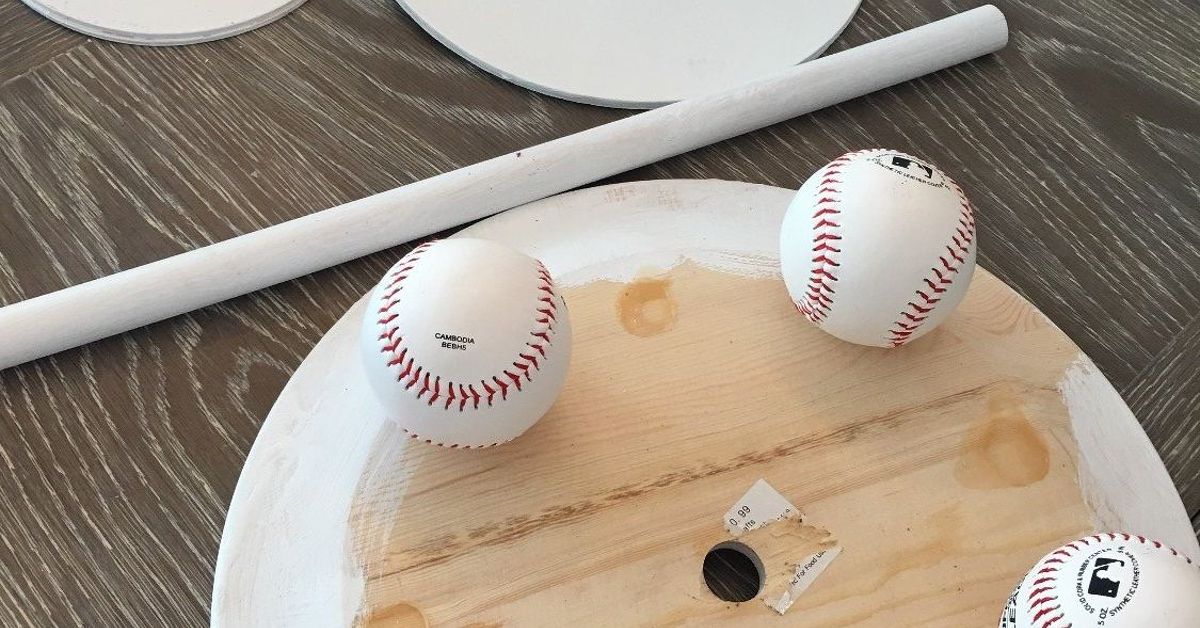
- Risers/supports: 3 foam baseballs (or 3 foam balls painted like baseballs), OR 2–3 wooden dowel segments, OR candlesticks
- Center support: 1 wooden dowel rod (optional but recommended for stability)
Adhesives & hardware
- Strong craft adhesive (E6000-style) or two-part epoxy for long-term strength
- Hot glue (for positioning, not as the only “forever” support)
- Wood screws (for wood build), washers (optional), and wood glue
Decor + finishing
- White paint + red paint marker (or red acrylic) for baseball stitching
- Sandpaper (for wood), primer (optional), and a protective topcoat (if painting wood)
- Ribbon, twine, mini pennants, number stickers, or vinyl decals
- Food barrier: parchment circles, cupcake liners, doilies, or small trays/bowls
Tools
- Ruler/tape measure, pencil, scissors/craft knife
- Drill (for wood build), drill bits sized for dowel/screws
- Foam cutter or serrated knife (if shaping foam)
Recommended Sizes (So It Holds Food Without Looking Like a Jenga Experiment)
A classic 3-tier look is 12" + 10" + 8". Another popular compact size is 10" + 8" + 6".
Bigger bottom tiers improve stability and make the whole stand look intentionalnot like it happened by accident during a crafting blackout.
How many cupcakes can each tier hold?
- 12" tier: about 12–14 standard cupcakes (depending on spacing)
- 10" tier: about 8–10 cupcakes
- 8" tier: about 6–8 cupcakes
Pro tip: Leave a little breathing room so frosting doesn’t turn into a contact sport.
Step-by-Step: DIY Tiered Baseball Stand (Foam Baseball Risers Edition)
This version is fun because the “columns” are baseballsso the theme is built into the structure. It’s also easy to scale up or down.
Step 1: Prep the tiers (strength first, cute second)
-
Cardboard build: Double up each tier by gluing two rounds of the same size together (unfinished sides inward),
then press flat under books while drying. - Wood build: Sand edges smooth (especially if kids will be grabbing snacks). Wipe off dust.
- If you’re decorating with paper, fabric, or vinyl, do that after the tiers are structurally reinforced.
Step 2: Make your baseball risers
-
Use foam baseballs or round foam balls roughly 3–4 inches in diameter.
(Bigger balls create more space between tiersuseful for tall cupcakes.) - Paint them white. Let dry.
- Add red “stitching” with a paint marker or fine brush. Don’t stress perfectionreal baseball stitching isn’t judging you.
- Optional: Seal with a clear coat if they’ll be handled a lot (allow full cure time before using near food).
Step 3: Plan the layout (centering prevents heartbreak)
- On each tier, lightly mark the center point (measure across, then across again).
-
Decide how many baseball risers you want between tiers:
- 3 risers (triangle layout) = stable and easy to assemble
- 4 risers (square layout) = extra stable, slightly busier look
-
For 3 risers: imagine a triangle about 2–3 inches in from the edge. Mark the three spots evenly spaced.
Keep them far enough in that the top tiers don’t overhang like a diving board.
Step 4: Add a center dowel (optional, but makes it feel “pro”)
If you want the stand to survive enthusiastic guests (and possibly a sibling who thinks it’s a drum), add a center dowel.
This isn’t just for cakesstacked structures behave better with a “spine.”
-
Wood build: Drill a center hole through each tier just wide enough for your dowel.
If you’re nervous, drill a small pilot hole first. - Cut the dowel so it runs from the base tier through the top tier, with a little extra length if you want a decorative topper.
- If you’re using cardboard, you can still use a doweljust reinforce the center with extra cardboard layers and use washers to spread pressure.
Step 5: Assemble the stand (bottom-up, like building confidence)
-
Start with the largest tier on a flat surface.
Add non-slip pads underneath if you have them (especially on slick tables). -
Glue the baseball risers onto the marked spots on the bottom tier.
Use a strong adhesive for the “real hold,” and hot glue only to tack pieces in place while it sets. - Carefully place the middle tier on top of the risers. Press gently and check alignment.
- Repeat: glue risers, then place the top tier.
- If using a center dowel, slide tiers down the dowel as you go, and secure the dowel at the base with glue or a screw (wood build).
Step 6: Decorate like a baseball party mastermind
- Wrap tier edges with red ribbon (instant “stitching” illusion).
- Add small pennants, team colors, or a number topper (birthday age = jersey number).
- Make tiny “menu” labels: Peanuts, Popcorn, Cracker Jack–Style Mix, Home Plate Cupcakes.
- Top it with a mini baseball, foam finger, or a paper “HOME RUN” sign.
Dollar-Store Shortcut: Plates + Candlesticks Tiered Stand
Want the “wow” factor without breaking out power tools? Use a large plate for the bottom, two smaller plates for upper tiers,
and candlesticks as connectors. The key is using an adhesive that’s actually meant to hold weightthen letting it cure fully.
- Center a candlestick on the large plate and glue.
- Center the next plate on top of the candlestick and glue.
- Repeat for tier three if you want extra height.
- After curing, decorate the rims with red “stitch” lines using paint marker or vinyl strips.
Food-Friendly (and Kid-Friendly) Safety Tips
Don’t place unwrapped food directly on craft paint or fresh sealers
Even when finishes are considered safe after curing, “party food” has a special talent for smearing, sweating, and melting.
The simplest solution: use a barrierparchment circles, doilies, cupcake liners, mini plates, or small bowls.
Your stand stays pretty, your snacks stay clean, and nobody eats a surprise speck of glitter (which is not a fun crunch).
Let adhesives and coatings cure fully
Strong glues and coatings often need time to fully harden and off-gas. Build the stand at least a day aheadlonger if you’re painting
or sealing. If it still smells “chemically,” it’s not party-ready.
Stability check before game time
- Press gently on each tierno wobble should happen.
- Put heavier items on the bottom tier (bowls, heavier cookies, snack bags).
- Keep the top tier light (mini cupcakes, toppers, labels).
Baseball Snack & Cupcake Ideas That Look Amazing on Tiers
You don’t need complicated recipes to make the display look like a ballpark buffet. The trick is mixing textures, colors, and shapes.
Here are crowd-pleasers that stack well:
Bottom tier (heavier, “anchoring” snacks)
- Mini popcorn tubs or paper cones
- Snack-size chip bags (bonus: they’re already wrapped)
- Pretzel bites in a small bowl
- Peanuts or sunflower seeds (label allergens clearly)
Middle tier (desserts and grab-and-go treats)
- Baseball cupcakes (white frosting + red stitch lines)
- Chocolate-dipped sandwich cookies with white drizzle “stitches”
- Rice cereal treats cut into “ticket stub” rectangles
Top tier (lightweight showpieces)
- Mini cupcakes or cake pops
- Small candy cups in team colors
- A centerpiece topper: “PLAY BALL,” “HOME RUN,” or the birthday kid’s name
Customization Ideas (Make It Look Store-Bought Without Paying Store-Bought Money)
Team colors without repainting everything
- Use removable ribbon on tier edges (swap colors later).
- Add printable circles under cupcakes (team logos, jersey numbers, tiny baseball diamonds).
- Use chalkboard labels so you can rename snacks every party.
Turn it into a baseball field
- Cover the bottom tier with green felt to look like turf.
- Add white tape lines for baselines.
- Place cupcakes as “players” and a small sign as the scoreboard.
Troubleshooting (When Your Stand Starts Acting Like a Rookie)
Problem: Wobbling
- Cause: risers not evenly placed or table surface uneven
- Fix: add a center dowel, move risers inward, or add non-slip pads
Problem: Tiers sagging (cardboard builds)
- Cause: thin boards or too much weight
- Fix: double/triple-layer the rounds, keep heavy items on the bottom, use smaller bowls
Problem: Glue joints feel weak
- Cause: hot glue used as the only structural adhesive
- Fix: reinforce with epoxy/strong craft adhesive and let it cure fully
Problem: Paint smudges or sticky sealers
- Cause: not enough drying/cure time
- Fix: allow extra time; use barriers under food even after curing
Cleanup, Storage, and Reuse
Store your stand like a trophy: clean, dry, and protected from crushing. If it’s wood, wipe with a damp cloth (don’t soak it).
If it’s cardboard-based, keep it away from humidity. The easiest “reuse upgrade” is swapping the trim:
new ribbon + new labels = totally new theme without rebuilding anything.
Wrap-Up
A DIY tiered baseball snack or cupcake display stand is one of those rare party projects that’s both useful and genuinely fun.
It makes your table look intentional, keeps snacks organized, and gives guests a “wow” moment before they even take a bite.
Build it once, tweak it forever, and enjoy the sweet satisfaction of hearing someone say:
“Wait… you MADE this?” (Yes. Yes, you did.)
Extra : Real-World DIY Experiences & Lessons (So You Don’t Learn the Hard Way)
Many DIYers discover the first big truth of tiered stands the moment they do a “test load”: snacks are heavier than you think.
A few cupcakes? Easy. A bowl of pretzel bites? Suddenly your stand is questioning its life choices. The most reliable trick is
treating the build like a small piece of furniture: a wider base, supports set in from the edge, and a center “spine” if you want
confidence. If you’re using cardboard rounds, doubling them up is the difference between “party-ready” and “why is the middle tier
doing a sad little dip?”
Another common experience: the stand looks perfect on your kitchen counter… and then you move it. Transportation is the real boss level.
If you’re bringing the stand to a park or a friend’s house, assemble it at the location if possible. If it must travel assembled,
keep it empty, place it in a box, and wedge towels around the base so it can’t slide. For stands with foam baseball risers, people often
add a hidden center dowel or a screw-through-base method on wood builds, because bumps in the road can turn “cute display” into “modern art.”
Paint and finishing are another “learned by living” moment. The temptation is to build and decorate in one nightbecause party prep is chaos.
But many makers report that rushing cure times is what causes fingerprints, tacky surfaces, and weird smells right before guests arrive.
A better rhythm is: build on Day 1, paint on Day 2, decorate on Day 3. If you don’t have that kind of time (who does?), use removable décor:
ribbon, paper wraps, and labels. These give you the baseball look without waiting on paint layers to behave.
At the party itself, the stand tends to become a magnetkids love height, and adults love anything that looks organized.
A smart move is putting “messy” snacks on the bottom tier (chips, popcorn, wrapped candy) and keeping frosting-heavy cupcakes on the middle
tier where elbows are less likely to collide. The top tier works best for small, light items: mini cupcakes, labels, or a sign.
People also find that clear labeling helps with both allergies and traffic: when guests can quickly identify what’s where, they don’t hover,
and the table stays calmer.
Outdoor parties create their own set of experiences. Wind can flip lightweight labels and turn napkins into airborne athletes.
If you’re outside, use slightly heavier décor (cardstock instead of thin paper), and consider adding non-slip shelf liner under the base.
Shade matters toofrosting and chocolate don’t love direct sun. A tiered stand helps here because you can put more sun-sensitive treats on
the higher tiers and keep sturdier snacks on the bottom, adjusting placement as the sun moves.
Finally, the best “experience tip” is one that sounds boring but saves the day: do a five-minute rehearsal.
Set the stand where it will go, place a few items on each tier, and give the table a gentle bumpbecause parties are basically controlled
bumping. If anything shifts, fix it before guests arrive. Once you’ve done that, you’ll feel like a hosting wizard, and your snack table will
look like it was designed by someone who definitely, absolutely, totally has their life together (even if you built it in pajamas).