If your walls are feeling a little naked and your budget is feeling a little attacked, DIY rope shelving is about to be your new best friend. With a couple of boards, some sturdy rope, and a drill, you can create floating rope shelves that look straight out of a designer catalog but cost closer to a fast-food run than a furniture-store splurge.
Inspired by classic Remodelaholic projects and other popular DIY hanging shelf tutorials, this guide walks you through how to build easy DIY rope shelving that works in a tiny apartment, a home office, or a cozy guest room. We’ll cover planning, materials, step-by-step instructions, styling ideas, and real-life tips, so your shelves look intentional, not like you lost a fight with the lumber aisle.
Why DIY Rope Shelving Is So Popular
Rope shelving keeps showing up in makeover shows, blogs, and social feeds for a reason: it hits the sweet spot between style and practicality.
Budget-friendly storage with big visual impact
Compared to traditional shelving systems with brackets and hardware, rope shelves are incredibly affordable. Most builds use basic pine boards or plywood, a length of rope, and a couple of hooks or anchors. You can even repurpose reclaimed wood or inexpensive trays to keep costs down while still getting a custom look.
Works in small or awkward spaces
Because the shelves hang from rope instead of bulky brackets, they take up minimal visual space and can fit in tricky spots: over a toilet, next to a closet, above a desk, or between two windows. They’re perfect when you need extra storage but don’t want to close in a small room.
Endless design personalities
Change the wood and rope, and you completely change the vibe:
- Rustic farmhouse: Chunky stained boards + thick jute rope.
- Beachy coastal: Soft whitewashed wood + natural sisal.
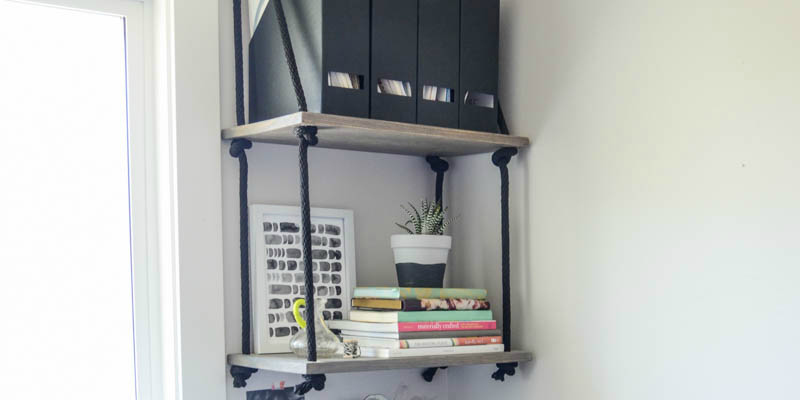
- Modern minimalist: Clean, straight boards + black nylon rope and matte black hooks.
- Boho: Color-dyed rope, painted shelves, and plants everywhere.
Planning Your Easy DIY Rope Shelving
Before you run to the hardware store, take a few minutes to plan. It’s not glamorous, but it’s the difference between “wow, nice shelves” and “why is that leaning like the Tower of Pisa?”
Step 1: Decide where your rope shelf will go
Pick a spot with enough wall height for your shelves plus some breathing room above and below. Common locations include:
- Above a desk to hold a printer, router, and office supplies.
- Over a dresser for plants, framed photos, and books.
- In a bathroom for towels, candles, and pretty storage baskets.
- In a kitchen as a light-duty spice or mug rack.
Mark the approximate top of the rope shelf with painter’s tape so you can visualize the height before you commit to drilling.
Step 2: Think about what you’ll store
Rope shelving is great for <em.light- to medium-weight items. It’s not a good idea for stacks of textbooks, heavy speakers, or your collection of cast-iron skillets. Plan to display lighter décor and everyday essentials like:
- Paperback books and small framed art.
- Small plants in lightweight pots.
- Baskets for cords, remotes, craft supplies, or toiletries.
- Electronics like a Wi-Fi router, as long as the hardware and anchors are sized correctly.
Step 3: Measure and sketch
Grab a tape measure and a scrap of paper (or your notes app):
- Measure the width of the wall where the shelves will hang.
- Decide how many shelves you want (most people choose two or three).
- Choose a shelf length that leaves a few inches of breathing room on each side of the wall space.
- Plan vertical spacing; 10–14 inches between shelves usually works for books and décor.
A quick sketch with rough dimensions helps you calculate how many boards you need and how much rope to buy.
Tools and Materials You’ll Need
The exact list will vary depending on your design, but most easy DIY rope shelving projects use the same basic ingredients:
- Boards for shelves: 1×10 or 1×12 pine boards, plywood cut to size, or reclaimed planks.
- Rope: 3/8″ to 5/8″ jute, sisal, cotton, or nylon, depending on the look and weight capacity you want.
- Hooks or anchors: Heavy-duty ceiling hooks, eye screws, wall anchors, or drywall-friendly hooks rated for the load.
- Drill and drill bits: A bit slightly larger than your rope diameter so the rope passes through cleanly.
- Sandpaper or sanding block: To smooth edges and drilled holes.
- Finish: Wood stain, clear sealer, or paint to match your décor.
- Level and tape measure: Non-negotiable for straight, safe shelves.
- Pencil and painter’s tape: For marking hole locations and hook positions.
If you’re working with drywall and don’t hit a stud, consider high-capacity drywall hooks or screw-in anchors designed to hold 25–50 pounds. Always check the package rating and stay comfortably under that limit once your shelves are loaded.
Step-by-Step: How to Build Easy DIY Rope Shelving
Step 1: Cut and prep your boards
- Cut the boards to your desired length. Many beginners start with shelves around 24–30 inches long.
- Lightly sand all edges and corners so you don’t get splinters every time you dust.
- Decide how many shelves you want to hang on the same set of ropestwo or three is common for a floating rope shelf.
Step 2: Mark and drill the rope holes
Lay your boards flat and stack them so you can drill through in the same spot on each one for perfectly aligned corners.
- Measure in from each side and end to mark where the rope holes will go (typically 1–1.5 inches from each edge).
- Use a square or straightedge to double-check that the marks are the same on every board.
- Clamp the boards together if you canthat keeps them from shifting while you drill.
- Drill a hole at each corner using a bit just larger than the rope. Go slowly to avoid chipping.
- Sand inside each hole for a smooth finish.
Step 3: Finish the wood
This is where you make your rope shelves match your home’s style:
- Stain and seal: For a warm, rustic look, apply wood stain and let it dry before sealing with a clear topcoat.
- Painted shelves: Use primer and paint for bold color or crisp white shelves. Add a light sanding between coats for a smooth finish.
- Weathered or whitewashed: Wipe diluted paint over the wood and quickly wipe off the excess to let the grain show through.
Let everything dry fully before you start threading rope. If the finish is even slightly tacky, dust and fibers will stick and drive you crazy later.
Step 4: Thread and knot the rope
There are two popular ways to string rope shelves: using two long ropes (one on each side) or four separate ropes (one per corner). For beginners, four separate ropes are easier to adjust.
- Cut four lengths of rope, leaving plenty of extra for knots and hanging. It’s better to have extra to trim than to come up short.
- Tie a large knot near the end of each rope. These knots will support the bottom shelf.
- Flip your bottom shelf upside down and thread each rope through a corner hole so it rests on the knot.
- Measure up from the bottom shelf to where you want the next shelf to sit, then tie another knot at that height on each rope.
- Slide the second shelf down onto those knots. Adjust the knots as needed to get the board level.
Don’t panic if it’s not perfect on the first try. Rope shelves are very forgivingyou can loosen and re-tie knots until everything looks straight.
Step 5: Install the hooks or anchors
Now it’s time to commit to your wall or ceiling.
- Hold the assembled rope-and-shelf unit up to the wall where you want it to hang. Mark where the rope loops or ends will meet the wall or ceiling.
- Use a stud finder to see if you can place the hooks in a stud. If yes, you can use heavy-duty hooks rated well above the weight of the shelves and décor.
- If there’s no stud, use high-capacity drywall anchors or specialty hooks designed for drywall. Follow the package directions carefully and don’t exceed the load rating.
- Install two hooks for a wall-hanging design or one centered hook if your ropes join at the top in a single loop.
Step 6: Hang and level your rope shelves
- Lift the rope shelving and hang the rope loops or tied ends on the hooks.
- Use a level to check the bottom shelf from side to side and front to back.
- Adjust individual knots by sliding them slightly up or down until everything is straight.
- Trim any excess rope, leaving a small tail for future tweaks. If you like, wrap the ends with tape or tie decorative knots.
This is usually the longest part of the project, but it’s worth the fuss. Once the ropes are dialed in, your shelves will stay level for the long haul.
Design Ideas and Styling Tips
Once the shelves are up, the fun part begins: styling them so they look curated instead of cluttered.
Keep it light and balanced
Because rope shelves visibly move if overloaded on one side, balance matters. Try this:
- Mix a few books with lighter items like candles, plants, and framed art.
- Spread visual weight evenlydon’t put all the heavy items on one side or one shelf.
- Leave some negative space so the shelves don’t feel crowded.
Play with textures
Rope shelving loves texture. Combine woven baskets, ceramic pots, glass jars, and wood frames to create layers that look intentionally styled. A small trailing plant softens the straight lines and adds life to the display.
Lean into the theme
- Nautical: Add navy accents, striped containers, and small driftwood pieces.
- Boho: Use tassels on the rope ends, colorful planters, and vintage books.
- Modern: Keep the palette neutral with black-and-white frames and simple ceramics.
Safety and Weight Considerations
Rope shelving can be sturdy, but it’s only as strong as your hardware, anchors, and knots. A few safety guidelines:
- Use hardware and anchors rated for more than the total expected weight (boards + décor).
- Mount into studs when possible; if not, use high-quality drywall anchors or specialty hooks.
- Check the knots occasionally, especially in the first few weeks as the rope stretches.
- Avoid placing very heavy or breakable items on the highest shelves, especially in homes with kids or pets.
When in doubt, keep the load light and decorative. For heavy storage, go with traditional bracket shelves instead.
Where Easy DIY Rope Shelving Shines
Need ideas for where to use your new hanging rope shelf? Try these real-life scenarios:
- Home office: Hang a two-shelf unit above the desk to lift the printer, modem, and router off the floor, then use a basket for extra cords.
- Guest room: Add rope shelves above a small dresser for extra towels, a small plant, and a welcome tray.
- Bathroom: Use sealed wood and keep items lightthink rolled washcloths, jars of cotton balls, and a candle.
- Entryway: Install a narrow rope shelf near the door for keys, sunglasses, and a small catchall tray.
Real-Life Lessons from Easy DIY Rope Shelving Projects
After you build rope shelves once or twice, you start collecting little tips that make the next set faster, straighter, and better looking. Consider this your shortcut to the “I’ve done this before” confidence.
1. Cut the rope longer than you think you need
Almost everyone underestimates how much rope the knots and hanging height will use. Between the knots, the hanging loop, and small adjustments, extra rope disappears quickly. Add at least 20–30% more length than your rough calculation suggests. You can always trim the excess, but you can’t magically add length to a rope that’s already been cut too short.
2. Drill all the boards at once for perfect alignment
One of the easiest ways to end up with wonky shelves is drilling each board separately. Even a tiny difference in hole placement can make the stack lean or twist. If you stack your boards, clamp them together, and drill through the full stack, the holes will line up almost perfectly. The result: the boards hang evenly, and you spend less time fighting the level.
3. Practice your knots on scrap pieces
Rope shelves don’t require advanced knot skills, but a solid overhand or figure-eight knot makes a big difference. Before threading your actual boards, practice tying a few knots on scrap rope. Pull hard to tighten them and see how much they “settle.” That gives you a feel for how much rope the knot will eat up and how far it may slide when under tension.
4. Level from the bottom shelf up
It’s tempting to fuss over the top board first because it’s at eye level. In practice, you’ll get cleaner results if you start with the bottom shelf. Get that one perfectly level side-to-side and front-to-back, then use it as your reference point. Adjust the knots that support the next shelf until it matches. Working from the bottom up keeps the whole stack looking straight and prevents a slight tilt from compounding as you go higher.
5. Choose the right rope for your climate
Natural ropes like jute and sisal look beautiful but can react to humidity. In damp bathrooms or coastal climates, they may stretch or feel slightly fuzzy over time. Synthetic ropes, like nylon or polyester, are more resistant to moisture and stretching, though they look a bit more modern. If you’re placing rope shelves in a bathroom or laundry room, a synthetic rope and sealed boards are usually the better long-term choice.
6. Style with maintenance in mind
Rope shelves will collect dust just like any other surface. Items that are easy to lift and wipe aroundlike baskets, jars, and framed artmake cleaning easier. Super intricate objects with lots of tiny details can be a pain to dust around, especially on higher shelves. If you want the look of a styled shelf without weekly dusting marathons, choose fewer, larger pieces instead of a crowd of small ones.
7. Test the setup before trusting it with treasures
Once the shelves are hung and leveled, load them slowly. Start with a few heavier items you wouldn’t cry over if something went wrong (think books, not heirloom ceramics). Watch for any movement in the rope, knots, or hooks. If everything stays put, you can confidently add your more fragile décor. It’s a small patience test that pays off big in peace of mind.
8. Embrace the handmade character
Rope shelving is not meant to look like factory-perfect cabinetry. A tiny bit of variation in the rope, a subtle knot detail, or a slightly uneven edge in reclaimed wood is part of the charm. Instead of aiming for sterile perfection, lean into the handcrafted feel. Once your shelves are styled with plants, books, and art, the overall impression is what people noticenot whether both sides are mathematically identical down to the millimeter.
With these small experience-based tweaks, “Easy DIY Rope Shelving” really lives up to its name. You’ll move faster, make fewer mistakes, and enjoy the shelves more because you know what’s happening behind the scenes: smart planning, thoughtful hardware choices, and a few clever tricks learned from real-life projects.
Conclusion: Drill, Knot, Hang, and Enjoy
Easy DIY rope shelving is one of those rare projects that checks all the boxes: affordable, beginner-friendly, space-saving, and stylish. It uses simple materials, basic tools, and a little patience with knots and leveling to create floating rope shelves that feel custom to your home.
Whether you’re channeling a nautical guest room, a modern home office, or a plant-filled boho corner, rope shelves adapt to your style with just a few changes in wood finish, rope type, and décor. Start with a small two-shelf setup, learn how the ropes behave, and you may find yourself planning a second set for another room before the first one is even fully styled.