Somewhere in America, a perfectly innocent teapot is sitting in a thrift store, minding its own business, when suddenly you walk in and decide it deserves a second act… outside… in the sun… possibly wearing birdseed. Honestly? Iconic. “Garden art from vintage teapot and dishes” is one of the most cheerful ways to upcycle old china, add personality to your yard, and quietly let your neighbors know you have both taste and a glue gun.
This guide covers practical, weather-smart DIY ideas using vintage teapots, teacups, saucers, plates, and mismatched dishes: bird feeders, planters, dish totems, and mosaic-style accentsplus the little details that keep your creation from turning into “modern art” after the first thunderstorm.
Why Vintage Teapots and Dishes Make Great Garden Art
Old dishes are naturally decorative: patterns, gold rims, florals, cottage-core vibes, mid-century geometricsthe whole buffet. In the garden, that visual drama pops against greens and browns, and it adds height and sparkle where flowers might be between blooms.
- They’re easy to find at thrift stores, yard sales, estate sales, and the back of your own cabinet.
- They’re already “designed”you’re basically curating instead of creating from scratch.
- They tell a story: a chipped saucer becomes “character,” not “trash.” (Within reason.)
- They’re modular: mix-and-match pieces until your garden sculpture feels balanced and intentional.
Collecting Pieces Without Accidentally Buying Your Own Dishes Back
Where to hunt
Thrift stores and flea markets are the classic move. Estate sales are a gold mine for complete sets and quirky one-offs (and also for learning how many gravy boats a family can own). If you’re buying online, look for “lots” of mixed china for variety.
What to look for
- Thickness and weight: heavier pieces usually feel sturdier for outdoor use.
- Interesting silhouettes: tall teapots, fluted bowls, pedestal cups, and plates with scalloped edges.
- Stable bases: a wide bottom plate or platter gives a sculpture that “planted” look.
- Chips are okay if they’re not sharp and not on a surface that will handle food (like a bird feeder lip).
Tools and Materials That Make This Way Easier
You can keep it simple (glue + a shepherd’s hook) or go full “yard engineer” (drilling, rods, sealants). Here’s the realistic middle:
- Adhesive: outdoor-rated epoxy, silicone sealant, or a strong construction adhesive.
- For drilling: diamond or carbide bits suited for ceramic/porcelain; painter’s tape; water for cooling.
- Hardware: copper pipe, threaded rod with washers/nuts, rebar, or a sturdy garden stake.
- Safety: eye protection, gloves, and patience (which is free but often out of stock).
- Optional: grout/thinset and sealer if you’re doing mosaic-style work.
Project 1: Teacup Bird Feeder (Cute, Fast, and Weirdly Elegant)
This is the gateway craft. One teacup + one saucer = a bird feeder that looks like it should be served with tiny scones. You can hang it or mount it on a stakeboth work.
Option A: Hanging teacup feeder
- Test the angle. Tilt the cup slightly so seed doesn’t bounce out, and keep the handle up like a tiny handrail.
- Glue cup to saucer. Use an outdoor-suitable adhesive. Press firmly and let it cure fully.
- Add hanging hardware. Tie sturdy twine around the handle, or use a metal hanger designed for feeders.
- Fill with seed. Use a quality seed mix (less filler = less mess).
Option B: Stake-mounted teacup feeder (less swinging, more “garden sculpture”)
- Glue teacup to saucer.
- Attach saucer to a flat cap or platform on a copper pipe or garden stake.
- Push stake into the ground near shrubs (birds like an escape route).
Pro tip: Put the feeder somewhere you can actually reach for cleaning. If it’s “adorable but unreachable,” you’ve made decor, not a feeder.
Project 2: Teapot Planter (Because Plants Love Drama Too)
A vintage teapot planter is pure cottage charm. The key question: drainage. You can drill a hole (best long-term), or you can skip drilling and treat it like a “cachepot” (a decorative outer pot that holds a nursery pot inside).
Method A: Drill drainage (best for real planting)
- Mark the spot on the bottom.
- Stabilize the teapot on a towel or sandbag so it doesn’t wobble.
- Drill slowly with the right bit; keep the area wet to reduce heat and cracking.
- Plant with quality potting mix and a plant that likes containers (succulents, herbs, compact annuals).
Method B: No drilling (the low-stress version)
- Place a small plastic nursery pot inside the teapot.
- Water the plant at the sink, let it drain, then put it back inside the teapot.
- Use the teapot purely as a “pretty sleeve.”
What not to do: The classic “rocks at the bottom for drainage” trick is more folklore than fix. Better drainage comes from an actual drainage hole and proper potting mixnot a rock layer that steals root space.
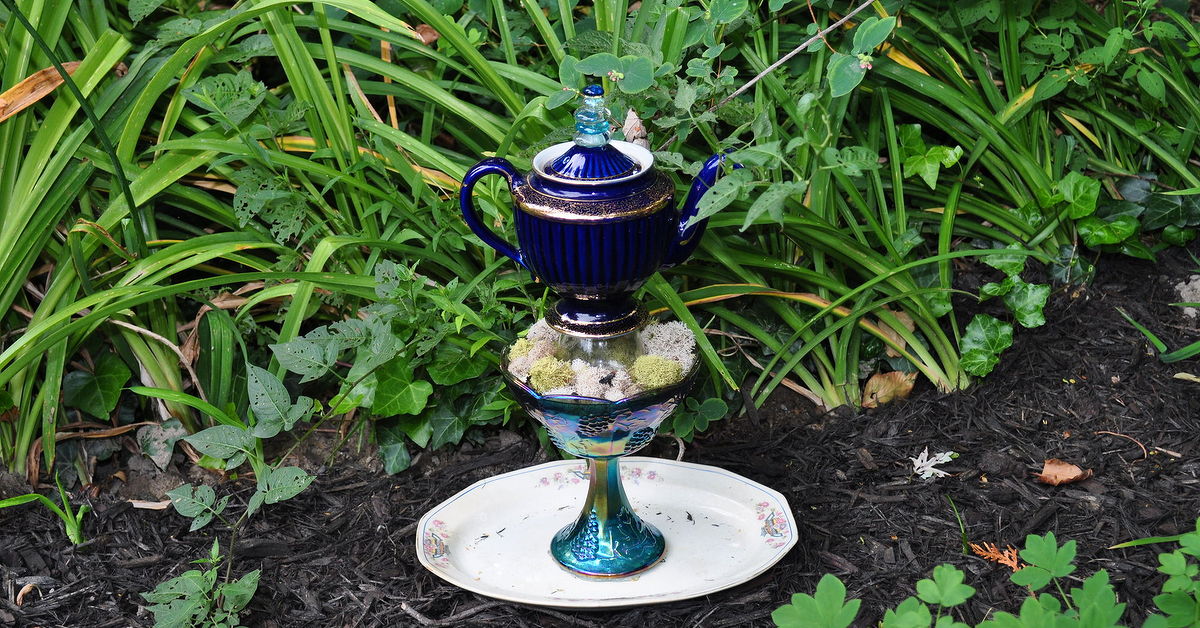
Project 3: Dish Totem with a Teapot Topper (A Yard Landmark, In the Best Way)
Dish totems are vertical sculptures made by stacking plates, bowls, cups, and sometimes glass pieces. Top it with a vintage teapot and suddenly it feels like garden art with a plot twist.
Choose your “spine” (the support that holds everything)
- Threaded rod (most secure): washers + nuts between pieces give stability and spacing.
- Copper pipe or rebar (simpler): stack pieces with adhesive; use a sturdy base plate.
- Stake-based: best for smaller totems that won’t catch strong wind.
Build it (basic method)
- Lay out your design first. Arrange by size: wider at the bottom, lighter at the top.
- Decide spacing. Use small bowls, candle holders, or even stacked washers to create pleasing gaps.
- Secure connections. Adhesive at contact points; hardware if using threaded rod.
- Finish with the teapot. Lid on for a clean “cap,” or lid off if you want to tuck in a small solar light.
Design tip: Repeat a color 2–3 times (blue rim here, blue floral there) so it looks curated, not chaotic. Unless you’re aiming for “chaotic tea party,” which is also valid.
Project 4: Broken-China Mosaic Accents (For When You Want Texture)
If you’ve got cracked plates or a teapot lid that didn’t survive The Great Dish Drop of 2024, mosaic-style garden art is your comeback story. Think: a small stepping stone, a birdbath insert, a pot topper, or a decorative plaque.
Outdoor mosaic basics (so it lasts)
- Use the right bonding method outdoors: cement-based thinset is often favored for weather exposure compared to basic craft glue.
- Grout matters: work it into gaps thoroughly and clean off haze as it cures.
- Seal smart: outdoor grout and mosaic sealers help resist water intrusion and grime.
Where mosaic shines: adding broken-china “petals” around the base of a teapot totem, or creating a decorative ring on top of a planter. You get the charm without needing a full patio renovation.
How to Drill Ceramic and Porcelain Without Hearing the Sound of Your Heart Breaking
Drilling vintage dishes is half technique, half mindset. The technique: correct bit, slow speed, steady pressure, and water to cool. The mindset: accept that you’re doing arts and crafts with a material designed for gentle tea drinking. Be kind to yourself.
- Tape the spot with painter’s tape so the bit doesn’t skate.
- Start at an angle to create a tiny groove, then slowly bring the drill upright.
- Keep it cool with waterheat is the villain of porcelain.
- Go slow and let the bit do the work; forcing it is how cracks happen.
Weatherproofing and Longevity (Because Rain Has Opinions)
Outdoor dish art is a relationship. A beautiful one. But still a relationship. Sun, rain, and temperature swings will test your bondsliterally. Here’s how to stack the odds in your favor:
Adhesives: pick for outdoors, not optimism
- Epoxy: great for strong bonds and gap filling; many formulas are water resistant and cure clear.
- Silicone sealant: flexible and waterproof; helpful where movement or expansion happens.
- Construction adhesive: useful for attaching dish art to wood posts or garden bases.
Freeze-thaw and moisture
If you live where water freezes, moisture can sneak into tiny cracks and expand like it pays rent. Consider placing delicate pieces in more protected spots, or using proven outdoor mosaic methods and sealers for cement-based work.
Bird-Friendly Placement and Maintenance (So Your Feeder Is Helpful, Not Gross)
A teacup bird feeder is adorable. A teacup bird feeder full of soggy seed? Less adorable. Keeping feeders clean reduces mold and helps prevent disease spread. Plan for easy cleaning from day onefuture-you will be very grateful.
- Clean regularly: scrub off old debris, rinse well, and let it dry before refilling.
- Keep seed dry: place feeders where they get airflow and not constant drips from sprinklers.
- Tidy underneath: rake up hulls and wet seed to discourage rodents and mold.
Style Ideas That Look Intentional (Even If You Built It in Pajamas)
Pick a theme
- “Vintage Tea Party”: florals, gold rims, lace-like patterns, a teapot topper.
- “Coastal”: blues, whites, wave motifs, sea-glass accents.
- “Bold & Modern”: solid colors, geometric plates, clean stacking.
- “Fairy Garden”: tiny cups, miniature spoons, little stone paths around the base.
Use repetition
Repeating a color or motif across different pieces is the easiest trick for cohesion. It’s like an outfit: one statement piece is fun, but three unrelated statement pieces is… a lot.
Troubleshooting (Common Problems and Quick Fixes)
- Wobbly totem: widen the base, add weight at the bottom, or switch to threaded rod for structure.
- Glue joints failing: clean surfaces thoroughly, roughen glossy glaze lightly where hidden, and use outdoor-rated adhesive with full cure time.
- Water collecting inside teapots: drill a discreet drain hole, tip it seasonally, or position the spout so it sheds water.
- Moldy birdseed: reduce how much you put out and clean more oftenespecially after wet weather.
of Real-World Experience: What I’d Do Differently Next Time
The first time you make garden art from vintage teapot and dishes, you think it’s going to be a calm, spa-like craft session. Light music. A gentle breeze. Birds applauding politely. In reality, it’s more like hosting a tiny construction project where the materials are fragile, slippery, and emotionally attached to someone’s grandmother. After enough teapot-and-dish experiments, a few lessons become non-negotiable.
Lesson one: design on the ground before you commit. Stacking plates and cups in your hands feels efficient until you realize the “perfect” top piece makes the whole thing look like a leaning tower of teacups. When you lay everything out first, you can spot problems earlylike a plate that’s visually heavy, a bowl that eats up too much height, or a teapot that looks adorable but turns into a wind sail once it’s elevated. Ground-design also helps you build rhythm: a repeated color, alternating shapes, or a pattern that feels intentional instead of “I bought whatever was $1.”
Lesson two: placement is half the durability. The same dish totem that survives all summer in a sheltered corner can get absolutely humbled by a gusty open spot. If you’re proud of your piece (and you should be), give it a fighting chance: tuck it near a fence, a hedge, or a wall that softens wind. Also, keep it where you can maintain it. Garden art that requires a ladder for cleaning is just a fancy way of saying, “I’ll deal with that never.”
Lesson three: the “right adhesive” is not a suggestion. There’s a special disappointment reserved for watching your teacup feeder separate like a polite breakup after the first hard rain. Outdoor-rated epoxy or silicone can be the difference between “lasting yard charm” and “mysterious porcelain fragments in the mulch.” And cure time is real. If the label says 24 hours, it does not mean “until the glue feels mostly dry and you get impatient.”
Lesson four: teapot planters are happiest when you respect drainage. If you drill a hole, greatyour plant can breathe and you can water normally. If you don’t drill, treat the teapot like a decorative sleeve and use an inner pot. What doesn’t work is guessing. Guessing is how you end up with soggy roots, fungus gnats, and the uncomfortable feeling that you’ve personally disappointed a succulent.
Lesson five: if you make feeders, commit to cleaning. Birds are worth the effort, but feeders get gross fastwet seed, old hulls, and debris build up. A quick scrub routine keeps your feeder safer and keeps birds coming back. Bonus: clean feeders look better, which matters, because you definitely made this partly for joy and partly for the aesthetic.
The best part? Once you’ve built one solid pieceone teacup feeder that holds up, one dish totem that stays straight, one teapot planter that drains you start seeing possibilities everywhere. That “random saucer” becomes a base. That chipped plate becomes mosaic texture. That lonely teapot lid becomes the perfect topper. And your garden stops being just plants; it becomes a gallery where every weird little piece has a job.
Conclusion: Turn Tea-Time Into Yard-Time
Garden art from vintage teapot and dishes is equal parts creativity and practicality: you’re rescuing charming ceramics, giving them an outdoor purpose, and building personality into your landscape. Start small with a teacup bird feeder, level up to a dish totem, and thenif you catch the bugadd mosaic accents and teapot planters for a cohesive theme. Pick outdoor-friendly materials, drill carefully when needed, and treat maintenance as part of the craft.