Halloween decorating is basically interior design… with permission to be dramatic. The trick is to make your table feel
chilling (moody lighting, eerie details, a little “did that candlestick just wink at me?”) without making dinner feel
like an obstacle course of plastic spiders and elbow-jabbing centerpieces.
A great Halloween tablescape is built like a good scary movie: you set the mood, sprinkle in clues, then hit guests with a
few perfectly timed surprises. In this guide, you’ll get an easy, repeatable formula, three ready-to-copy themes, DIY centerpiece
ideas, and practical hosting tipsbecause nothing kills the vibe faster than a candle tipping over or a centerpiece that blocks
every conversation.
Start With the Vibe: Pick a “Spooky Lane” (And Stay in It)
Before you buy anything, decide what kind of spooky you’re serving. Choosing a lane makes your Halloween table decorations look
intentional, not like you panic-bought every aisle at the craft store.
Three foolproof vibe options
- Gothic Glam: black + gold + deep red (roses, pomegranates, velvet ribbon). Elegant, grown-up, photo-ready.
- Haunted Garden: mossy greens, branches, dried botanicals, stoneware. Feels like dinner in a witch’s greenhouse.
-
Modern Monochrome: black + white + one accent (copper, neon green, or blood-orange). Clean lines, high contrast,
low clutter.
Once you’ve chosen your lane, pick a simple color rule: 2 neutrals + 1 accent. For example: black and bone-white,
plus a hit of metallic gold. This small decision is the difference between “editorial spooky” and “yard-sale haunted.”
The 7-Layer Formula for a Chilling Halloween Tablescape
Think of your Halloween tablescape as layers. You can go full haunted mansion or keep it subtle, but the structure stays the same.
Start large, end small.
Layer 1: The Foundation (Tablecloth, Runner, or Bare Wood)
Your base sets the tone instantly. For a chilling look, skip busy patterns unless they’re intentional (like a vintage damask).
Options that work every time:
- Black tablecloth for instant drama (even if everything else is simple).
- Cheesecloth runner in charcoal or bone-white for a “fog rolling in” effect.
- Bare wood plus a narrow runner to keep the table warm and grounded.
Pro move: if your tablecloth is dark, add a lighter runner for contrast. If your base is light, use a dark runner to create depth.
Layer 2: The Charger or “Anchor Plate”
Chargers are the easiest way to make a Halloween dinner party feel styled. If you don’t own chargers, use a larger plate, a
thrifted platter, or even a painted wood round. Popular choices:
- Matte black (modern, chic, hides crumbs like a champ).
- Antique gold or brass (instant gothic glam).
- White with a black rim (classic and crisp).
Layer 3: The Place Setting (Napkin, Flatware, One “Moment”)
Your place settings are where guests get close enough to notice detailsso give them one delightful little “moment” each.
Keep it simple:
- Napkins: black linen, gauze, or even kraft paper for a potion-label vibe.
- Flatware: gold for glam, black for modern, silver for haunted manor.
- The “moment”: a mini pumpkin, a sprig of rosemary tied with twine, a tiny faux bat clip, or a spooky name card.
Layer 4: Centerpiece (Low, Long, and Conversation-Friendly)
Centerpieces should create moodnot take over the table like a needy houseplant. For a chilling Halloween tablescape, aim for
low and long (or tall and skinny, if height is your thing).
- Low + long: garland, moss runner, clustered pumpkins, a line of candles.
- Tall + skinny: branches in a vase, taper candles in thin holders.
Rule of thumb: if guests have to lean left and right like they’re dodging a traffic cone, your centerpiece is too tall.
Layer 5: Lighting (The Fastest Way to Make It “Chilling”)
Lighting is the secret sauce. Overhead lights scream “Parent-Teacher Conference.” Candlelight says “Welcome to my tasteful crypt.”
Mix your lights:
- Taper candles for height and elegance.
- Votives or tea lights to fill in the glow.
- String lights tucked into greenery for subtle sparkle.
- Flameless candles if kids, pets, or energetic sleeves are involved.
Safety note: if you use real flames, keep candles away from anything that can burn, avoid drafts, use sturdy holders, and never
leave them unattended. (See safety sources [S1].)
Layer 6: Texture + “Spooky Props” (A Little Goes a Long Way)
This is where you add the Halloween. The goal is eerie elegance, not “my table got attacked by a dollar-store spider.”
Choose one or two texture families:
- Botanical: dried eucalyptus, black feathers (faux), moss, branches, dark florals.
- Bone + stone: little skull accents, stoneware, black glass.
- Vintage apothecary: amber bottles, labeled jars, cloches, old books (real or faux).
Keep props out of food zones. Decorative “potion bottles” are cute; decorative potion bottles next to the salad are… a trust exercise.
Layer 7: The Finishing Touches (Place Cards, Menus, and Tiny Surprises)
This layer is optional, but it’s what makes guests say, “Okay, you really did the thing.”
- Place cards: tiny tombstones, black cardstock, or tags tied to napkins.
- Mini menus: a simple printed card with “Tonight’s Spells.”
- One surprise: a tiny chocolate “bat,” a faux key labeled “Basement,” or a single black rose on the host’s plate.
Three Ready-to-Copy Themes for a Chilling Halloween Tablescape
Theme 1: Gothic Glam (Black, Gold, and “Expensive Haunted”)
This theme is perfect if you want spooky tablescape ideas that look elegant in photos and work for both dinner and dessert.
Think: black matte plates, gold utensils, and moody florals. (This “elevated serveware” approach is a consistent recommendation
in entertaining coverage [S2].)
- Palette: black + antique gold + deep red or plum.
- Centerpiece: a line of taper candles with small pumpkins and dark roses tucked between.
- Texture: velvet ribbon, satin napkins, or a black lace runner (used sparingly).
- Finishing touch: name cards in gold pen on black tags.
Keep it classy: choose one “creepy” element (skull napkin rings, tiny bats, or a single candelabra). Too many creepy items and
it becomes a haunted souvenir shop.
Theme 2: Haunted Garden (Moody Greens, Branches, and Witchy Botanicals)
If you like natural textures, this is your lane. It’s also forgiving if your budget is small: branches and greenery do a lot of
visual work for free.
- Palette: moss green + black + bone-white.
- Centerpiece: a moss runner (real or faux) with clustered gourds and scattered votives.
- Height: black-painted branches in a vase, kept to the center so guests can still see each other.
- Finishing touch: rosemary “herb bundles” tied to napkins like mini spell ingredients.
For a chilling twist, add one “specimen” detail: a cloche over a mini pumpkin, a labeled jar of “Nightshade Seeds” (aka peppercorns),
or a single dramatic bloom in an amber bottle.
Theme 3: Modern Monochrome (High Contrast, Low Clutter, Big Impact)
This is the best option if you want your Halloween table decor to feel stylish, not cluttered. It’s also the easiest to pull off
with items you already own.
- Palette: black + white + one accent (copper, orange, or neon green).
- Centerpiece: white mini pumpkins clustered with black candleholders.
- Pattern: use one graphic element (stripe runner, checker napkins, or spiderweb-etched glasses).
- Finishing touch: modern name cards with a tiny bat silhouette.
If you want a little extra bite, make the accent “unexpected,” like copper flatware or a single bright chartreuse ribbon.
It reads “designer,” not “seasonal aisle.”
DIY Halloween Centerpiece Ideas That Don’t Block Eye Contact
Centerpieces are where most tablescapes either shine or collapse under their own ambition. Here are three options that look
impressive but still leave room for conversation.
1) The Pumpkin Vase (Easy, Photogenic, Surprisingly Elegant)
- Choose a medium pumpkin with a stable bottom (white pumpkins look especially chic).
- Cut a lid and scoop out the inside.
- Place a small cup or jar inside to hold water (keeps the pumpkin from turning into a science experiment).
- Add greenery first, then flowers, then one dramatic element (like dark berries or a tall stem).
Want it more chilling? Use deep burgundy flowers, black-painted faux stems, or dried elements. Want it modern? Keep the arrangement
mostly white with a single dark accent.
2) The “Haunted Branch” Centerpiece (A Little Witchy, Very Fast)
- Find a few clean, dry branches (craft store or outdoors).
- Spray paint matte black (outside, because lungs are not decorative).
- Place in a heavy vase with stones for stability.
- Hang paper bats or tiny ornaments on thin thread.
This works especially well on a buffet table or sideboard, where height is welcome and plates aren’t flying around.
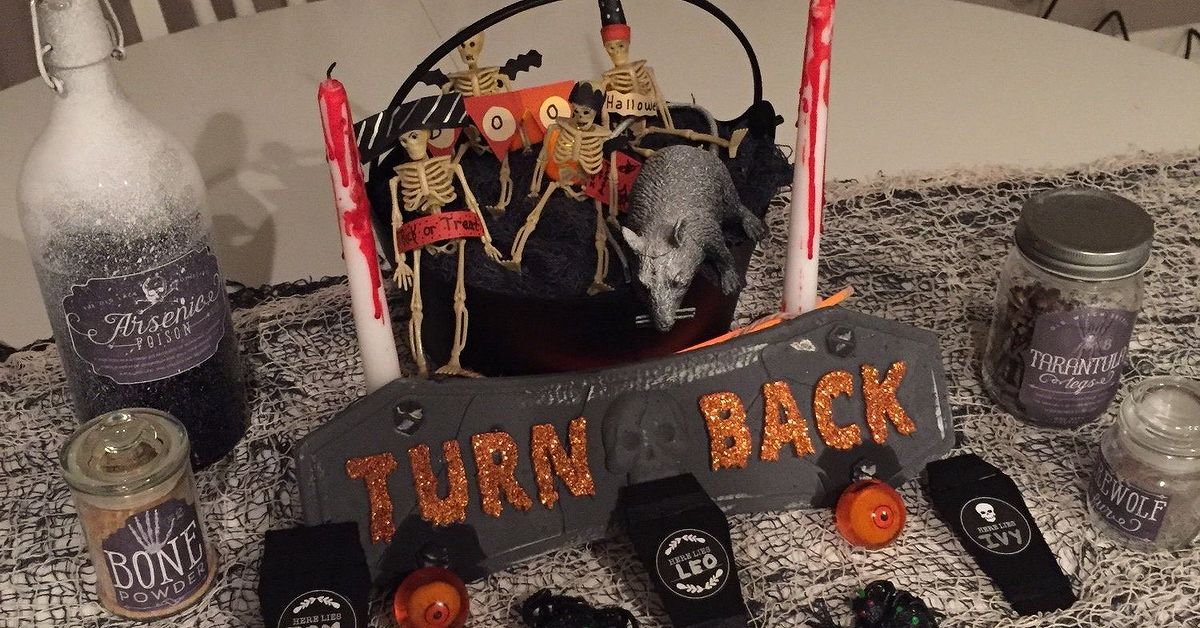
3) The Apothecary Row (Perfect for a Witchy Tablescape)
Line up three to five small bottles or jars (amber glass looks amazing) and fill them with:
- Rosemary sprigs, dried flowers, or eucalyptus
- Battery fairy lights
- Black sand or tiny stones
Add simple labels like “Elixir,” “Moon Dust,” or “Graveyard Herb” for charm. Keep labels minimal so it feels playful, not cheesy.
Food + Drink Styling That’s Spooky (But Still Practical)
A Halloween dinner party tablescape should make serving easier, not harder. The easiest way to do that is to design zones:
a dining zone (plates, candles, centerpiece) and a serving zone (food and drinks). If your table is small, put food on a sideboard
and let the table be the mood.
Make the menu match the tablescape
- Gothic Glam: dark berries, blackberries, pomegranates, chocolate, black napkins.
- Haunted Garden: herb-forward bites, “forest” colors, rustic boards.
- Modern Monochrome: high-contrast treats (white frosting with black sprinkles, orange accents).
Keep it safe and stress-free
If you’re serving perishable foods, don’t leave them out at room temperature for too long. A good rule is to refrigerate leftovers
quickly and follow the “two-hour” window for foods that need temperature control (and shorten that window in very hot conditions).
(See food-safety sources [S3].)
For drinks, go with festive mocktails and kid-friendly options: citrus “witch fizz,” sparkling juice with a
gummy “eyeball,” or lemonade with a black-sugar rim. Halloween should be spookyyour choices should still be age-appropriate.
Budget-Friendly Tricks That Still Look High-End
- Shop your house first: candlesticks, glass bottles, old books, trays, and fabric scraps can become decor.
- Thrift for texture: brass candleholders, vintage plates, and amber glass bottles are tablescape gold.
- Repeat shapes: clusters of mini pumpkins look expensive because repetition reads “designed.”
- Use printables: place cards and mini menus on cardstock instantly look polished.
- Choose reusable spooky: black linen napkins and neutral pumpkins work for fall, not just Halloween.
Kid- and Pet-Safer Halloween Tablescape Ideas
If your household includes curious hands, tails, or a cat who considers taper candles a personal challenge, you can still create
a chilling Halloween tablescape:
- Use flameless candles (the glow is still dramatic).
- Skip tiny choking hazards (mini beads, loose “eyeballs,” confetti).
- Keep breakables toward the center and use sturdy holders (see candle safety source [S1]).
- Choose soft textures (gauze runner, fabric pumpkins) instead of sharp props.
Set-Up Timelines: 30 Minutes, 2 Hours, or “I’m Planning Like a Legend”
30-minute quick set (low effort, high impact)
- Runner or cloth
- Plates + napkins
- Clustered mini pumpkins + 6–10 votives
- Simple place cards
2-hour set (the sweet spot)
- Add chargers and upgraded glassware
- Build one DIY centerpiece (pumpkin vase or apothecary row)
- Add a second lighting layer (tapers + votives)
- Style a serving zone on a tray or sideboard
Day-before set (for maximum chill, minimal scramble)
- Prep place cards and menus
- Gather centerpiece supplies and test the layout
- Stage non-perishable serving pieces
- Do a “walk-around” to check traffic flow and candle placement
Common Mistakes That Make a Halloween Tablescape Feel Messy
- Too many themes: pick one lane. “Gothic Glam + Cute Pumpkins + Neon + Pirates” is… a lot.
- Centerpieces too tall: chilling should not mean “I can’t see my friends.”
- Overdoing cobwebs: use them like seasoning, not a blanket.
- Lighting only overhead: layer candlelight or warm lamps for mood.
- Decor where food needs to land: leave space for plates, serving bowls, and hands.
Conclusion: Your Table, But Make It Delightfully Unsettling
Creating a chilling Halloween tablescape isn’t about buying more stuffit’s about building mood on purpose. Pick a vibe, stick to
a tight color palette, and layer your table in a way that feels designed: foundation, place settings, centerpiece, lighting, then
a few perfectly chosen spooky details.
If you do nothing else, remember this: candlelight + repetition + one dramatic focal point is the fastest path to
“wow.” Your guests will feel the atmosphere the second they sit downand your photos will look like you hired a stylist (even if
you did it in sweatpants while whispering, “Why is there glitter on my soul?”).
Extra Hosting Experiences: What People Usually Notice (And What They’ll Remember)
Here’s the funny thing about Halloween tablescapes: the details you stress over are rarely the parts guests talk about the next day.
Most people won’t remember whether your napkins were charcoal or true black. But they will remember how the table made them
feelcozy, intrigued, a little spooked, and very much included.
In real homes, the most successful “chilling” tables tend to share a few lived-in truths. First: lighting wins. Guests respond to
warm, low light instantly because it changes the whole mood of the room. Even a simple setupmini pumpkins and a line of votives
can look intentional when the glow is right. People lean in a little closer, voices soften, and suddenly the table feels like an
event, not just a meal. That’s also why many hosts end up turning off the overhead lights within five minutes of guests arriving.
It’s practically a Halloween ritual.
Second: comfort matters more than perfection. A gorgeous centerpiece that makes it hard to pass a platter or set down a glass will
quietly annoy everyone, even if they’re too polite to say it. The best tablescapes leave breathing room. When guests can actually
use the table easily, they relaxand relaxed guests are the ones who laugh, take photos, and stay longer. If you’re unsure, do a
quick “plate test” before anyone arrives: set down a plate, a glass, and a napkin at each seat. If it feels cramped, edit the decor.
Editing is not quitting. Editing is hosting.
Third: the “tiny moment” at each place setting is the detail guests notice the most. It doesn’t have to be expensive. A name card
on black cardstock, a mini pumpkin, or a rosemary sprig tied with twine gets picked up, admired, and often photographed. It also
creates that warm feeling of “this was made for us,” which is the opposite of scarybut somehow makes the spooky vibe even better.
Finally: people remember the one surprise. Not twenty surprises. One. A cloche with a little “specimen” inside, a row of amber
bottles with playful labels, or a single dramatic candelabra becomes the table’s main character. Guests point at it, ask where you
found it, and then the conversation starts. That’s the real magic of a chilling Halloween tablescape: it gives people something to
talk about the moment they sit down, and it keeps the gathering feeling special even if the menu is simple.
So if you’re styling and you feel yourself spiralingbecause the napkins aren’t perfect, or the pumpkins are slightly different
sizesremember the real-world win: mood, comfort, and one memorable focal point. Do those three things, and your table will feel
like Halloween in the best possible way.