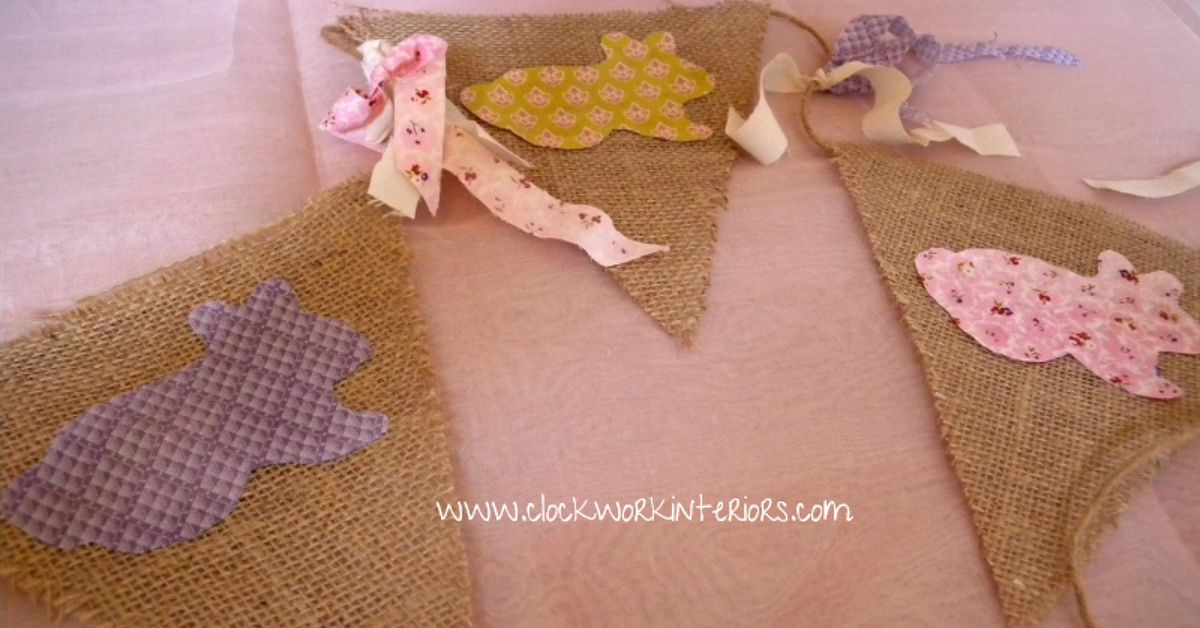
If your home decor mood is “spring, but make it rustic,” a burlap bunny bunting is basically your love language.
It’s cute, it’s cheap, it’s wildly forgiving, and it has one job: show up, look charming, and make your mantle
feel like it drinks iced coffee year-round.
The best part? You can absolutely make this in 15 minutes of hands-on timeespecially if you keep it
no-sew, skip complicated painting, and embrace the slightly wonky farmhouse vibe. (Burlap is supposed to look
a little rebellious. That’s part of the charm.)
What You’re Making (In Plain English)
A string of small burlap flags (the “bunting”) decorated with bunny shapes (the “aww”) that you can hang across a
mantel, shelf, doorway, or even a blank wall that’s been begging for a personality.
Materials and Tools
Pick the “fast” version if you want to finish in 15 minutes:
- Burlap: pre-cut burlap pennants or burlap ribbon (fastest), or a small piece of burlap fabric
- Jute twine or sturdy string (about 6–10 feet, depending on where you’ll hang it)
- Hot glue gun + glue sticks (the speediest “no-sew” superhero)
- Scissors (sharp onesburlap laughs at dull scissors)
- White cardstock or paper (to make a bunny template) OR a printable bunny silhouette
- Marker or chalk (for tracing)
Optional (for extra cuteness without extra stress):
- Acrylic craft paint or fabric paint (white is classic)
- Foam pouncer, sponge brush, or stiff stencil brush (less bleeding than a floppy paintbrush)
- Mini pom-poms, cotton balls, or felt dots (for tails)
- Ribbon scraps, twine bows, faux flowers, mini clothespins
- Mod Podge + patterned paper (for decoupage-style bunnies)
- Heat-bond/iron-on adhesive (helps control fraying if you have time)
The 15-Minute Game Plan
This is the “I need it cute, I need it now” schedule. Your hands do the work in 15 minutes. Drying time (if you
paint) is extra, but you can cheat that with thin coats and quick-dry paint.
- Minute 1–3: Cut your burlap flags (or unwrap pre-cut flags like a crafting genius).
- Minute 4–6: Trace and cut a simple bunny template.
- Minute 7–10: Trace bunnies onto the flags (or stencil/paint if you’re feeling fancy).
- Minute 11–13: Add tails and quick details.
- Minute 14–15: Glue flags onto twine, space them out, and hang.
Step-by-Step: Make a Burlap Bunny Bunting (No-Sew)
Step 1: Decide Your Bunting Size (So You Don’t Make a Bunny Parade Accidentally)
First, pick where it’s going: mantle, shelf, doorway, wall, or above a dessert table (bunnies love snacks).
Measure the space and add extra twine on both ends so you can tie it up easily. A good rule:
add 8–12 inches of twine on each end for tying.
For flag size, a fast, balanced look is:
5–6 inches wide and 6–7 inches tall per flag.
Plan on 7–11 flags for a standard mantle, or fewer for a mini banner.
Step 2: Cut the Burlap Flags (Fast and “Rustic”)
If you have burlap ribbon, you can cut flags like you’re making sandwichesefficiently and with confidence.
If you’re cutting from burlap fabric, lay it flat and cut rectangles first, then cut a triangle notch at the bottom
(classic pennant shape).
Speed tip: Don’t fight fraying too much. Light fray = texture. Total unraveling = chaos. Aim for texture.
Step 3: Make a Bunny Template (Yes, You Can Draw One)
Grab cardstock or thick paper. Draw a simple bunny silhouette: a rounded head, body, and two ears.
This is not a museum commission. This is a bunting bunny. If your bunny looks like it had a big day,
that’s personality.
Cut out the bunny template. If you want consistency, fold the paper in half before cutting so both sides match.
If you want “handmade charm,” cut it freehand and call it a design choice.
Step 4: Add Bunny Shapes to the Flags (Choose Your Style)
Option A: Trace + Paint (Classic Farmhouse)
- Place the bunny template on a flag and trace lightly with chalk or a faint marker.
- Use a sponge pouncer to dab on paint (dabbing reduces paint bleed through burlap’s open weave).
- Do one thin coat first. If you need more coverage, add a second thin coat.
Option B: Cut-Out Bunnies (No Paint, All Speed)
- Trace the bunny onto felt, cardstock, or patterned paper.
- Cut it out and glue it onto the burlap flag.
- This is the fastest way to get crisp bunnies without drying time.
Option C: Decoupage (Pretty + Forgiving)
- Cut bunny shapes from patterned paper (florals look amazing for spring).
- Brush a thin layer of Mod Podge on the back of the paper bunny.
- Press onto burlap and smooth gently. Seal with a light coat on top.
Step 5: Add the Bunny Tail (Because This Is Non-Negotiable)
Add a cotton ball, pom-pom, or felt dot right where a bunny tail should be. Hot glue works great, but use a small
dottoo much glue can soak into burlap and look shiny.
Easy style upgrades:
- Use different tail textures: yarn pom-poms, fluffy felt circles, mini rosettes.
- Add tiny bows at the ear base using ribbon scraps or twine.
- Make “boy/girl bunnies” with bow ties and hair bows (optional, but adorable).
Step 6: Attach Flags to Twine (The No-Sew Fold-Over Method)
Lay your flags face down (upside down helps you line up the top edge neatly).
Place the twine about 1/2 inch from the top edge, then fold the top edge of burlap over the twine
and glue it down. This creates a clean “pocket” that holds the banner on the string.
- Cut twine to length and leave extra on both ends for hanging.
- Arrange flags in order with about 1/2–1 inch spacing between each (or closer for a fuller look).
- Hot glue the twine to the back top edge of each flag, then fold down and glue the flap.
- Press for a few seconds so the glue sets.
When you’re done, lift the banner by the twine and gently shake it like a victorious flag of spring.
If a flag slides, add another small dot of glue inside its fold.
Step 7: Hang and Style It Like You Meant to Do That All Along
Tie the ends to hooks, nails, knobs, or removable wall hooks. You can also drape it across a mantel and tuck the
ends behind decor. Pair it with simple greenery, pastel eggs, or a small basketinstant spring moment.
Pro Tips to Keep It Fast (and Not a Burlap Disaster)
- Protect your surface: paint and glue can seep through burlap. Put down cardboard or freezer paper.
- Use dabbing, not brushing: pouncing paint reduces bleed and keeps edges cleaner.
- Thin coats win: one heavy coat turns into blotchy bunny soup.
- Embrace fray strategically: pull a few threads for a rustic edge, but stop before it unravels.
- Hot glue control: small dots, quick presses. Let the gun warm fully for smoother lines.
Design Variations (Same Bunny Energy, Different Aesthetic)
1) Modern Minimal
Use white felt bunnies on natural burlap, skip tails, and space flags wider apart. Keep the twine taut and the
shapes simple for a clean look.
2) Cottagecore Floral
Decoupage floral bunnies, add lace trim along the top edge of each flag, and use soft pastel ribbon instead of twine.
Warning: you may suddenly want to host a tea party.
3) Kid-Friendly “Make It Messy”
Let kids finger-paint dots on the flags, then you add the bunny shapes and tails afterward. The bunting will look
joyful and chaotic in the best waylike spring break, but on a string.
4) Cricut / Cutting Machine Shortcut
If you have a cutting machine, you can cut consistent bunny shapes from burlap (or from iron-on vinyl and apply it).
This adds speed for people who enjoy technology helping them craft like a tiny robot assistant.
Common Problems (and the Quick Fixes)
“My paint bled through and my bunny looks fuzzy.”
- Use less paint, dab instead of brush, and do two thin coats.
- Place cardboard under the burlap while painting to prevent seep-through.
- Consider felt/paper bunnies if you want super crisp edges fast.
“My burlap is fraying like it’s trying to escape.”
- Trim loose threads and add a tiny line of glue along the cut edge (on the back) to stabilize.
- Cut with sharp scissors; dull blades pull threads and start the unraveling early.
- Lean into a controlled fray for texture, but stop before it becomes fringe.
“My flags are sliding on the twine.”
- Add an extra dot of hot glue inside the fold-over pocket.
- Make sure the twine is glued and the flap is firmly pressed.
- Use a slightly thicker string if your burlap is stiff and springy.
Storage and Reuse
To store your bunting, wrap it around a piece of cardboard (like a ribbon spool) so the flags don’t crease.
Keep it in a dry binburlap and moisture do not have a healthy relationship.
Experience-Based Notes and Real-World Tips (500+ Words)
Here’s what tends to happen when people actually make burlap bunny bunting in real lifemeaning: at a kitchen table,
with a glue gun that’s either too hot or not hot enough, and at least one person asking, “Is it supposed to look like that?”
These are practical lessons gathered from common crafting outcomes and repeat fixes (aka the stuff you learn after
bunny #2, not bunny #12).
First: the “15 minutes” promise is most realistic when you treat the project like a sprint and not
a full interior design phase. The biggest time-saver is choosing a decoration method that doesn’t require drying.
Felt bunnies glued onto burlap flags? Fast. Painted bunnies with two coats plus touch-ups? Still easy, but the
drying minutes sneak in like a cat onto a fresh craft surface.
Second: cutting is where people accidentally waste time. The fastest approach is using burlap ribbon
or pre-cut pennants, because measuring each flag turns into a “wait, are these even?” debate. If you do cut your own,
a simple trick is to cut one “master” pennant first, then trace it repeatedly. It keeps your shapes consistent and
makes the whole bunting look more polishedeven if your bunnies have slightly different ear personalities.
Third: painting burlap is all about pressure and paint amount. People who brush paint on like they’re
painting a bedroom wall usually end up with a bunny that looks like it’s dissolving into the weave. The craft
improvement that changes everything is switching to a sponge pouncer or a stiff stencil brush and using a “tap-tap”
motion. You get better edges, less soak-through, and you don’t have to keep rescuing the outline.
Fourth: hot glue strategy matters. The most common complaint isn’t that the bunting falls apartit’s
glue strings. If you’ve ever looked down and realized your craft has spiderwebs, you’re not alone. A fully warmed
glue gun helps, and so does using small glue dots instead of long swipes. People also find that pressing the fold
for a solid 3–5 seconds per flag prevents later shifting. It doesn’t sound like much, but on the wall, a banner
that stays spaced evenly looks ten times more intentional.
Fifth: tails are the quickest “wow” detail, and they also hide imperfections. If one bunny is a little
off-center, adding a fluffy tail draws the eye right where you want it. Cotton balls look classic, pom-poms look
playful, and felt dots look clean and modern. Some crafters like layering a small felt circle under a pom-pom so the
glue doesn’t soak into the fluff. That’s a tiny detail that makes the finish look neater.
Finally: the most satisfying real-world upgrade is making the bunting match your space. People who
already have neutrals and wood tones in their decor love plain burlap + white bunnies + twine. If your home leans
colorful, adding patterned paper bunnies or floral decoupage makes it feel like spring without turning the room into
an Easter aisle explosion. And if you’re gifting it, adding initials or a short phrase (“HOP,” “SPRING,” “HELLO”) on
a few flags makes it feel custom without adding much time.
In short: the bunting is fast because it’s simple, but it looks “expensive-cute” when you focus on clean shapes,
consistent spacing, and one standout detail (usually the tails). That’s the sweet spot where a 15-minute craft
looks like you planned it for dayswithout actually sacrificing your afternoon.
Conclusion
A burlap bunny bunting is one of those rare crafts that checks every box: quick, affordable, beginner-friendly,
and cute enough to make your space feel instantly seasonal. Keep it simple for a true 15-minute win, or add paint,
tails, bows, and patterns if you want a banner that looks straight out of a spring home tour. Either way, you’ll end
up with decor that feels handmade (in the best way) and reusable year after year.