If you’ve ever looked at a deco mesh flower wreath and thought, “That’s adorable… and also I might need a second mortgage to buy it,”
I have good news: you can make one yourself. Even better news: you’ll end up with a bold, petal-packed daisy that looks like it belongs
on a magazine cover (or at least on your front door where your neighbors will pretend they’re not jealous).
This tutorial walks you through a classic deco mesh daisy petal wreath build using a wire frame, plastic canvas support,
and simple petal folds that create that signature “3D flower” look. You’ll also get pro-level fixes for the most common problems
(crooked petals, fraying mesh, and the mysterious case of the lumpy center).
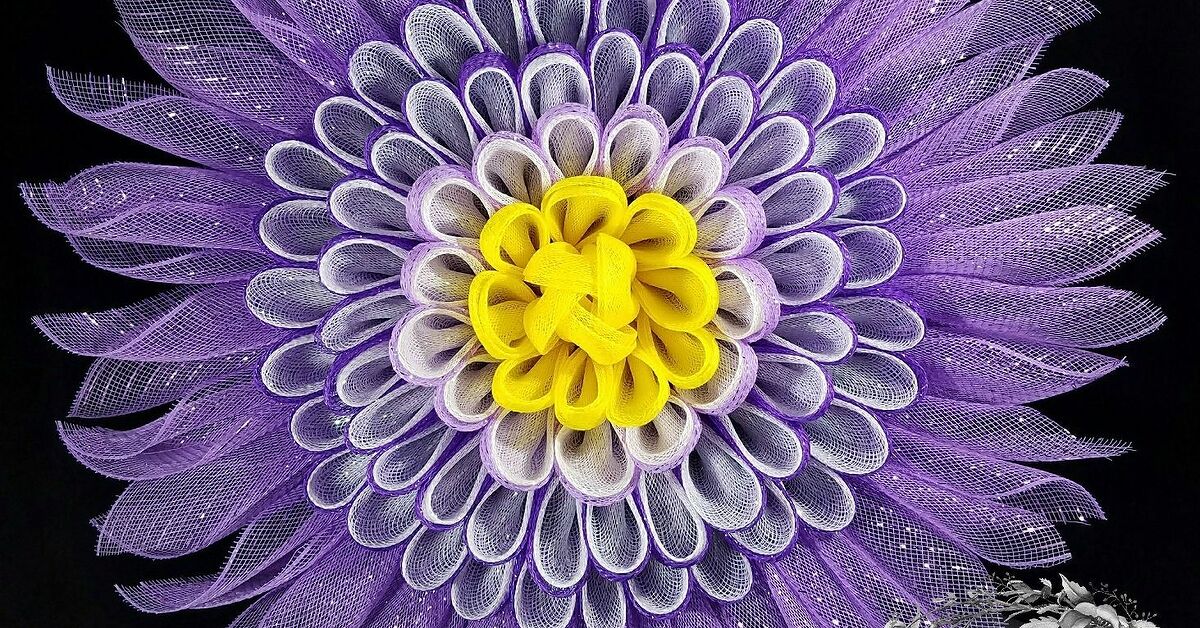
Why a Deco Mesh Daisy Wreath Works So Well
A daisy petal wreath is basically the extrovert of the wreath world: bright, fluffy, and impossible to ignore. Deco mesh and poly burlap mesh
hold shape beautifully, create huge volume with minimal material, and survive busy households better than delicate dried florals.
With the right base structure (hello, plastic canvas), you can keep petals evenly spaced and make the center look intentional
not like a crafting accident you’re calling “rustic.”
Supplies and Tools
Here’s what you’ll want on your craft table before you begin. (Pro tip: put snacks nearby. Petal folding is oddly hypnotic and time disappears.)
Core Materials
- Wire wreath frame (10–14 inch frame works great; the finished flower will measure larger once petals are added)
- 10-inch deco mesh or poly burlap mesh (petals); optional green mesh for leaves
- Plastic canvas mesh sheet (used as a “petal platform” and center support)
- Zip ties (small/medium) and/or chenille stems (pipe cleaners)
- Flower center: pre-made center, faux flower bundle, felt circle, burlap rosette, ribbon rosette, or a decorative sign
- Optional accents: ribbon tails, mini florals, ladybug picks, greenery, or bow
Tools That Make Life Easier
- Rotary cutter + self-healing mat (fast, clean cuts)
- Sharp scissors (for ribbon and trimming)
- Wire cutters (your scissors deserve better)
- Hot glue gun (optional but helpful for centers and small accents)
- Ruler or cutting guide (for consistent petal size)
Mesh Choices (Quick, Useful Breakdown)
- Poly burlap mesh: crisp petals, strong structure, slightly more “fabric” look.
- Standard deco mesh: fluffy and forgiving, great for bright daisies.
- Metallic mesh: extra sparkle, but can be pokier (it’s basically glitter’s tougher cousin).
Before You Start: Choose Your Daisy “Recipe”
Your color plan keeps the wreath from looking chaotic. Pick one main petal color, one center color, and (optional) one leaf color.
Here are a few combos that always behave nicely:
- Classic Daisy: white petals + yellow center + green leaves
- Spring Pop: hot pink petals + lime center + teal accents
- Sunflower-ish: golden yellow petals + brown center + deep green leaves
- Patriotic Daisy: white petals + red/blue center + navy bow
Step-by-Step: Build the Base (Plastic Canvas Support)
Plastic canvas is the secret sauce that makes your petals consistent and your center attachment easy.
Think of it like a “tiny stage” where your daisy gets to be the main character.
Step 1: Measure and Cut the Plastic Canvas Circle
- Measure the open center of your wire frame.
- Cut a plastic canvas circle slightly smaller than the inner opening so it fits neatly inside.
-
If you’re using a 10-inch style work frame, many makers find a circle around 6–7 inches works well
because petals and center decor will visually cover the edges.
Step 2: Attach Plastic Canvas to the Wire Frame
- Set the canvas in the center of the frame.
- Use zip ties or chenille stems to fasten the canvas to the inner ring at multiple points (aim for evenly spaced ties).
- Snip zip tie tails cleanly and rotate cut ends toward the back so they don’t show from the front.
Optional: If the back of your wreath will be visible (glass door, storm door, or you’re gifting it to someone with a mirror obsession),
add a felt backing later to hide mechanics.
Step-by-Step: Make the Daisy Petals
We’re using a classic “triangle fold” petal that creates a crisp point and a nice, full body. The goal is consistent size,
consistent pinch point, and consistent attachment spacingbecause “even petals” is what separates “wow” from “why.”
Step 3: Cut Your Mesh Pieces
Cut mesh into 10-inch squares (or 10–10.5 inches if your mesh is a bit stiff and you want bigger petals).
For a standard full daisy look, plan for:
- 24 petals for a single, full layer (great for a clean daisy)
- 36–48 petals for a double-layer, extra-fluffy flower (great for “I want drama”)
Fray control tip: If you’re working with poly burlap and you want clean edges, use a wood-burning tool on a glass surface
to seal edges while cutting. If you don’t have that setup, a rotary cutter and steady pressure still worksjust expect a little fluff at the edges.
Step 4: Fold One Petal (Repeat Forever, But With Confidence)
- Lay one mesh square flat like a diamond (one corner pointing up).
- Fold corner-to-corner to make a triangle.
-
Take the left and right corners and fold them inward toward the top point, creating a “kite” shape.
(You’re basically doing fancy paper airplane moves, but for home decor.) - Flip it over and pinch the bottom edge together to form a gathered base.
- Secure the pinch with a short chenille stem twist or hold it firmly if you’re inserting into a zip tie next.
Step 5: Decide How You’ll Attach Petals
You can build petals onto the wire frame itself, or (my favorite for symmetry) use the plastic canvas holes as attachment points.
Here’s the difference:
- Chenille stems: easy repositioning while you “audition” petals; great for beginners.
- Zip ties: tight, secure hold; great for durability and long-term shape.
Step-by-Step: Attach Petals and Build the Daisy Shape
Step 6: Create Petal Placement “Zones”
To keep spacing even, mentally divide the wreath into quarters (top, bottom, left, right). Place a petal at each “compass point” first.
Now the rest of your petals have a map instead of vibes.
Step 7: Attach the First Petal Layer
- Start at the bottom of the wreath (it’s the least visible while you warm up).
- Insert the pinched base into a plastic canvas hole area or onto the inner ring area of your frame.
- Secure with a zip tie or chenille stem.
- Angle petals slightly outward so the flower looks open and dimensional.
- Continue around until the first layer is complete.
Step 8: Add a Second Layer (Optional, But Delightful)
If you want a fuller, more 3D daisy, add a second layer closer to the center, staggering petals so they sit between the petals of the first layer.
This “brick-lay” pattern hides mechanics and makes the flower look intentionalnot like a craft store exploded politely.
Step 9: Fluff Like You Mean It
Deco mesh has memory. You’re training it. Pull petals forward, separate layers, and rotate the wreath as you fluff.
Step back every few minutes and look at it from 6 feet away (the “front door distance”).
Build the Center: The Part Everyone Stares At
The center is the wreath’s personality. Petals are the outfit; the center is the facial expression.
Option A: Ribbon Rosette Center (Classic and Pretty)
- Cut wired ribbon (or burlap ribbon) and twist it into a spiral rosette.
- Hot glue layers as you spiral.
- Glue the finished rosette to a felt circle.
- Attach to the plastic canvas center using zip ties, wire, or chenille stems (glue alone can fail outdoors).
Option B: Faux Floral Cluster Center (Fast and “Fancy”)
- Bundle a few faux florals and greenery.
- Trim stems and wrap with floral wire.
- Zip-tie the bundle through the plastic canvas holes and add a dab of glue for extra grip.
Option C: Sign Center (Cute, Themed, and Very Sellable)
- Add zip tie mounts or staple chenille stems to the back of the sign.
- Feed stems through the plastic canvas holes and twist tightly on the back.
- Hide the mechanics with a small bow or extra petal cluster.
Add-Ons That Make It Look Professional
Ribbon Tails (The “Instant Upgrade”)
- Cut 8–12 inch tails, dovetail ends, and tuck them between petals.
- Keep patterns consistent: one plaid + one solid + one accent is usually enough.
Leaves (Because Daisies Appreciate Context)
- Make leaf petals using green mesh pieces with the same triangle fold method.
- Place leaves at 4–6 spots around the base to frame the flower without overwhelming it.
Troubleshooting: Fix the Stuff That Makes People Quit
“My petals aren’t the same size.”
This is nearly always a cutting consistency problem. Use a ruler and batch-cut your mesh squares. If you already attached petals,
move the “smaller” petals toward the bottom or behind the bow/center where the eye doesn’t linger.
“My mesh is fraying like it has a personal grudge.”
Poly burlap frays less than some loose weaves, but any mesh can fray if cuts are jagged. Rotary cutter helps.
For ultra-clean edges, seal cuts using a heated cutter on a safe surface (glass), and keep a fan or ventilation going.
“My center looks lumpy.”
You likely have too many mechanics stacked in one spot. Spread attachments around the plastic canvas, rotate zip tie heads to the back,
and trim tails clean. If needed, add a felt circle “cover” before attaching the decorative center.
“Zip ties are showing.”
Use zip ties in a color close to your mesh, keep heads on the back side, and don’t over-tighten until you’re happy with placement.
Then cinch for durability.
How Big Will the Finished Wreath Be?
Even a smaller wire frame can produce a big flower. As a rough guide:
- 10–12 inch frame + petals = typically finishes around 18–24 inches across (depending on petal length and layering)
- 14–16 inch frame + petals = can finish 24–30+ inches across (a true “statement” door moment)
Care and Hanging Tips (So It Stays Cute)
- Hang under cover if possibledirect sun can fade bright mesh over time.
- Use a sturdy hanger or a wreath hook that doesn’t crush petals.
- Store in a large wreath container or a garbage bag with plenty of space so petals don’t flatten.
- Fluff after storage: a quick reshape brings it back to life in minutes.
FAQ
Can I make this without plastic canvas?
Yes, but plastic canvas makes the center easier and keeps petal spacing more controlled. If you skip it,
attach petals directly to the frame and use a felt circle or pre-made center that can be wired to the inner ring.
Zip ties or pipe cleaners: which is better?
Pipe cleaners are easier for beginners because you can adjust petals without cutting anything. Zip ties are sturdier for long-term hanging.
Many makers start with pipe cleaners for placement, then reinforce with zip ties where needed.
What’s the best mesh width for petals?
For petal pieces, 10-inch mesh is the sweet spotlarge enough for dramatic petals, easy to cut into squares,
and compatible with most wreath frames and flower boards.
Final Fluff: Your Daisy Is DoneNow Make It Yours
Once your petals are full, your center is secure, and your add-ons feel balanced, you’ve officially built a
deco mesh daisy petal flower wreath that looks custom (because it is).
Make a second one if you wantyour first wreath always deserves a sibling. Plus, it’s easier the second time,
because your hands finally understand what “pinch the base” means without filing a complaint.
Real-World Crafting Experiences: What It’s Actually Like Making a Deco Mesh Daisy Wreath
The first time most people try a mesh flower wreath tutorial, they expect a calm, Pinterest-perfect evening with a candle burning softly in the background.
What they get is more like: mesh glitter in places that should never sparkle, a growing pile of zip tie tails, and the sudden realization
that “just one more petal” is the crafting equivalent of “just one more episode.”
One of the most common experiences crafters report is how quickly a daisy petal wreath goes from “this looks like a sad sea creature”
to “WAIT… this is actually working.” The turning point is almost always the same: you finish about 70% of the petals, you fluff them,
you step back, and your brain finally sees a flower instead of a science project. That’s why the “front door distance check” is so powerful.
Up close, you notice every tiny inconsistency. From a few feet away, you see what guests see: a bold, cheerful daisy with real depth.
Another very real moment: the Great Petal Debate. Halfway through, you start questioning everything. “Are my petals too pointy?”
“Why does this side look fuller?” “Did I attach that one upside down… or is it just confident?” This is normal.
Mesh has personality, and each roll behaves a little differently. The solution isn’t panicit’s consistency.
Cut your pieces in batches, fold with the same motions each time, and attach petals in a repeating pattern.
Most “uneven” wreaths don’t need a redesign; they need five minutes of fluffing and a couple of petals rotated forward.
People also learn fast that the center can either make the wreath look polished or make it look like it’s wearing a hat that doesn’t fit.
If your center feels bulky, it’s usually because all the mechanics are stacked in one spot. Spreading attachment points across the plastic canvas
makes a huge difference, and adding a felt circle under your center is like concealer for wreathsit hides what you don’t want anyone to notice.
Crafters who build more than one flower wreath often end up with a “center stash”: rosettes, foam disks, premade sunflower centers,
and little signs for every season. It’s not hoarding if it’s organized inspiration.
The best part is what happens after the wreath is finished. People hang it up, walk away, and then come back… repeatedly.
It’s the “I made that” effect. A deco mesh daisy wreath is big, bright, and unapologetically cheerful, so it changes the vibe of a door instantly.
Many crafters start with one for spring, then “accidentally” end up making versions for summer, fall (hello, orange petals), and holidays
(yes, you can absolutely make a Christmas poinsettia-style flower with the same petal concept).
Finally: storage. Everyone learns storage the hard way at least once. The wreath that looked perfect in April can look like it got into a wrestling match
with a closet in August. The experience teaches a simple truth: give petals space. Big storage bins, wreath bags, or hanging the wreath on a wall
are the difference between “quick fluff and done” and “why is my daisy now a pancake?” If you store it well, your wreath will last season after season,
and you’ll have a handmade door decor piece that keeps paying you back in compliments.