If your ceiling light is giving “builder-grade blah” instead of “wow, where did you get that?”, a DIY drum shade chandelier might be exactly the upgrade your room has been begging for. It has the clean shape of a modern pendant, the softness of a fabric shade, and the dramatic presence of a chandelierwithout the boutique price tag that makes your wallet do a tiny scream.
The beauty of this project is that it looks custom, but it is absolutely doable for a confident DIYer. In its simplest form, you start with a drum lampshade or drum frame, pair it with a chandelier body or pendant kit, and finish it with trim, diffuser details, or decorative accents that match your room. The result is a light fixture that feels polished, intentional, and far more expensive than it really was. That is the sweet spot every home project dreams about.
In this DIY tutorial, you will learn how to plan, size, build, wire, and style your own drum shade chandelier. We will also cover the stuff that actually matters in real life: hanging height, bulb heat, ceiling support, fabric choices, and the common mistakes that turn a chic light fixture into a lopsided UFO. Let’s make something good.
Why a Drum Shade Chandelier Works So Well
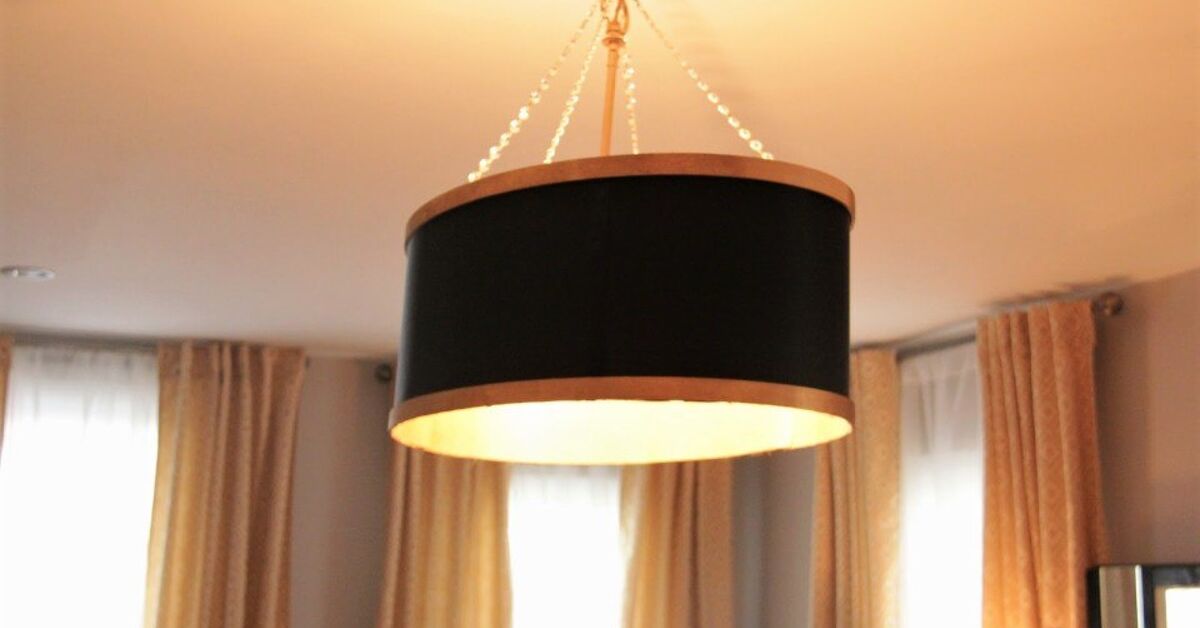
A drum shade chandelier is popular for one simple reason: it balances beauty and function. The cylindrical shade softens the look of exposed bulbs, diffuses light more evenly, and gives a room a tailored, designer feel. It also works with an absurd number of decorating styles. Modern farmhouse? Yes. Transitional? Absolutely. Coastal, classic, minimalist, glam, boho? Also yes. It is basically the little black dress of overhead lighting.
Unlike ornate chandeliers that demand an entire room revolve around them, a drum shade fixture plays nicer with furniture, art, and architecture. It can become the star of the room without acting like it owns the place. That makes it perfect for dining rooms, breakfast nooks, bedrooms, foyers, home offices, and even larger bathrooms when local codes and fixture ratings allow it.
Before You Start: Plan the Size, Height, and Safety
Pick the Right Shade Size
If the chandelier is going over a dining table, a good visual rule is to choose a fixture that is about one-half to two-thirds the width of the table. So, if your table is 48 inches wide, aim for a drum shade around 24 to 32 inches wide. That keeps the light feeling proportional instead of tiny and apologetic.
If you are sizing for the room instead of a table, use the classic shortcut: add the room’s length and width in feet, then convert that number to inches for an approximate chandelier diameter. A 12-by-14-foot room, for example, can usually handle a fixture around 26 inches wide.
Get the Hanging Height Right
Over a dining table, hang the bottom of the drum shade about 30 to 36 inches above the tabletop. In open spaces, make sure the bottom of the chandelier clears the floor by at least 7 feet. If your ceiling is taller than 8 feet, add roughly 3 inches of hanging height for every extra foot of ceiling. In other words, the light should feel intentional, not like it is preparing to boop the tallest person in your family on the head.
Think About Heat and Electrical Support
This part is not glamorous, but it is what keeps your project smart instead of spicy. If you are using fabric, paper, or any decorative wrap near bulbs, choose LED bulbs. They run much cooler than old-school incandescent bulbs and are a better fit for enclosed or semi-enclosed shade designs. Also check the fixture’s maximum wattage and never exceed it.
Just as important: make sure the ceiling junction box can support the weight of your finished chandelier. If your fixture is heavy, the box may need to be rated and braced for that load. If you are unsure, this is the moment to call an electriciannot after the fixture starts auditioning for gravity.
Tools and Materials
There are a few ways to make a homemade chandelier, but this version is practical, attractive, and beginner-friendly. Here is what you will typically need:
- A drum lampshade or drum shade frame
- A pendant light kit or small chandelier body
- LED bulbs
- Spider fitter, shade ring, or hardware adapter as needed
- Decorative trim, ribbon, or bias tape for finishing edges
- Fabric, linen, or shade-friendly material if you are recovering the shade
- Fabric glue or high-temp craft adhesive rated for this type of project
- Scissors
- Measuring tape
- Pencil or fabric marker
- Painter’s tape or clips
- Screwdriver
- Wire connectors if hardwiring is involved
- Ladder
- Optional diffuser material, acrylic panel, crystals, metal mesh, or decorative chain
If you are re-covering an old shade, choose a clean, sturdy shade with a solid frame. Crooked frames are like bad bangs: you may think you can hide them, but they will absolutely reveal themselves under overhead lighting.
Step-by-Step DIY Drum Shade Chandelier Tutorial
Step 1: Choose Your Base Fixture
Start by deciding whether you want a true chandelier look or a simpler drum pendant light. A mini chandelier body gives you more sparkle and layered light. A pendant kit gives you a cleaner, simpler silhouette. Either can work beautifully inside a drum shade.
If you already have an outdated hanging light, you may be able to refresh it by adding a custom drum shade around the existing light source. If you are buying new hardware, look for a kit that fits the scale of your shade and includes clear installation instructions.
Step 2: Measure the Shade and Test the Fit
Before gluing, cutting, or congratulating yourself too early, test the relationship between the light fixture and the shade. The bulbs should sit comfortably inside the drum without pressing too close to the fabric. The chandelier body should feel centered and balanced. If the scale is off, fix it now while your pride and budget are still intact.
For a polished look, leave enough space between the bulbs and the inner wall of the shade so the fixture breathes visually. A crowded interior can look messy and may create heat issues depending on bulb type and enclosure.
Step 3: Recover or Customize the Drum Shade
If your shade already looks good, lucky you. Move on to Step 4. If not, recover it with fabric. The easiest method is to place the shade on the back side of your fabric, roll it across the fabric to map the shape, and cut with enough extra material to wrap the top and bottom edges and overlap the seam. A simple linen, cotton, or textured neutral usually gives the most high-end result.
Glue one end of the fabric at the shade seam, wrap the material snugly around the shade, then trim and tuck the edges neatly inside. Finish the top and bottom with a thin bead of glue and press the fabric into place. Add ribbon, trim, or bias tape to hide seams and create a crisp finished edge.
This step is where a bargain project turns into a custom-looking one. Go slowly. Smooth fabric matters. Neat seams matter. And yes, the pattern being upside down absolutely matters, unless your aesthetic goal is “haunted boutique hotel.”
Step 4: Add Decorative Details
This is where your DIY chandelier tutorial becomes your chandelier. Keep it simple with clean fabric and matte black hardware, or dress it up with metallic trim, crystal strands, wood beads, or a frosted diffuser. If your room already has a lot going on, a plain drum shade with subtle contrast trim is usually the smarter move.
For a richer look, consider lining the interior in metallic paper or paint approved for the project. A warm gold-toned interior can bounce light beautifully and give the fixture a more luxurious glow. Just keep all decorative materials compatible with the bulb type and fixture design.
Step 5: Assemble the Shade and Fixture
Attach the drum shade to the fixture using the appropriate fitter or adapter hardware. Depending on your design, the shade may hang from the center rod, attach to a spider fitter, or rest on a supported ring. Check that everything is centered before tightening the hardware.
Once assembled, step back and look at it from several angles. If it leans, wobbles, or looks like it had one too many mimosas, adjust it now. Ceiling lights are not forgiving. They are eye-level drama for the entire room.
Step 6: Turn Off Power and Install the Fixture
If you are hardwiring the chandelier, turn off power at the breakernot just the wall switch. Use a voltage tester if you have one. Remove the old fixture, confirm the box is secure, and mount the new bracket according to the manufacturer’s directions. Connect the wires properly, tuck them carefully into the box, and secure the canopy.
If any of that sentence felt like an unkind pop quiz, hire a licensed electrician for the install. There is zero shame in outsourcing the dangerous part and still taking full credit for the design.
Step 7: Adjust the Height
Before final tightening, double-check the hanging height. Over a dining table, the chandelier should feel low enough to create intimacy but high enough that people can see one another without peering around a lampshade like nervous meerkats. In a bedroom or entry, it should anchor the room without obstructing movement.
Step 8: Add Bulbs and Test the Glow
Install LED bulbs in the recommended base and wattage equivalent. Warm white bulbs usually work best for a soft, flattering glow. Turn the light on and see how the shade diffuses it. If the light feels too harsh, consider a diffuser. If it feels too dim, increase lumens rather than exceeding the fixture’s watt limit.
Common Mistakes to Avoid
- Choosing a shade that is too small: Tiny shades make a fixture look accidental instead of intentional.
- Using the wrong bulbs: Skip high-heat incandescent bulbs when fabric is involved.
- Ignoring the ceiling box rating: A pretty chandelier still needs proper support.
- Hanging it too high: Many DIY lights end up floating awkwardly near the ceiling.
- Overdecorating the shade: Beads, trim, ribbon, fringe, crystals, tasselschoose a lane.
- Forgetting the seam: One messy seam can cheapen the whole project.
Best Places to Use a DIY Drum Shade Chandelier
A drum shade chandelier works especially well in dining rooms, breakfast nooks, bedrooms, entryways, and home offices. In dining areas, it creates a cozy pool of light and acts as a visual anchor over the table. In bedrooms, it brings softness and sophistication without feeling overly formal. In a foyer, it gives guests an immediate sense that your home has style and that you maybe, just maybe, know what you are doing.
For small spaces, do not automatically think small fixture. Sometimes a slightly larger drum shade makes the room feel more finished and intentionally designed. The key is proportion, not fear.
Is Making Your Own Drum Shade Chandelier Worth It?
Absolutelyif you enjoy DIY, want a custom look, and like the idea of saving money while still ending up with something that looks elevated. A store-bought drum shade chandelier can be expensive, especially if you want quality materials and a size that actually fills the room. Making your own gives you control over the fabric, finish, scale, hardware, and mood.
It is also one of those rare DIY lighting projects that can make a room look dramatically more expensive without requiring a full renovation. Paint helps. New pillows help. But a great overhead light? That changes the whole room in one move.
Final Thoughts
If you want a lighting project that lands somewhere between practical upgrade and mini design triumph, a DIY drum shade chandelier is a terrific choice. It softens light, adds shape, defines a room, and gives you endless options for personalization. Keep the proportions right, respect electrical safety, choose cool-running LED bulbs, and focus on clean finishing details. Do that, and your homemade chandelier will look less like a weekend experiment and more like the fixture that should have been there all along.
In other words: measure twice, center carefully, glue neatly, and resist the urge to turn it into a craft-store parade. Your ceiling deserves better.
Real-Life Experiences and Lessons From Making a Drum Shade Chandelier
The first surprise most people have when making a drum shade chandelier is how much the fixture changes the room before the light is even switched on. A bare bulb or generic builder-grade pendant tends to disappear into the ceiling. A drum shade, on the other hand, creates visual structure. Suddenly the table feels grounded, the room feels styled, and the ceiling no longer looks like an afterthought. It is one of those projects where the “before” photo starts to offend you the minute the “after” is done.
Another common experience is realizing that the hardest part is not the wiring. It is the patience. People expect the install to be the tricky bit, but in many cases the real test is covering the shade neatly, aligning the seam, trimming the fabric evenly, and getting the whole thing centered. One slightly crooked wrap can make a finished fixture feel homemade in the wrong way. The upside is that this project rewards slow, careful work. You do not need superhero-level skills. You need a measuring tape, decent lighting, and the emotional maturity to peel back fabric and redo a seam instead of pretending it looks “artisan.”
Many DIYers also learn that materials matter more than they expected. Cheap shiny fabric can make a chandelier look costume-y very quickly, while a simple linen or cotton blend often looks far more refined. The same goes for trim. The best projects usually have restraint: one beautiful fabric, one clean edge treatment, one clear point of view. The worst ones look like every aisle of the craft store got invited to the same party.
There is also the practical lesson of bulb choice. People who switch from hotter bulbs to LEDs often notice the room feels more comfortable and the shade materials feel like a safer pairing. That matters with enclosed or semi-enclosed designs. A drum shade is supposed to soften a room, not create low-level anxiety every time the light stays on through dinner.
One of the best things about this project is how adaptable it is. Some people use an old thrifted shade and a fresh pendant kit. Others upgrade an existing chandelier by hiding the dated arms inside a crisp new drum. Some go minimal and modern with white fabric and black hardware; others lean cozy with textured linen and warm brass. There is no single correct version, which is exactly why the project stays popular. It bends to the room instead of forcing the room to bend around it.
And finally, there is the satisfaction factor. A good DIY drum shade chandelier tends to earn compliments that sound slightly suspicious, like, “Wait, you made that?” That is when you know the project worked. Not because it fooled anyone into thinking it came from a luxury showroom, but because it feels thoughtful, finished, and right for the space. That is the real win. You are not just making a light fixture. You are creating atmosphere, personality, and a little proof that a smart DIY project can still have serious style.