Tiger lilies are the extroverts of the summer garden: bold orange blooms, dramatic freckles, and enough energy to
make your quieter perennials feel underdressed. Plant them once, andif you treat them rightthey’ll show up
every year like that friend who always brings snacks and stays to help clean up.
This guide walks you through how to plant tiger lily bulbs the right way, with the kind of details that
actually matter: timing, depth, spacing, soil drainage, and what to do if your lilies get a little too enthusiastic
about multiplying. You’ll also get troubleshooting tips, container options, and a “real-life garden” section at the end
packed with experience-based lessons gardeners tend to learn the fun (and occasionally frustrating) way.
Quick Tiger Lily Basics (So You Know What You’re Planting)
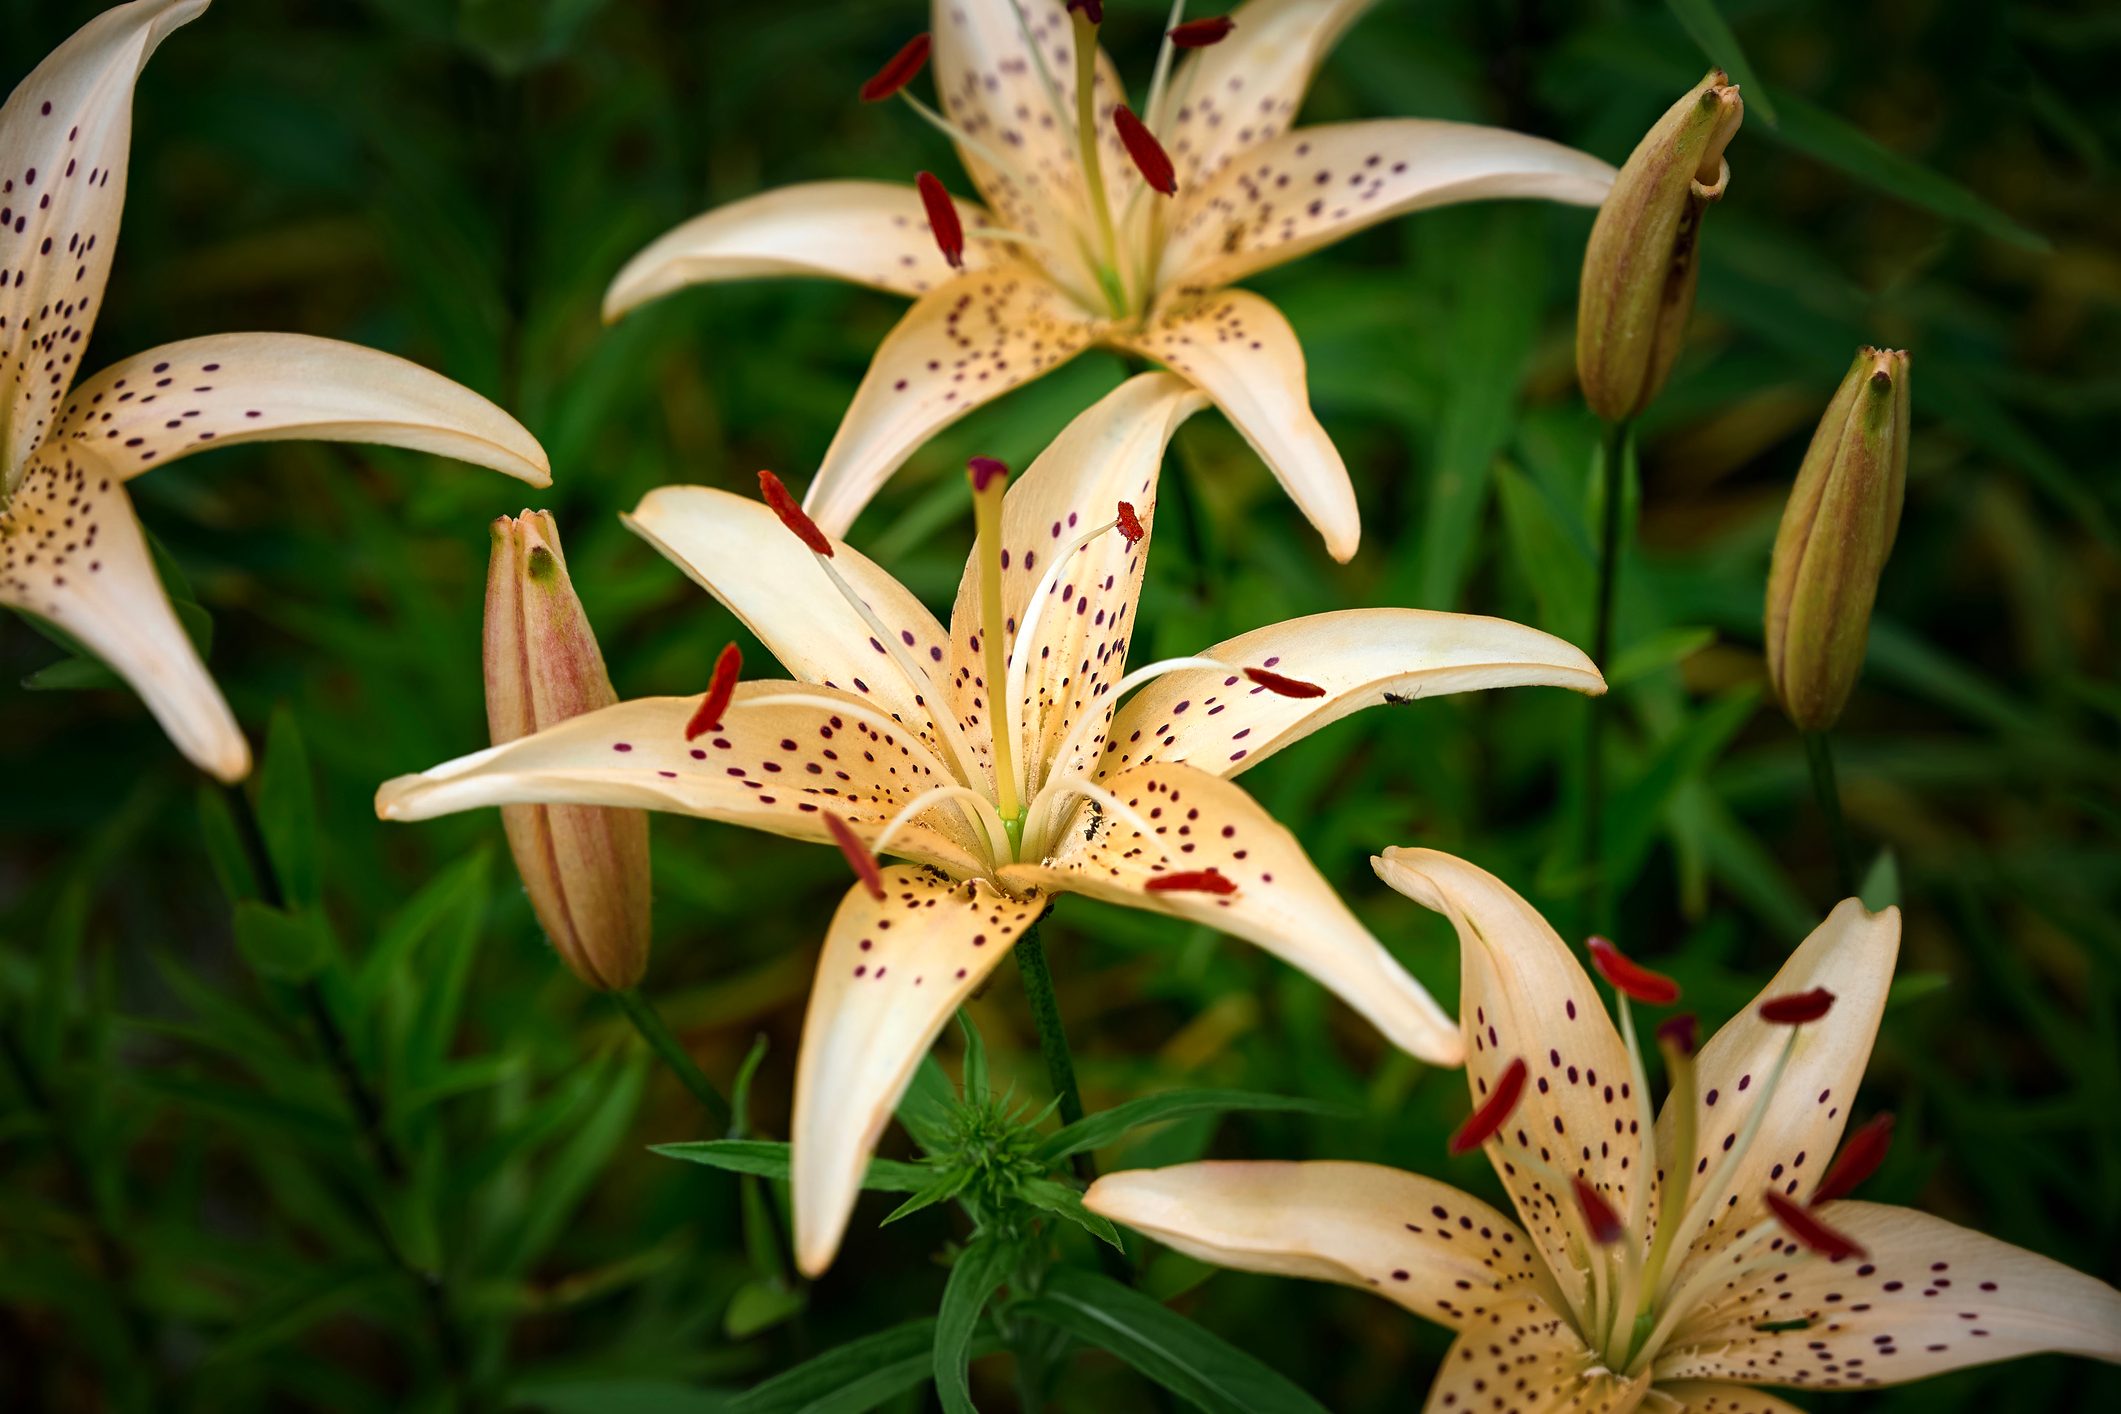
“Tiger lily” commonly refers to Lilium lancifolium (also called Lilium tigrinum in older references).
It grows from a true bulb made of scales (not a papery onion-style bulb). Many types are hardy in much of the U.S.,
bloom in mid-to-late summer, and can form clumps over time. A signature feature: some varieties produce little
dark “bulbils” (tiny baby bulbs) along the stem that can drop and create new plants.
Heads-up for pet owners
True lilies (genus Lilium, including tiger lilies) are extremely toxic to cats. Even small exposures can be dangerous.
If you share your home with a feline supervisor, plant lilies only where your cat cannot access themor pick a safer flower.
When to Plant Tiger Lily Bulbs
Tiger lily bulbs can go in the ground in fall or early spring:
-
Fall planting: Best for strong root growth before winter. Aim for about a month before the ground freezes.
In colder regions, fall planting plus mulch helps protect bulbs from temperature swings and frost heave. - Early spring planting: Works well when soil is workable and not waterlogged. Expect slightly later establishment.
Where to Plant Tiger Lilies for Bigger Blooms
Tiger lilies are not picky divas, but they do have standards. Give them what they want and they’ll reward you with
taller stems and more flowers.
Light
Full sun to part shade is ideal. More sun usually means stronger stems and better flowering, but in very hot climates,
a bit of afternoon shade can prevent stress. A classic lily trick is “head in the sun, feet in the shade”:
keep the top growth sunny while the soil stays cooler (often by mulching or using low companion plants).
Soil and drainage (the non-negotiable)
Lilies hate wet feet. The single most common reason bulbs fail is poor drainage that leads to rot.
If your soil stays soggy after rain, you have three smart options:
- Plant on a slight mound or raised bed so water runs away from the bulb zone.
- Amend with compost to improve structure (and add nutrients) without turning your bed into quicksand.
- Use containers with excellent drainage if your ground stays swampy.
How Deep to Plant Tiger Lily Bulbs (Without Starting a Garden Argument)
Lily planting depth advice can look contradictory because it depends on bulb size, soil type, and whether the lily
forms stem roots above the bulb. Here’s the practical, gardener-proof way to handle it:
The best rule of thumb
Plant the bulb so the top sits at roughly 2–3 times the bulb’s height below the soil surface.
In many gardens, that works out to about 4–6 inches deep for typical lily bulbs.
The “cover” method (especially helpful for tiger lilies)
Many tiger lily instructions describe planting so the nose/tip is covered by about 1–2 inches of soil.
Depending on bulb size, that often lands the bulb at a similar effective depth as the rule of thumb.
If your winters are cold, slightly deeper planting can add protection and support stronger stems.
Adjust depth for soil type
- Sandy soil: Plant a bit deeper so bulbs don’t dry out.
- Heavy clay: Plant slightly shallower and improve drainage with organic matter (and consider a mound/raised bed).
Spacing Tiger Lily Bulbs
Give bulbs breathing room so air can move between plants (this helps reduce disease and makes stems sturdier).
A solid target is 8–12 inches apart. If you want a more “wow” look, plant in clusters of
3–5 bulbs rather than a single lonely bulb standing there like it missed the group chat.
Step-by-Step: How to Plant Tiger Lily Bulbs
-
Pick your spot. Choose a location with good drainage and at least half a day of sun.
Avoid areas where sprinklers keep soil constantly wet. -
Prep the soil. Loosen soil 10–12 inches deep. Mix in compost to improve drainage and fertility.
If your soil is clay-heavy, this step is not optionalit’s the difference between lilies and mushy bulb soup. -
Dig the hole to the right depth. Aim for 2–3 times the bulb height, typically 4–6 inches deep,
or use the “cover the tip by 1–2 inches” method depending on bulb size and your climate. -
Place the bulb correctly. Set the bulb with the pointed end up. If you truly can’t tell,
lay it on its sideplants are surprisingly determined. - Backfill and water. Cover with soil, gently firm, and water thoroughly to settle air pockets.
-
Mulch lightly. Add 2–3 inches of mulch to keep moisture steady and reduce weeds.
Keep mulch from piling directly against the stem once growth appears.
Watering and Fertilizing After Planting
Watering
After planting, water well. Then keep soil evenly moist but not soggy. A deep soak is better than daily sprinkles:
it encourages roots to grow down where the soil stays cooler and more stable. During hot spells, check moisture a couple inches down;
if it’s dry, water.
Fertilizing
If you amended with compost, you’re already ahead. In spring as shoots emerge, you can add a balanced slow-release fertilizer
or a compost top-dressing. Avoid overdoing nitrogentoo much can produce lush leaves and fewer flowers (the plant equivalent of
skipping leg day).
Staking, Deadheading, and Post-Bloom Care
Support tall stems
Tiger lilies can get tall and top-heavy when blooming. In windy areas, stake early so you don’t snap stems during a summer thunderstorm.
Discreet supports or a ring stake can keep everything upright without turning your flowerbed into a construction site.
Deadheading
Once blooms fade, remove spent flowers so the plant doesn’t waste energy making seed pods. (Snip just the flower part, not the whole stem.)
Don’t cut the leaves too soon
Let foliage yellow naturally at the end of the season. Those leaves are charging the bulb for next year’s show.
Cutting green leaves early is like unplugging your phone at 9% and hoping it magically hits 100% by morning.
How to Multiply Tiger Lilies (Or Calm Them Down)
Tiger lilies can spread by:
- Bulb division: Clumps expand underground over time.
- Bulbils: Tiny bulbs along stems can drop and sprout if conditions suit them.
To propagate on purpose
Divide clumps in fall after foliage dies back or in early spring before strong growth. Replant divisions immediately at proper depth.
If you collect bulbils, plant them shallowly and be patientbulbils can take a couple seasons to reach flowering size.
To keep them from taking over
If your tiger lilies start marching across the garden like they own the place, thin clumps every few years and remove bulbils
before they drop (or simply pull tiny volunteer sprouts while they’re small). In some regions, tiger lilies can naturalize aggressively,
so keep an eye on spread near wild areas.
Common Problems (and How to Fix Them)
1) Bulbs rot before sprouting
Usually drainage. Improve soil, plant on a mound, or move to containers. Avoid low spots where water collects.
2) Leaves look great, flowers are disappointing
Check sunlight first. Too much shade reduces blooms. Also consider overcrowdingtight clumps compete for nutrients and light.
Divide and replant with proper spacing.
3) Stems flop over
Not enough sun, too much nitrogen, or wind exposure. Stake early, reduce high-nitrogen fertilizer, and consider a brighter location.
4) Chewed shoots and missing buds
Deer and rabbits may sample lilies. Use fencing or repellents where browsing pressure is high.
Also watch for rodents that dig bulbswire baskets can help in problem areas.
Planting Tiger Lily Bulbs in Containers
Containers are a great solution if your soil is wet, you want more control, or you’re gardening on a patio.
Use a deep pot with multiple drainage holes, fill with a high-quality potting mix (not heavy garden soil),
and plant bulbs at the same depth rules: about 2–3 times bulb height. Space bulbs so they aren’t touching.
Keep containers evenly moist, and protect them in winter if you’re in a colder region (move to an unheated garage or sheltered spot,
or insulate the pot) so bulbs don’t freeze-dry.
Experience-Based Notes: What Gardeners Learn After Planting Tiger Lily Bulbs (The Extra )
Planting tiger lily bulbs is straightforwardbut the “real world” is where the best lessons happen. Here are experience-based scenarios
gardeners commonly run into, plus what usually works.
The clay-soil surprise: “Why are my bulbs fine one year and gone the next?”
In heavy clay, tiger lilies may sprout beautifully during a mild season, then rot after a wet spring. The fix is less about
babying the plant and more about re-engineering the real estate. Gardeners report the biggest improvement when they plant on a gentle
mound (even 3–4 inches makes a difference) and mix compost into the planting zone. A slightly raised planting line along a walkway,
where water drains away naturally, can outperform a “nice flat bed” that quietly holds moisture.
The “too much love” problem: tiger lilies that multiply like they’re paid per stem
Tiger lilies can be generoussometimes overly so. Gardeners often notice small volunteer lilies popping up a foot or two away from the
original clump. That’s frequently from bulbils dropping and rooting. If you want a controlled look, the easiest habit is a quick
late-season scan: as stems age, remove bulbils before they fall, or pull baby sprouts in spring while the soil is soft and roots are shallow.
If you do want more lilies, bulbils are basically nature’s “buy one, get twelve free” dealjust be patient about bloom time.
The windy-yard lesson: “My lilies keep face-planting during storms.”
Tall lilies + summer storms = plant physics. In exposed yards, gardeners have better luck staking early (when stems are still flexible)
instead of waiting until buds are heavy. Another trick that comes up often: planting in groups lets stems support each other a bit,
especially when you tuck them among sturdier perennials. Full sun also matters herestems grown in brighter light are typically stronger.
The shade compromise: blooms that are “fine” instead of “WOW”
Many gardeners try lilies in part shade and get decent foliage with fewer flowers. If that’s your situation, the fix isn’t always moving
the plant; sometimes it’s pruning back nearby shrubs to increase morning sun, or planting lilies where they get spring and early-summer light
before trees fully leaf out. If you can give them at least half a day of sun, you’ll usually see a meaningful improvement without
redesigning the whole yard.
The “I cut it all down” regret (and how to avoid it)
A very common experience: blooms finish, the stems look tired, and the urge to tidy becomes irresistible. But lilies store energy through
their leaves. Gardeners who let foliage die back naturally tend to get better bloom performance the next year. If you can’t stand the look,
disguise the fading foliage with low, leafy companion plantsthink hardy geraniums, catmint, or even ornamental grassesso the bed stays
attractive while the bulbs recharge.
The pet-safety reality check
Gardeners with cats often share the same takeaway: lilies aren’t worth the risk where cats can access pollen, petals, or leaves.
If you love the look but need a safer yard, choose alternative flowers for areas your cat can reach. The “best” planting method is always
the one that keeps your household safe.
Conclusion
Planting tiger lily bulbs is mostly about getting the fundamentals right: excellent drainage, smart depth,
generous spacing, and patient aftercare that lets foliage feed the bulb for next year. Do that, and your lilies
will return with dramatic blooms that look like they were painted by someone who really enjoys the color orange.