If your ceiling tile has a water stain the size of Florida, a mystery crack, or the general charm of a forgotten office basement, you may be ready to remove it. The good news: in many cases, taking out a ceiling tile is a beginner-friendly DIY job. The slightly less glamorous news: the process depends on what kind of tile you have. A lightweight drop ceiling panel pops out with a simple lift-and-tilt move, while an old glued or stapled tile may cling to the ceiling like it pays rent.
This guide walks you through how to remove a ceiling tile safely, cleanly, and without turning your room into a snow globe of dust. We’ll cover drop ceiling tiles, surface-mounted acoustic tiles, stubborn glued panels, and the warning signs that mean you should stop and call a pro. Along the way, you’ll also get practical tips for working around lights, vents, and the classic “I only meant to replace one tile, and now I have opinions about the whole ceiling” situation.
Before You Start: Figure Out What Kind of Ceiling Tile You Have
Before you grab a ladder and channel your inner renovation hero, identify the tile type. This makes the job much easier and helps you avoid damaging the ceiling grid, drywall, or whatever is lurking above the tile.
1. Drop ceiling or suspended ceiling tiles
These are the most DIY-friendly. They sit inside a visible metal grid, usually in 2-by-2-foot or 2-by-4-foot sections. To remove them, you typically push the tile up, angle it, and lower it through the grid opening.
2. Stapled or nailed acoustic ceiling tiles
These tiles are attached directly to a ceiling surface or furring strips. They often show up in older basements, rec rooms, and homes where the design brief was apparently “functional, but make it beige.” Removing them takes more patience because fasteners may be hidden along the edges.
3. Glued ceiling tiles
Glue-up tiles are common in decorative ceilings and some older remodels. These can be trickier to remove cleanly because the adhesive often takes some of the underlying surface along for the ride.
4. Surface-mount clip systems
Some modern ceiling systems use tracks and clips instead of glue or exposed grid. These tiles or planks usually need to be slid or unclipped according to the manufacturer’s layout. They are neat, clever, and slightly less intuitive when you’re standing on a ladder squinting at the ceiling.
Safety First, Because Gravity Is Very Consistent
Removing a ceiling tile is usually simple, but “simple” is not the same as “do it in flip-flops while balancing on a wobbly chair.” Use a sturdy step ladder, wear safety glasses, and protect your lungs with a dust mask or respirator if the tiles are dusty, brittle, or stained. Gloves are a good idea too, especially if the tiles are old enough to crumble when you look at them too hard.
If you’re working near a light fixture, ceiling fan, smoke detector, or vent with wiring nearby, turn off power at the breaker first. If there’s water damage, find and fix the leak before installing a new tile. Otherwise, your replacement panel will become a sequel nobody asked for.
One more important note: if the home is older and the ceiling materials are original or suspiciously ancient, do not assume they’re harmless. Some older ceiling materials may contain asbestos. If you suspect that could be the case, pause the project and have the material professionally tested before disturbing it.
Tools and Supplies You May Need
- Step ladder
- Safety glasses
- Dust mask or respirator
- Work gloves
- Drop cloth or plastic sheeting
- Flashlight
- Utility knife
- Flat pry bar or putty knife
- Needle-nose pliers
- Trash bags or a debris box
- Painter’s tape for labeling tiles if needed
- Vacuum or shop vac for cleanup
You may not need every item for every job, but having them nearby beats climbing up and down the ladder twelve times while muttering at the ceiling.
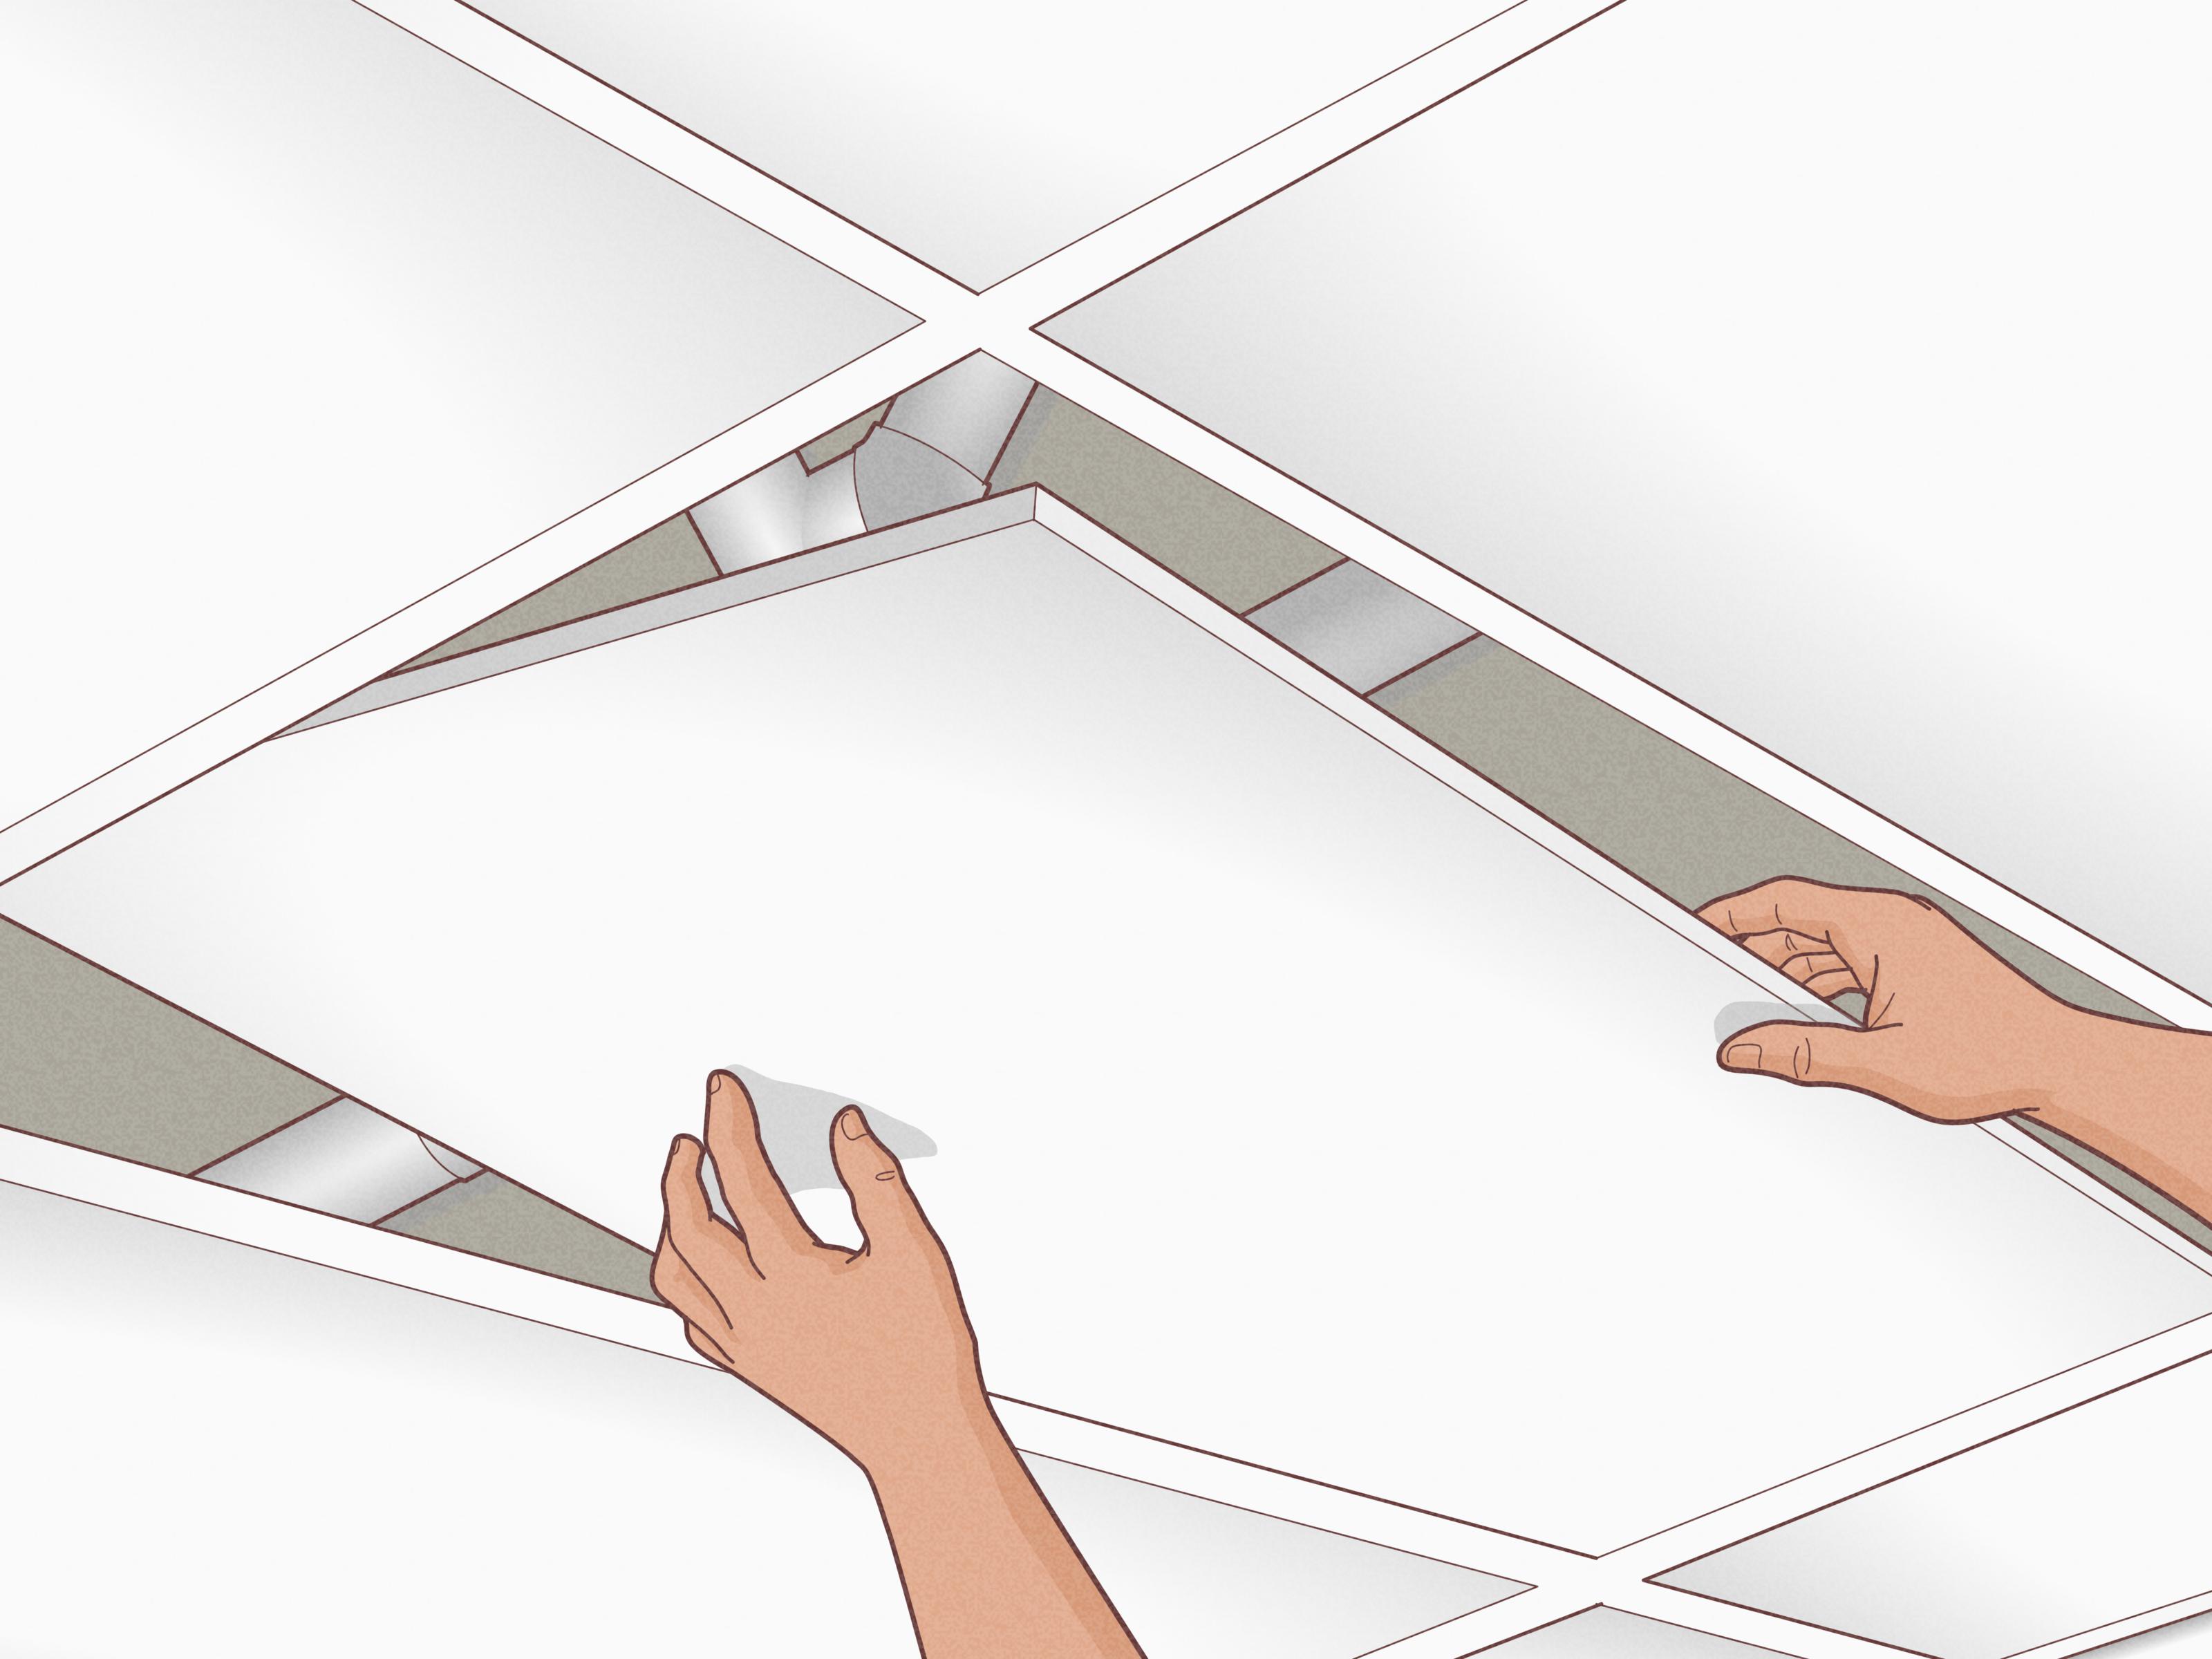
How to Remove a Drop Ceiling Tile
If you have a suspended ceiling, congratulations: this is the easiest version of the job. Most lay-in ceiling panels are designed to be removed from below for access to plumbing, wiring, or ductwork.
Step 1: Clear the area below
Move furniture out of the way or cover it with a drop cloth. Ceiling dust has a talent for finding your nicest belongings.
Step 2: Position your ladder under the tile
Stand directly below the panel you want to remove. If it’s a full-size field tile, removal is usually straightforward. Edge or border tiles may need a little more finesse because they are often cut to fit.
Step 3: Push the tile upward gently
Use both hands to lift the tile above the metal grid. Don’t force it. Ceiling panels are often lightweight mineral fiber or fiberglass and can crack if bent too much.
Step 4: Tilt the tile diagonally
Once the panel clears the grid, angle it so one corner dips below the opening. Then lower it carefully through the grid. Think “elevator, then yoga pose.”
Step 5: Lower and inspect
Bring the tile down slowly. If you plan to reuse it, set it somewhere flat and dry. While the tile is out, inspect the grid, wiring, pipes, and insulation above. If the tile was stained, this is the time to find the reason.
Pro tip: If you need a matching replacement tile, flip the removed panel over and look for a product number, brand stamp, or identifying mark on the back. That can make replacement shopping much easier.
How to Remove a Border Ceiling Tile
Border tiles are the panels around the perimeter of the room. These are often trimmed to size during installation, so they may not lift and tilt out the same way as a full tile.
Start by removing a nearby full-size tile first. That gives you more room to maneuver. Then gently lift the border tile and slide it toward the open space. If it seems stuck, don’t yank it. It may be cut tightly against the wall angle or shaped with a decorative edge. Slow, careful movement is the name of the game here.
How to Remove Stapled or Nailed Ceiling Tiles
Older acoustic ceiling tiles are sometimes stapled or nailed to strips or directly to the ceiling. These can come down cleanly, but they can also crumble dramatically, as if auditioning for a demolition montage.
Step 1: Score painted seams if needed
If the tile edges were painted over, run a utility knife along the seams to break the paint film. This reduces tearing and helps keep chunks of drywall paper from coming off with the tile.
Step 2: Find the fasteners
Look closely along the tile edges and corners. Staples and small finish nails are often hidden in the pattern or texture. A flashlight held at an angle can help reveal them.
Step 3: Pry gently
Slide a putty knife or flat pry bar under one corner and lift slowly. The goal is to expose the fasteners, not launch the whole tile across the room. Once you can see the staple or nail, use pliers to pull it out.
Step 4: Support the tile as it comes loose
These tiles can crack under their own weight. Keep one hand supporting the tile while you work around the edges removing fasteners.
Step 5: Clean up the ceiling surface
After the tile is removed, you may need to pull remaining staples, scrape old adhesive, or patch small gouges before installing a new finish.
How to Remove Glued Ceiling Tiles
Glue-up ceiling tiles can be the most stubborn category. If the tile was installed with strong construction adhesive, expect some resistance and possibly some patching afterward.
Step 1: Score around the tile edges
Use a utility knife to cut through caulk, paint, or built-up finish at the perimeter. This helps separate the tile from neighboring panels and reduces surface tearing.
Step 2: Start at a loose corner
If one corner is already lifting, congratulations, the ceiling has chosen your starting point. Slip a putty knife underneath and work it back and forth to loosen the bond.
Step 3: Use a wider tool to separate the tile
Once you’ve made a small gap, switch to a broader putty knife or pry tool and work across the tile gradually. Don’t try to rip it off in one heroic motion. That’s how ceilings become repair projects.
Step 4: Expect surface damage
Even with care, glue-up tile removal may pull away paint, drywall paper, or a skim coat. That doesn’t mean you failed. It means adhesive was doing its job a little too enthusiastically.
Step 5: Scrape and patch
Remove leftover adhesive, sand rough areas lightly, and patch the surface before installing something new. If a large section is damaged, you may need more extensive ceiling repair.
Working Around Lights, Vents, and Ceiling Fixtures
Ceiling tiles often wrap around vents, recessed lights, speakers, or access panels. If you’re removing a drop ceiling tile around a fixture, support the tile carefully and check whether the fixture trim overlaps the panel. In some cases, a trim ring or vent grille may need to be removed first.
For anything wired, shut off power before touching the area. Never let a light fixture hang from a ceiling tile alone. Fixtures should be independently supported. If that isn’t the case, that’s not a “quick DIY fix” problem; that’s a “step away and call someone qualified” problem.
Common Mistakes to Avoid
Using too much force
Ceiling tiles are not known for emotional resilience or structural toughness. If something won’t move, stop and look for the reason instead of forcing it.
Skipping leak inspection
A stained tile is often a symptom, not the disease. Replacing it without fixing the leak is like putting a throw pillow over a broken chair.
Ignoring possible asbestos
If the material is old, brittle, and original to an older home, get it checked before disturbing it. This is especially important during demolition or renovation.
Working without floor protection
Dust, fragments, and mystery ceiling grit fall fast. Protect the room first.
Forgetting to label reusable tiles
If you remove several tiles for access, label the backs lightly so they go back in the same spots. Older ceilings often have slightly different cuts and shades across the room.
When You Should Call a Professional
DIY is great. Heroic denial is less great. Call a professional if:
- You suspect asbestos or other hazardous materials
- The ceiling tile is supporting or interfering with wiring or a fixture
- Water damage is severe or the ceiling feels soft or sagging
- You discover mold, rot, or structural damage above the tile
- You need to remove a large glued area without damaging the substrate
There is no prize for turning a one-tile project into a full-ceiling remake because you refused to retreat at the correct moment.
What to Do After the Tile Is Removed
Once the tile is down, use the opportunity wisely. Vacuum dust from the grid or framing, check for leaks, inspect insulation, and confirm that vents and ducts are secure. If you’re replacing a tile, measure carefully and make sure the thickness and edge profile match the existing ceiling. In suspended ceilings, a mismatch can be annoyingly obvious. One tile that sits too high or too low will stare at you forever.
If you’re removing tiles as part of a bigger remodel, decide whether you’re replacing with similar tiles, covering the ceiling with planks, patching drywall, or starting fresh with another finish. Ceiling work tends to escalate in exactly this way. One minute it’s maintenance, the next minute you’re comparing plank finishes at midnight.
Real-World Experiences and Lessons From Removing Ceiling Tiles
The most common experience homeowners report is surprise at how easy a suspended ceiling tile is to remove once you know the lift-and-tilt trick. Before that moment, many people assume the panel is somehow clipped in, glued in, or protected by secret ceiling magic. Then they push it up a few inches, angle it slightly, and suddenly feel like they’ve cracked an ancient home-improvement code. That small win is often what gives people the confidence to inspect a leak, replace a stained panel, or finally look at the wiring above the basement ceiling.
Another very common experience is discovering that the tile itself was not really the problem. Someone removes a panel because of a stain, expecting a quick cosmetic swap, only to find a slow plumbing drip, condensation on ductwork, or an old roof leak that has been quietly working overtime. In that sense, removing a ceiling tile is often less like replacing a decoration and more like opening a clue in a mystery novel. It’s not always dramatic, but it can save you from bigger repairs later.
People dealing with stapled or glued acoustic tiles usually describe a different kind of adventure: the “well, this escalated quickly” phase. What looked like a simple corner lift turns into a careful process of prying, pulling staples, scoring paint lines, and collecting a surprising amount of dusty debris. The lesson here is that patience matters more than strength. The homeowners who take their time usually end up with less ceiling damage and a much easier patch-and-repair stage afterward.
There is also the emotional experience of old-house uncertainty. If the ceiling materials are decades old, many DIYers wisely pause and ask whether the tile might contain asbestos or whether the adhesive might be hiding a much older surface. That moment of caution is not overthinking. It is good judgment. Plenty of experienced remodelers will tell you that the smartest move in any renovation is knowing when not to keep going until you have more information.
One of the more satisfying experiences comes from replacing a single ugly tile and seeing the room instantly look cleaner and brighter. A stained panel in a basement or laundry room can make the whole space feel neglected. Swap it out, vacuum the grid, and suddenly the ceiling stops shouting for attention. It’s one of those small jobs that punches above its weight in visual payoff.
Finally, many homeowners say ceiling tile removal changes the way they think about the “fifth wall.” Once they realize the ceiling is accessible, fixable, and upgradeable, they start noticing everything overhead: uneven panels, tired textures, bad lighting placement, and all the missed opportunities for a better finish. So yes, removing one ceiling tile may solve a problem. It may also start a larger project. Consider yourself warned, respectfully and with affection.
Conclusion
Learning how to remove a ceiling tile is one of those practical DIY skills that seems more intimidating than it really is. If you have a drop ceiling, the process is usually quick: lift, tilt, lower, done. If you have stapled or glued tiles, the project takes more care, but it’s still manageable when you move slowly and protect the ceiling surface as much as possible. The key is identifying the tile type, working safely, and treating stains or damage as clues rather than isolated cosmetic issues.
Take your time, respect old materials, and do not ignore warning signs like severe water damage or possible asbestos. Remove the tile carefully, inspect what’s above it, and you’ll not only improve the look of the ceiling but also get a better understanding of what your home is trying to tell you. Sometimes the ceiling really does have notes.