If you’ve ever stood in front of a bare window thinking, “I’d like a little privacy, but I don’t want to live in a cave,” lace DIY window film might be your new favorite home hack. It’s budget-friendly, renter-friendly, totally reversible, and looks like something you paid a boutique window company way too much money for. Inspired by the beloved Remodelaholic lace DIY window film tutorial, this guide walks you through how to turn a plain pane of glass into a soft, lacy focal point that still lets in gorgeous natural light.
We’ll cover what lace window film is, why it works so well, how to install it step by step, and clever variations using cornstarch paste, contact paper, and other privacy film ideas. We’ll also talk about real-life pros, cons, and maintenance so you know exactly what to expect before you break out the fabric and paintbrush.
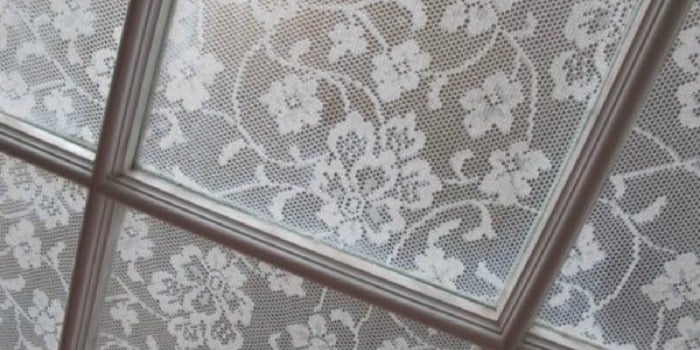
What Is Lace DIY Window Film?
Lace DIY window film is essentially lace fabric adhered directly to the glass using a removable medium such as cornstarch paste, fabric starch, or sometimes spray adhesive. Once the lace is glued to the window and the paste dries clear, you get a dreamy frosted look that blurs the view in and out while keeping light streaming through.
Unlike store-bought vinyl window film, lace has built-in pattern, texture, and charm. The open weave diffuses light, the floral or geometric motifs add decor, and the whole project usually costs less than a takeout dinner. Tutorials from Remodelaholic, Apartment Therapy, Bloomin’ Blinds, and several DIY blogs all use some version of this simple formula: clean glass + cornstarch paste + lace = instant privacy.
Where Lace Window Film Works Best
- Bathroom windows that need privacy but still benefit from daylight.
- Street-facing living room or entry windows where you’re not into front-row life on display.
- Kitchen windows over a sink where curtains would just get splashed to death.
- Rental spaces where you can’t alter the window permanently but want a custom look.
- Odd-shaped panes or sidelights where standard curtains or blinds don’t fit well.
If you can reach it and clean it, you can probably lace-ify it.
Supplies You’ll Need for Lace DIY Window Film
The charm of this project is that you don’t need a workshop, power tools, or a design degree. Most tutorials rely on the same basic set of supplies:
- Lace fabric – Curtain panels, lace yardage from the fabric store, or thrifted tablecloths. Choose a pattern you love and a fairly tight weave for better privacy.
- Cornstarch (cornflour) – The secret ingredient that becomes a clear, removable “glue.”
- Water – To make the starch jelly.
- Clean bucket, bowl, or large measuring cup – For mixing the paste.
- Measuring spoons and cup – So your paste isn’t chaos in liquid form.
- Paintbrush or foam brush – For spreading the paste on the glass and over the lace.
- Sharp scissors or rotary cutter – To cut lace panels to size.
- Microfiber cloth, glass cleaner, and paper towels – Clean glass = better adhesion and fewer bubbles.
- Step stool (if needed) – Because falling off a chair is not a cute DIY story.
Step-by-Step: How to Make Lace DIY Window Film
This method mirrors the classic Remodelaholic approach and many similar tutorials that use cornstarch paste for fabric-on-glass projects.
Step 1: Measure and Cut Your Lace
Start by measuring each window pane you plan to cover. For divided-light windows, measure each section individually. Add about 1/2 inch to each side so you have a little extra to trim or tuck if needed.
Lay the lace on a clean surface and cut panels to match your window measurements. If your fabric has a repeating pattern, try to align the motifs so they sit straight on the glasscrooked flowers will mock you forever.
Step 2: Mix the Starch Jelly
Most DIYers follow a simple ratio: mix 2 tablespoons cornstarch with 2 tablespoons cold water to form a smooth paste, then whisk in about 1½ cups of boiling water until it turns into a thick, glossy gel.
If it seems too runny, let it cool for a few minutes or add a tiny bit more cornstarch paste. If it’s too thick to brush smoothly, add a splash of hot water. You’re aiming for a gravy-like texture that clings to the glass but still levels out.
Step 3: Prep the Glass
Clean the window thoroughly with glass cleaner or a mix of vinegar and water. Wipe away dust, fingerprints, and mystery smudges. Any dirt trapped under the lace will showlike crumbs under a see-through tablecloth.
Dry the glass completely, then lay a strip of paper towel or an old towel along the sill to catch drips.
Step 4: Brush Paste onto the Window
Using a paintbrush or foam brush, apply a generous, even layer of the cornstarch jelly directly to the glass. Work slightly past the area where the lace will sit. A too-thin coat can lead to dry patches and loose corners later, so don’t be shy.
Step 5: Position the Lace
Carefully press your lace panel onto the wet paste, starting at the top and working your way down. Smooth with your hands as you go to avoid wrinkles and big air bubbles.
Don’t panic if it doesn’t look perfect at first. As long as the paste is still wet, you can gently peel back and reposition the fabric. Think of it like a polite, cooperative wallpaper.
Step 6: Brush on More Paste
Once the lace is in place, brush another layer of cornstarch jelly over the top, working from the center outward toward the edges. This saturates the fabric and helps it bond with the glass while sealing down the edges.
Use light strokes so you don’t drag the lace out of position. If you see any dry spots or bubbles, dab on a bit more paste and smooth them gently.
Step 7: Let It Dry (and Don’t Freak Out)
At this point your window may look cloudy, streaky, or worryingly white. That’s normal. The cornstarch paste dries clear, so resist the urge to peel everything off and declare the project a failure.
Depending on your climate and airflow, drying can take several hours. Once dry, the lace will feel secure but not rock-hard, almost like starched fabric. Some DIYers add a second thin coat for extra durability, especially in humid bathrooms.
Benefits of Lace DIY Window Film
Lace window film looks pretty, sure, but it’s also surprisingly practical. Blogs and home-decor sites highlight several key benefits:
1. Extra Privacy without Losing Light
The main reason people try this project is to stop neighbors (or delivery drivers with suspiciously good eyesight) from seeing straight into their homes. The lace pattern breaks up the view and blurs movement while still letting daylight pour in. It’s especially good for bathrooms, ground-floor bedrooms, and front doors with sidelights.
2. Charming, Custom Style
Lace adds instant cottage, vintage, or shabby-chic vibes. Choose a delicate floral lace for a romantic look, a geometric pattern for something more modern, or a bold motif to make the window a focal point. Because you’re working with fabric, you can cut to any size or shape and customize every pane.
3. Budget-Friendly and Renter-Friendly
Cornstarch, water, and thrift-store lace are about as inexpensive as DIY projects get. The cost is far lower than custom blinds or high-end etched glass film. When it’s time to move or change your style, the starch softens with warm water so the lace can be removed without damaging the glass. Many renters use this trick specifically because it’s reversible.
4. Flexible and Easy to Replace
If a panel gets stained, dusty, or torn, you can simply soak it off and put up a new lace piece. You can also swap patterns seasonallylight, airy designs for summer and denser patterns for more privacy in winter.
Tips, Tricks, and Common Mistakes
Choose the Right Lace
The tighter the weave, the more privacy you’ll get. Very open, net-like lace may look lovely but still allow clear views from the outside at night when your lights are on. Hold the fabric up to the window during the day and after dark to test how much it obscures the view.
Also consider color: classic white or ivory reflects light and feels bright, while off-white or soft gray can look more vintage. Dark lace tends to show dust more easily and can visually “shrink” a window.
Don’t Skimp on Cleaning
Grease, steam, and dustespecially around kitchen and bathroom windowscan interfere with adhesion. A quick once-over with cleaner isn’t always enough; if the glass feels slick or greasy, use a degreasing cleaner first and then wipe with plain water before you apply the paste.
Watch the Edges
Edges are the first place to lift, especially if your window has condensation or you have curious pets. Make sure your final coat of paste fully saturates the edge of the lace and extends just past it onto the glass. If an edge curls later, you can re-brush a little warm paste to stick it back down.
Know the Limits of Moisture
Cornstarch holds up surprisingly well, but continuous splashing or heavy condensation can slowly loosen the bond over time. In very steamy bathrooms or near shower enclosures, you might need occasional touch-ups or to place lace higher up where water doesn’t hit directly.
Alternatives and Variations on Lace Window Film
If you love the idea but want something slightly different, there are several spin-offs inspired by the lace-and-starch method:
1. Lace + Contact Paper Hybrid
Some DIYers adhere lace to clear or frosted contact paper first, then apply the contact paper to the window. This makes the setup easier to remove in one piece and can be helpful for renters who want zero cleanup on the glass. It’s also handy for hard-to-reach windows, since you can apply the lace to contact paper on a table and then stick it up once.
2. Fabric Window Film (Non-Lace)
The same cornstarch technique works with cotton, linen, or patterned fabric if lace isn’t your style. Think buffalo check for farmhouse kitchens, subtle stripes for a more modern look, or even solid linen for soft, frosted-glass vibes. Many tutorials for DIY fabric window privacy film use identical ratios of cornstarch and water, just with different material.
3. Lace Window Screens in Wooden Frames
Sites like She Holds Dearly show how to stretch lace in a simple wood frame to create removable lace window screensperfect for people who don’t want anything attached to the glass at all. The framed lace sits in the window like a screen or leans against the sill, providing privacy with a bit of boho farmhouse charm.
4. Mixing Lace with Other Films
You can mix and match: for example, apply frosted film on the lower half of a window and lace film on the upper panes, or use lace on a central panel and plain frosted film around the edges. This gives you privacy where you need it most while still letting architectural details shine.
Care, Cleaning, and Removal
Once your lace DIY window film is dry, it needs surprisingly little care. Light dusting with a soft brush attachment or feather duster keeps it fresh. Avoid soaking it when cleaning adjacent trim; excess water can soften the starch and cause sagging over time.
To remove, dampen a sponge with warm water and press it against the lace. As the starch re-hydrates, the fabric will release from the glass. You can peel it off gently and wipe away any remaining residue with warm, soapy water. Most people find that the glass looks exactly like it did beforeno ghost outlines or damagemaking this a low-risk project even for high-end windows.
Real-World Pros and Cons of Lace DIY Window Film
Pros
- Inexpensive materials and tools
- Custom fit for any window shape
- Soft, decorative, high-end look on a budget
- Excellent balance of light and privacy
- Reversible and renter-friendly
Cons
- Not completely opaque at night with lights on
- Edges may need occasional touch-ups in damp areas
- Lace can collect dust in dusty environments
- Not ideal for windows that get frequent direct splashes
For most people, especially fans of cottage, vintage, or farmhouse style, the benefits far outweigh the minor quirksparticularly given how easy it is to reverse if you change your mind.
Conclusion: A Simple DIY with Big Impact
Lace DIY window film is one of those rare projects that checks nearly every box: stylish, affordable, non-permanent, and surprisingly doable even if your crafting skills top out at “I own scissors.” Thanks to tutorials from Remodelaholic and other DIY communities, you can borrow a tested formulacornstarch jelly plus laceand adjust it to suit any room in your home.
Whether you’re trying to tame a fishbowl-like bathroom window, soften harsh street views, or just add some romantic texture without committing to heavy curtains, lace window film delivers a lot of style per dollar. And the best part? If you ever get tired of it, a little warm water turns your “permanent” project right back into a blank canvas.
SEO Summary
sapo: Lace DIY window film is a clever way to get more privacy without sacrificing sunshine or style. Inspired by Remodelaholic’s popular tutorial, this in-depth guide shows you how to glue lace directly to your glass with removable cornstarch paste, creating a soft frosted effect that looks custom and high-end. From step-by-step instructions and supply lists to real-life pros, cons, and creative variations, you’ll learn everything you need to transform plain windows into charming focal points on a tiny budgetand remove it all later with nothing more than warm water if your style changes.
Extra: Real-Life Experiences with Lace DIY Window Film
Once you’ve read a few lace DIY window film tutorials, you start to notice patterns in how people actually live with this project. Beyond the pretty Pinterest photos, homeowners and renters share similar “aha” moments, small frustrations, and helpful tweaks that make the technique even better.
The First-Timer Surprise: “Why Didn’t I Do This Sooner?”
Many people test lace film on one small bathroom or laundry window as an experiment. The usual story goes like this: they expect a fiddly, messy ordeal and end up finishing in under an hour. The moment the paste dries and the sun hits the lace, they realize how much softer and cozier the room feels. That’s usually when the mental list of “other windows I could do” starts forming.
Several DIYers mention that the project actually changes how they use a space. A once-exposed bathroom suddenly feels spa-like. A front door sidelight no longer requires strategic tiptoeing in pajamas. A kitchen sink window becomes less like a spotlight and more like a framed, glowing backdrop.
The Learning Curve: Little Things You Only Notice Later
Most of the “wish I’d known” comments are simple but useful:
- Cut panels carefully. Slightly crooked edges are way more noticeable once the sun comes through. Taking the extra minute to square everything up pays off every single day.
- Don’t rush the drying time. People who try to trim or touch the lace while it’s still damp often stretch or distort it.
- Test the opacity at night. Some users add a second layer of lace or choose a denser pattern after realizing the first pick was still a bit too sheer with lights on inside.
Handling Humid Bathrooms and Busy Households
In steamy bathrooms, especially where hot showers fog the glass daily, lace film can loosen a little faster. DIYers who live with this setup long-term say the solution is simple: treat it like seasonal maintenance. Once or twice a year, they touch up edges with fresh paste or replace a panel entirelyabout as much effort as changing a shower curtain.
Households with kids and pets report that lace film holds up surprisingly well. Cats may pat at the lace, but because it’s flat against the glass and lightly stiffened by the paste, it doesn’t feel like a dangling toy. Small fingerprints are less obvious on the patterned glass than on bare windows, which is its own kind of victory.
Design Experiments That Actually Work
Creative DIYers have pushed the basic idea in fun ways:
- Mixing patterns. Using one lace pattern on lower panes and a different one on top can create a subtle “border” effect, almost like a vintage transom window.
- Color-washing the lace. Some people lightly dye inexpensive lace in tea or fabric dye before applying it for a warmer, antique look. The cornstarch still dries clear, so the tint of the fabric becomes the star.
- Framed panels as art. Inspired by lace window screens, a few DIYers mount lace-covered frames directly on the wall when they’re not needed in a window, letting one project do double duty as decor.
When People Decide to Remove It
Just as helpful as rave reviews are the reasons people eventually remove their lace film. Some move and need the window back to its original condition. Others change decorating styles and switch to sleeker roller shades or plain frosted film. The interesting thing is how many of them say they’d happily do the lace treatment again in the right house or roomit’s seen as a low-commitment style experiment rather than a forever choice.
The removal process itself is part of what keeps people recommending the project. Warm water, a sponge, maybe a plastic scraper for stubborn bits, and the glass is back to normal. Compared with patching screw holes from curtain rods or dealing with peeling adhesive film, cornstarch-and-lace feels refreshingly gentle.
Why the Remodelaholic Method Keeps Getting Shared
Among countless privacy window ideas on blogs and social platforms, the Remodelaholic lace DIY window film tutorial keeps being pinned, referenced, and updated in roundups of best window hacks. It uses ingredients most people already have, works on a wide range of window sizes, and solves a very everyday annoyancewanting privacy without darkening your home.
In the end, the real-world experience of lace DIY window film is refreshingly simple: it makes rooms feel softer, cozier, and more private for very little money and effort. If you’re willing to embrace a bit of pattern and texture on your glass, this project can be one of the highest-impact, lowest-risk updates you make to your home.