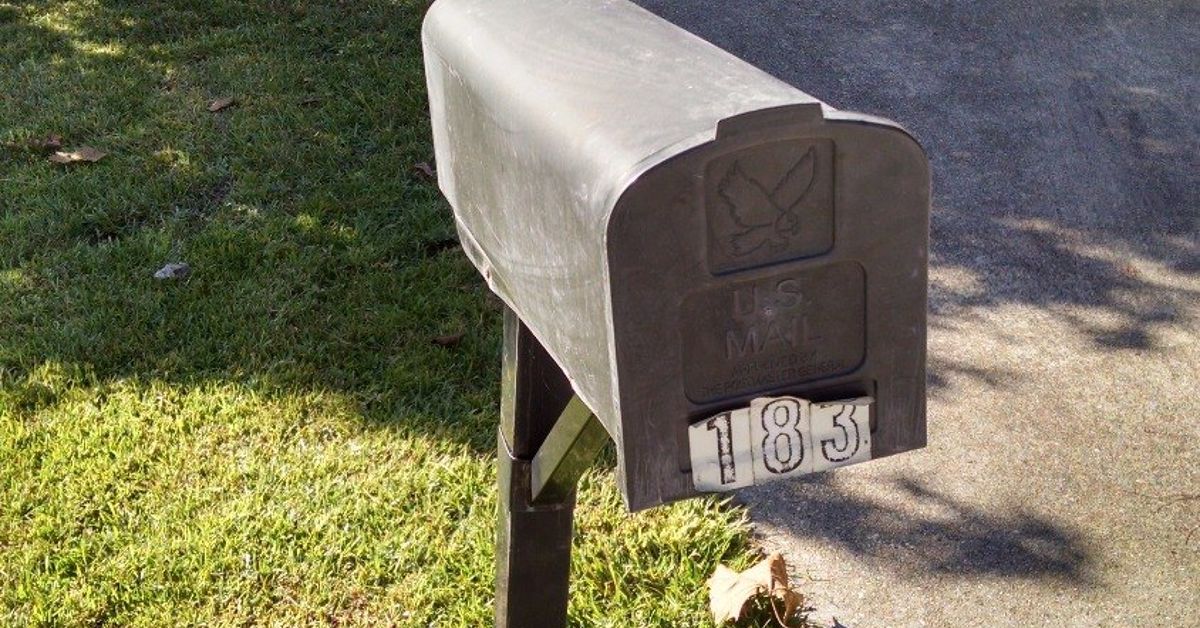
Your mailbox is the first thing most people “meet” on the way to your front doorbefore your porch light, your
landscaping, and definitely before your lovingly curated welcome mat that says “Hi” but secretly means
“Please don’t sell me solar panels.”
A mailbox makeover is one of those rare home projects that checks every box (pun fully intended):
it’s affordable, fast, satisfying, and it can boost curb appeal so much that your house suddenly looks like it has
its life together. Even better? With a little planning, you can upgrade style, visibility, and durability while
still playing nice with your mail carrier and local guidelines.
Why a Mailbox Makeover Works So Well
Curb appeal upgrades usually fall into two camps: “expensive and dramatic” (new siding) or “cheap and oddly
powerful” (fresh paint, new house numbers, andsurpriseyour mailbox). The mailbox sits right at the street,
which means it gets maximum eyeballs per dollar spent. And since it’s exposed to sun, rain, sprinklers, snowplows,
and the occasional rogue trash bin, it’s also one of the first exterior items to look tired.
Translation: if your mailbox is rusty, leaning, faded, or held together by vibes, fixing it makes everything else
look betterlike putting on clean shoes before a date. You didn’t change everything, but suddenly the
whole outfit makes sense.
Before You Start: The “Don’t Anger the Mail Carrier” Checklist
A great mailbox makeover is equal parts design and practicality. Here are the basics to confirm before you paint,
replace, or rebuild:
1) Placement and reach matter
Many curbside mailboxes follow standard placement guidelines so carriers can deliver efficiently from a vehicle.
If you’re moving your box or installing a new post, verify typical height and setback expectations for your area.
If conditions vary (no curb, unusual road edge, tight shoulder), it’s smart to check locally first.
2) Keep supports “safe” and breakaway-friendly
The safest mailbox supports are sturdy enough for weather but designed to bend or break away if hit. Avoid turning
your mailbox into an accidental roadside obstacle course. In some places, overly rigid installations (think heavy
masonry or other unyielding supports) can be discouraged or restrictedespecially within the public right-of-way.
3) Make the address easy to read
A mailbox that looks amazing but hides your house number is like a fancy restaurant with no signcute for Instagram,
terrible for guests, deliveries, and emergency services. Prioritize large, high-contrast numbers and clean placement.
Mailbox Makeover Levels: Pick Your Adventure
Not every makeover has to be a full rebuild. Choose the level that matches your budget, time, and how badly your
current setup is embarrassing you.
Level 1: Refresh (60–120 minutes)
- Deep clean the box and flag
- Light sanding and rust removal
- Prime + repaint (or touch up)
- Replace house numbers
- Add a small planter bed or edging
Level 2: Upgrade (half day)
- Replace the mailbox with a larger, more weather-friendly model
- Swap a wobbly post for a straight, attractive one
- Add a crossarm, finial, post cap, or newspaper holder (without interfering with the box)
- Install reflective numbers or a small solar spotlight for nighttime visibility
Level 3: Full Glow-Up (weekend project)
- New post + new box + upgraded hardware
- Landscaping bed with perennials
- Coordinated color palette that matches shutters/door
- Optional: locking mailbox or package-friendly box if theft/weather is an issue
Step-by-Step Mailbox Makeover (That Actually Lasts)
Step 1: Inspect what you’ve got
Give your mailbox a quick “physical.” Check:
- Rust: especially underneath and around seams
- Door alignment: does it close properly, or does it do that sad droop?
- Flag function: stiff, loose, or missing
- Post stability: wobble, rot at the base, insect damage
- Hardware: missing screws, stripped mounts, broken brackets
If the box is structurally fine, paint can do wonders. If the door is warped, the floor is Swiss cheese, or the
whole thing is doing a permanent lean into the street, it’s probably replacement time.
Step 2: Clean like you mean it
Paint doesn’t stick to dirt, chalky oxidation, or “mystery road film.” Wash the mailbox with soapy water, rinse,
and let it dry. If there’s greasy residue (hello, fingers and vehicle exhaust), use a degreaser. Take off numbers
and removable parts if possible.
Pro tip: clean the inside lip too. You don’t want your fresh paint job to glue the door shut like a dramatic
metaphor.
Step 3: Prep the surface (this is where durability is born)
For metal mailboxes, remove loose rust and flaking paint with a wire brush or sandpaper. Scuff glossy surfaces so
primer can grip. Wipe away dust before priming.
Important safety note: If you’re working on an older painted surface, sanding can release hazardous
dust. Use appropriate protection and clean up carefully.
Step 4: Prime properly
Primer is not optional if you want your mailbox makeover to survive a full year of sun and weather without peeling.
Use a rust-inhibiting primer on metal, especially where rust existed. Follow product directions for dry times.
Step 5: Paint like a grown-up (thin coats win)
Spray paint is popular for mailboxes because it gives a smooth finish with minimal brush marks. The trick:
several light coats, not one heavy coat. Start spraying off the object, sweep across, and release
off the other side to prevent drips and thick edges. Let coats dry as directed.
Finish ideas that look sharp (and hide grime): satin black, deep navy, soft charcoal, classic white, or a color that
matches your front door. If you go bold (red, teal, sunshine yellow), commit and make the numbers simple.
Step 6: Upgrade the details that make it look “custom”
This is where the mailbox makeover stops looking like “I painted a box” and starts looking like “I have a cohesive
exterior design plan.” Consider:
- New address numbers: large, high contrast, preferably reflective
- Hardware: stainless screws and brackets resist rust
- Post cap or finial: small change, big polish
- Mailbox flag: replace if cracked or faded
- Decals/stencils: subtle patterns, stripes, or a monogram (avoid blocking numbers)
Replacing a Mailbox or Post: Practical Installation Tips
If your post is leaning or rotting, replacing it can make the biggest visual differencebecause straight lines read
as “new,” and leaning posts read as “this home is powered by chaos.”
Choosing a mailbox size and style
Standard curbside mailboxes typically fall within common size ranges. If you want fewer “please pick up your package”
slips, consider a larger-capacity mailbox or a package-friendly design. Locking mailboxes can add security, but the
incoming slot still needs to accept your everyday mail comfortably.
Setting a new post (DIY-friendly approach)
- Call before you dig: use your local utility locating service to mark lines.
- Dig a stable hole: many DIY guides use a hole around 24 inches deep (or deeper based on local
conditions) and wide enough for the post plus backfill. - Add drainage: place several inches of gravel at the bottom so water doesn’t pool around the post.
- Set the post plumb: use a level on two sides and brace it.
- Backfill securely: depending on local rules and safety guidance, you may use compacted soil/gravel
or concrete below grade. Avoid creating a rigid hazard within the right-of-way. - Mount the mailbox: attach with rust-resistant hardware and confirm the door opens freely.
- Recheck alignment: step back, sight the post, and adjust before anything sets permanently.
If you’d rather skip the digging and measuring, many homeowners hire a handyman or installerespecially for brick
mailbox projects or replacement in hard soil. The “worth it” factor often comes down to whether you enjoy digging
holes or simply tolerate them.
Mailbox Landscaping: The Curb Appeal Multiplier
Landscaping around the mailbox is like framing a picture: it makes the whole thing look intentional. The goal is a
tidy, low-maintenance bed that won’t block access for the carrier, won’t snag sleeves, and won’t die the second you
go on vacation.
Mailbox garden rules of thumb
- Keep it low near the door: avoid tall plants that interfere with opening/closing.
- Choose sun-tough options: mailbox spots are often full sun and dry.
- Skip thorns and prickly plants: nobody wants a cactus-based delivery system.
- Edge the bed: a simple border makes it look finished and keeps mulch in place.
Easy plant ideas that play nice at the curb
Consider hardy, curb-friendly favorites like daylilies, black-eyed Susans, clematis on a small trellis (kept tidy),
rosemary, or compact conifersdepending on your climate and sun exposure. Mix one “structure” plant (shrub or small
evergreen) with seasonal color for a bed that looks good most of the year.
Design Ideas That Don’t Look Like a Craft Store Explosion
The best mailbox makeover designs feel like part of your home’s exterior, not a separate theme park attraction.
Here are a few looks that tend to land well:
Modern and clean
- Matte or satin black mailbox
- Simple sans-serif numbers in white or brushed metal
- Minimal landscaping: dark mulch + one sculptural plant
Classic American
- Black mailbox, white post
- Traditional red flag
- Small bed of perennials (easy repeat bloomers)
Coastal casual
- White or soft gray box with navy numbers
- Post wrap or cap detail
- Beachy grasses or lavender (where climate allows)
Rustic farmhouse (without the “live laugh love” requirement)
- Cedar-stained post or wood accents
- Simple black hardware
- Planter bed with hardy flowers and a neat border
Common Mailbox Makeover Mistakes (So You Don’t Do Them)
- Painting over rust without prep: it will bubble and peel faster than you can say “touch-up.”
- Blocking the door swing: landscaping should frame the mailbox, not hug it like an overattached relative.
- Tiny house numbers: if your number can’t be read from a slow-moving car, go bigger.
- Overbuilding the support: avoid turning a mailbox into a rigid roadside hazard.
- Ignoring local rules/HOA: nothing kills the joy like a politely worded letter with the energy of a parking ticket.
Maintenance: Keep Your Makeover Looking Fresh
Once your mailbox looks brand new, keep it that way with a tiny routine:
- Wipe it down seasonally (especially after winter or heavy pollen)
- Tighten hardware once or twice a year
- Touch up chips quickly to prevent rust from spreading
- Trim mailbox plants so the door and numbers stay clear
Conclusion
A mailbox makeover is the curb appeal equivalent of a great haircut: it makes the whole house look sharper, even if
nothing else changes. Whether you’re going for a quick paint refresh or a full weekend glow-up with a new post and a
mailbox garden, focus on three things: clean lines, readable numbers, and durable materials.
Do it right once, and you’ll get that satisfying “new home” feeling every time you pull into your drivewayplus a
mailbox that won’t embarrass you when the neighbors stroll by.
Bonus: Mailbox Makeover Experiences From the Curb (About )
If you’ve never done a mailbox makeover, here’s what people usually don’t expect: it feels ridiculously personal.
You’re not remodeling a kitchen you’ll show off at partiesyou’re upgrading a tiny street-side object that quietly
represents your home to everyone who passes. And that’s exactly why it’s so satisfying.
The first “experience” most DIYers report is the shock of instant improvement. You paint the box,
swap on crisp new numbers, straighten the post, and suddenly the whole front of the property looks tidier. Even if
your lawn is mid-recovery or your shrubs are doing their own abstract art thing, the mailbox reads as “maintained,”
and the rest of the yard looks more intentional by association. It’s visual psychology, but in a good way.
The second common moment: the neighbor ripple effect. One person upgrades their mailbox, and within
weeks you notice another mailbox gets repainted. Then someone adds a neat bed of flowers. Next thing you know, your
street looks like it’s quietly competing for “Most Improved Block,” and nobody is even mad about it. It’s one of
the rare home projects that can boost community vibe without requiring a meeting, a budget, or snacks.
There’s also the “I wish I’d done this sooner” lesson. A lot of people start with the idea of paintquick and
cheapthen realize the real issue is the post. Once they replace a wobbly, weathered support with a straight,
sturdy one, the mailbox finally looks intentional instead of accidental. It’s like hanging a picture on a crooked
nail: you can adjust the frame all day, but fixing the support is what makes it right.
Another surprisingly common experience is becoming very invested in house numbers. At first it
seems like a boring detail. Then you put up larger, high-contrast numbers and realize: deliveries go smoother,
guests stop missing the house, and you personally enjoy seeing your address look sharp. It’s a tiny upgrade that
feels weirdly grown-up, like buying matching socks on purpose.
Finally, the best mailbox makeover stories usually end with a simple habit: people keep it looking good because it
now feels worth maintaining. They trim the mailbox plants before they get wild. They touch up paint chips quickly.
They tighten one loose screw instead of letting it become a rattling, sagging problem for three years. The mailbox
makeover becomes a small “anchor” that nudges the rest of the exterior toward better upkeepwithout turning your
weekends into a never-ending DIY marathon.
In short: a mailbox makeover isn’t just a cosmetic fix. It’s a quick win that makes your home feel more welcoming,
more finished, and more “you.” And if you catch yourself smiling at a freshly painted mailbox on the drive home…
congratulations, you’ve joined the club.