Starting apple trees from seeds is equal parts science experiment, patience training, and “Wait… did I just grow a whole tree from something I almost composted?”
It’s also a gentle reminder that apples are wonderfully unpredictable. If you’re expecting a perfect Honeycrisp clone from one seed, this is where I lovingly hand you a
reality check and a paper towel for your tears (and for seed stratificationmore on that soon).
Done right, growing apple trees from seed can be a fun project, a way to create hardy seedlings for grafting, or a long-game adventure that might reward you with unique fruit.
This guide walks you through the full process: choosing seeds, cold stratification, planting, seedling care, and what to do when your seeds act like they’ve taken a vow of silence.
We’ll also cover the “secret” that orchard pros already know: if you want reliable, delicious apples, you usually graft a known variety onto a root system (often grown from seed).
The Big Truth: Apple Seeds Don’t “Copy-Paste” the Parent Tree
Here’s the most important expectation to set: apple seeds usually do not grow true to type. In plain English, a seed from a Granny Smith doesn’t reliably grow a Granny Smith tree.
Apple blossoms are typically pollinated by insects, and the genetics shuffle like a deck of cards. Each seed is its own unique combination.
That’s why nurseries and orchards typically produce named apple varieties by graftingthey attach a piece of a desired variety (the scion) onto a rootstock
that provides the roots (and often controls tree size and vigor). So if your goal is consistent fruit quality, seed-growing is a scenic route… and sometimes it’s a route with potholes.
But if your goal is learning, experimentation, and maybe discovering a surprise apple worth bragging about, seeds are perfect.
Why Bother Growing Apples From Seed?
1) It’s a legit gardening flex
“I grew this tree from a seed” is one of those sentences that makes gardeners nod respectfully, even if they have no idea what you’re talking about.
2) You can grow your own rootstock for grafting
Many growers use apple seedlings primarily as rootstocks. After a year or two, you can graft a known variety onto your seedling, combining the fun of seed-starting
with the practicality of predictable fruit.
3) You might get a unique apple
Most seedlings won’t produce “grocery store perfect” fruit. But some can produce tasty apples, cider apples, wildlife-friendly fruit, or even a quirky new favorite.
Think of it as the apple version of mystery-flavor jellybeansexcept it takes years to taste one.
What You’ll Need (A.K.A. Your Apple Seed Starter Kit)
- Apples (ideally fresh, locally grown, and not stored forever)
- Paper towels or a seed-starting medium (peat moss/sand mix works well)
- Sealable plastic bag or a small container with air holes
- Permanent marker + labels (future-you will thank you)
- Seed-starting mix and small pots or cell trays
- Grow light or bright window
- Patience (not optional)
Step-by-Step: How to Start Apple Trees From Seeds
Step 1: Choose Seeds Like You Mean It
You can use seeds from grocery store apples, but success can vary. Apples may have been stored for long periods, and seed viability can drop if seeds dried out too much or were mishandled.
For better odds, use fresh apples from a local orchard, farmer’s market, or a neighbor who casually has “too many apples” (the best kind of problem).
Pro move: start multiple seeds. Even under good conditions, not every seed germinates, and some seedlings are stronger than others.
If you start 20 seeds and end up with 6 healthy seedlings, you didn’t failyou did statistics.
Step 2: Extract and Clean the Seeds
Slice open your apple, remove the seeds, and rinse them under cool water to remove sugary fruit residue (sugar + moisture can encourage mold during stratification).
Pat them dry briefly on a towel. The goal is “not dripping,” not “desert-dry for days.”
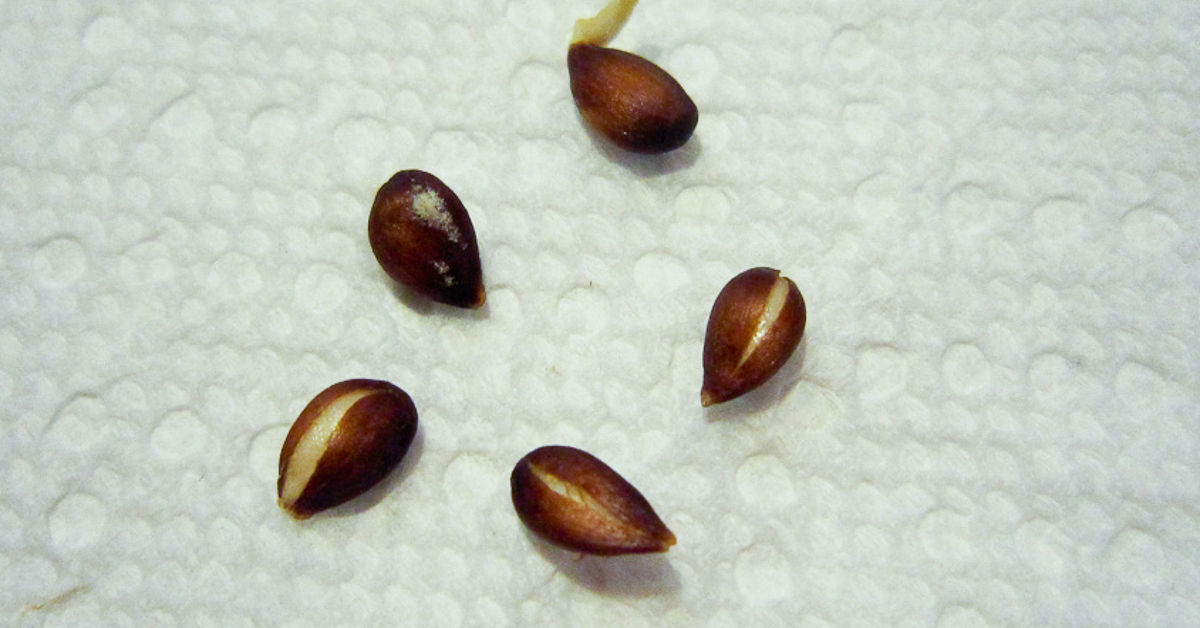
Step 3: Cold Stratify the Seeds (The “Fake Winter” Stage)
Apple seeds are naturally dormant and typically need a chilling periodcalled cold stratificationbefore they’ll germinate. In nature, they spend winter
in cool, moist conditions and sprout when spring arrives.
Easy fridge method (paper towel + bag)
- Moisten a paper towel so it’s damp but not soggy.
- Place seeds on the towel, fold it over, and slide it into a sealable bag.
- Label the bag with the date and seed source.
- Store in the refrigerator (not the freezer) for about 60–90 days.
Medium method (peat/sand mix)
If you want fewer mold issues, stratify seeds in a moist (not wet) 50/50 mix of peat moss and sand or peat and vermiculite in a container with ventilation.
This mimics natural conditions well and helps keep moisture more even.
During stratification, check once a week. If you see mold, remove affected seeds, replace the towel/medium, and reduce moisture slightly.
If seeds sprout in the fridge (tiny white “tails”), it’s go-time: plant them soon so the root doesn’t curl or break.
Step 4: Plant the Sprouted Seeds
Once you see a small root tip (or once your stratification window is complete), plant seeds in pots or trays filled with a sterile, well-draining seed-starting mix.
- Planting depth: about 1/4–1/2 inch deep
- Water: keep evenly moist, not swampy
- Temperature: room temperature is fine for germination
- Light: bright light after emergence (grow lights help prevent leggy seedlings)
Step 5: Seedling Care (Where Most “Oops” Happens)
Apple seedlings want consistent moisture, strong light, and decent airflow. The most common early problems are:
- Leggy growth (not enough light)
- Damping-off (too wet + poor airflow)
- Slow growth (cold temps, tired soil, or overwatering)
When seedlings have a few sets of true leaves, you can begin light feeding with a diluted, balanced fertilizer. Don’t overdo itseedlings don’t need an all-you-can-eat buffet.
They need a steady snack.
Step 6: Pot Up and Harden Off
Once seedlings outgrow their starter cells, transplant them into larger pots. Use quality potting mix and handle seedlings by the leaves (not the fragile stem).
Before moving them outdoors permanently, harden them off: over 7–10 days, gradually increase outdoor time and sun exposure.
This helps them adjust to wind, temperature swings, and real sunlight (which is brighter than your window, no matter how optimistic your window is).
Step 7: Planting Outdoors (Location Matters More Than Pep Talks)
Apple trees generally perform best in full sun and well-drained soil. Good airflow helps reduce disease pressure. Avoid low, frost-prone pockets
where cold air settlesapple blossoms and late frost are not friends.
If you’re planting multiple seedlings, space them generously. Even if you plan to thin later, crowding can increase disease issues and produce weak, spindly growth.
How Long Until Fruit? The Honest Timeline
A seed-grown apple tree can take many years to flower and fruitoften around 6–10 years, and sometimes longer depending on vigor and conditions.
Standard trees generally take longer than dwarf trees (which are typically grafted onto dwarfing rootstocks).
Translation: if you’re planting seeds today, you are also planting a future story you’ll tell later. Maybe at a backyard picnic. Maybe to your tree while you glare at it lovingly.
Want Better Apples? Use Your Seedling as Rootstock and Graft a Known Variety
If your dream is “reliably delicious apples,” the best next step is usually grafting. Here’s the basic idea:
- Rootstock = the rooted base (your seedling can become this)
- Scion = a piece of a known apple variety you want to grow
Once your seedling is about pencil-thick (often after 1–2 growing seasons), you can graft in late winter/early spring when plants are dormant or just waking up.
Common home-orchard methods include whip-and-tongue grafts, cleft grafts, and budding techniques.
Grafting sounds intimidating until you realize it’s basically plant surgery with cleaner language and fewer medical school loans.
You’re aligning living tissue layers so the plant heals into one functional tree. If you like hands-on projects, you’ll probably love it.
Pollination: One Tree Is Often Not Enough
Most apple varieties need cross-pollinationpollen from a compatible, different variety delivered by insects (usually bees).
That means two different apple varieties (that bloom around the same time) are often needed for good fruit set.
If you’re growing seedlings, you won’t know exactly what variety they are, but planting multiple seedlings increases the chance that you’ll have compatible bloom partners later.
In established orchards, crabapples are sometimes used as pollinizers because they can produce lots of viable pollen over a long bloom window.
Pests and Diseases: Keep It Simple, Especially at First
Young trees don’t need a complicated spray schedule to survive, but they do benefit from smart prevention:
- Sanitation: remove fallen leaves and rotting fruit to reduce disease carryover.
- Airflow: don’t crowd trees; prune for an open structure.
- Resistant varieties: when you graft, consider disease-resistant options if your area struggles with scab or fire blight.
- Observation: catch problems earlychewed leaves, sticky residue, spotted foliage, or oozing cankers.
Common issues in many regions include apple scab, fire blight, rust diseases, powdery mildew, and insect pests like codling moth and plum curculio.
Your local Extension office often has the most useful “what actually happens here” guidance.
Troubleshooting: When Your Seeds Don’t Cooperate
Problem: Seeds get moldy in the fridge
- Reduce moisture (damp, not wet).
- Swap to fresh paper towel or a peat/sand mix.
- Vent briefly during weekly checks.
- Start more seeds than you think you need.
Problem: No germination after 90 days
- Some seeds are not viabletry fresher apples next time.
- Make sure the fridge is consistently cold, not fluctuating warm.
- Try extending stratification a bit longer and keep the medium moist.
Problem: Seedlings are tall and floppy
- Increase light intensity (grow light closer, longer duration).
- Provide gentle airflow (a small fan on low can help strengthen stems).
Problem: Seedlings collapse at soil level
- This can be damping-offuse sterile mix, avoid overwatering, and improve airflow.
- Let the surface dry slightly between waterings.
Conclusion: The Best Way to “Win” at Apple Seeds
Growing apple trees from seeds is absolutely doablejust go in with the right expectations. You’re not cloning a favorite apple; you’re raising a brand-new genetic individual.
The process hinges on proper cold stratification, careful seedling care, and patience. If your goal is dependable fruit, consider grafting a known variety onto your seedling later.
Either way, you’ll learn a ton, grow something genuinely impressive, and gain a story that starts with: “So I saved these seeds from an apple…”
Experience-Based Notes (Extra )
Gardeners who try seed-started apples tend to share a few “wish I’d known that sooner” lessonsand they’re surprisingly consistent across climates and skill levels.
First: the fridge stage is where enthusiasm goes to nap. You’ll start out checking your bag every day like an excited golden retriever, then forget about it for three weeks,
then remember at midnight and shuffle to the fridge like a detective investigating a cold case. A simple trick that helps: set a calendar reminder for weekly checks and put a bright label on the bag
that says “DO NOT THROW AWAY (TREE IN PROGRESS).” This is especially important if you live with someone who believes unlabeled plastic bags are “mystery science leftovers.”
Second: people often underestimate how sensitive the moisture level is during stratification. If the towel is too wet, mold shows up like it pays rent.
If it’s too dry, seeds can stall. The sweet spot is “wrung-out sponge,” and many gardeners report better results when they switch from paper towels to a lightly moist peat/sand mix.
Another common pattern: starting with seeds from a local orchard tends to feel easier than seeds from long-stored supermarket apples.
The local fruit is often fresher, and the whole project feels less like you’re asking a seed to wake up from a decade-long nap.
Third: seedling survival often comes down to light and airflow. A lot of people sprout seeds successfully, then lose seedlings to leggy growth indoors.
The fix is unglamorous but effective: brighter light (a basic grow light works wonders) and a gentle fan. In practice, gardeners describe the “two-week transformation”
once seedlings get steady light, they stop stretching and start building sturdier stems and darker leaves.
Fourth: outdoor transition is where pride meets reality. Seedlings raised indoors can get sunburned quickly if they go straight into full sun.
Gardeners who do a slow hardening-off routine (increasing outdoor exposure over 7–10 days) report far fewer setbacks.
A realistic example: placing pots outside for one hour the first day, then two hours the next, then adding morning sun before moving into brighter afternoon light.
This isn’t overprotective parenting; it’s plant sunscreen training.
Fifth: people who stick with seed apples long-term usually do it for one of two reasons. Either they love the experiment and genuinely enjoy watching a unique tree develop,
or they’re planning to graft later and want homegrown rootstock. The grafting crowd often describes year two as the turning point:
the seedling finally looks “tree-ish,” and the idea of converting it into a known variety feels both practical and exciting.
A common strategy is to grow several seedlings, then keep the strongest one or two for grafting, while planting the rest as pollinator companions or wildlife trees.
It’s a very gardener solution: start with abundance, then edit down once you see what thrives.
Finally, nearly everyone who successfully grows apples from seed says the same thinglabel everything. Label the seed bag. Label the pots. Label the pots again.
And if you think, “I’ll remember which one is which,” that’s the exact moment you won’t. The good news? Even if labels disappear, the project still teaches you
the rhythm of dormancy, germination, and long-term plant care. And if a seedling eventually produces fruit that’s merely “fine,” you’ll still feel absurdly proudbecause you made it happen.