Retro kitchens are having a serious moment, and it’s no surprise. These kitchens pack a ton of personality, charm, and history into a space where we all seem to spend more time than anywhere else. But let’s face itcreating a stylish retro kitchen can quickly get pricey. Whether you’re dreaming of an updated version of your grandmother’s mint green fridge or a colorful backsplash straight out of an old-school diner, you don’t need to drain your bank account to bring these iconic looks into your home. The secret? A little creativity and a dash of DIY magic! So grab your apron, and let’s dive into how you can steal this looka cost-conscious retro kitchen in London that proves you don’t have to break the bank to add some vintage flair to your culinary space.
Why Go Retro? The Allure of a Nostalgic Kitchen
Retro kitchens are more than just an aesthetic; they’re a vibe, a throwback to simpler times when meals were served with a side of nostalgia. Think of it as a culinary time machine that transports you to the 1950s or ’60swhenever you envision the golden era of home cooking. The pops of color, the gleaming chrome, and the iconic details like checkerboard floors and vintage refrigerators create a space that feels fun, cozy, and most importantlyauthentic.
Now, why not give your own kitchen that same charming retro spin? The key is blending old-school style with modern efficiency. Plus, going retro doesn’t mean spending big. In fact, creating a cost-effective retro kitchen is totally doable with the right tools, materials, and mindset. Here’s how you can do it.
Step 1: Setting the FoundationThe Right Color Palette
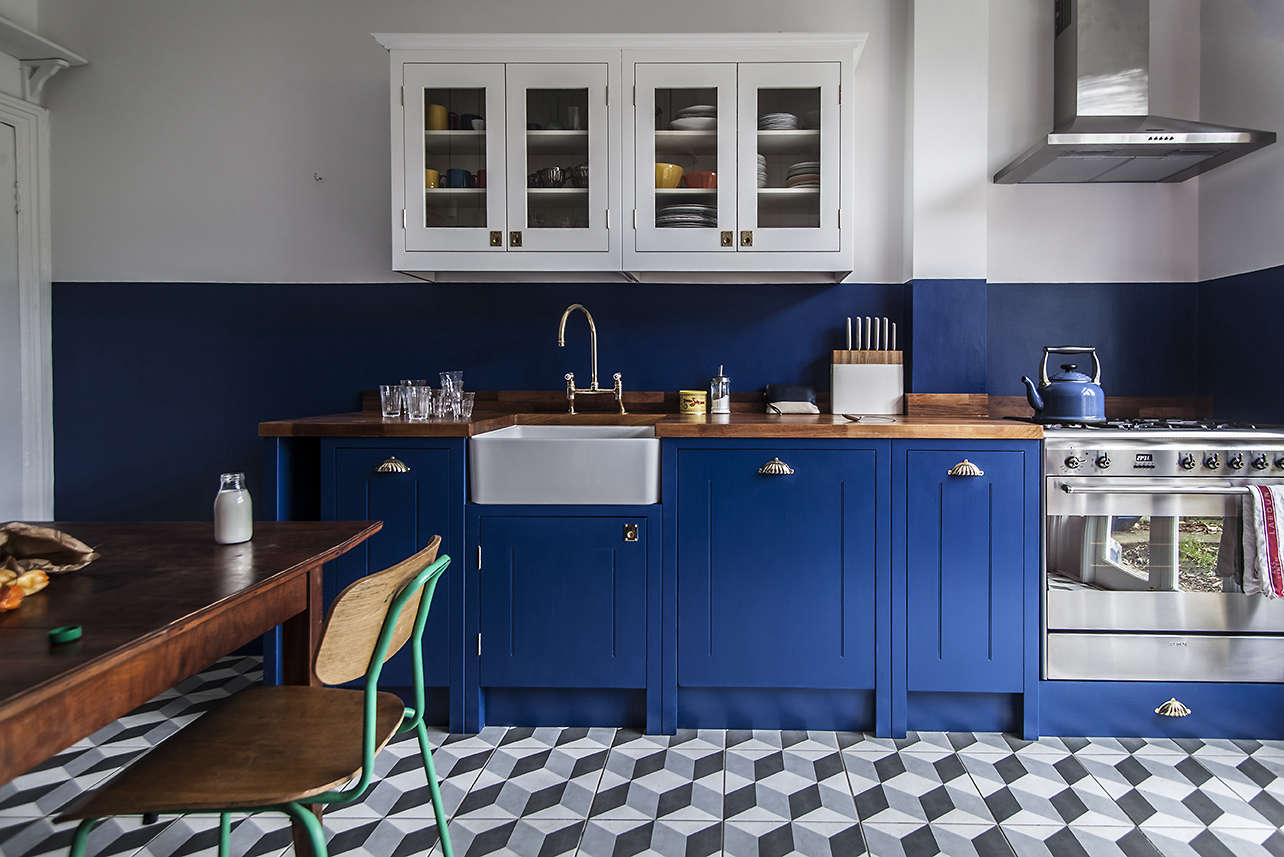
The foundation of any retro kitchen is the color palette. You can’t just pick any colors and expect it to look authentic. Retro kitchens typically feature bold, contrasting colors. Think mint green, cherry red, sunshine yellow, and baby blue. These colors reflect the bright, optimistic attitude of mid-century modern design. However, if you’re trying to keep costs low, you don’t have to re-paint everything in sight. Focus on strategic pops of color that make the biggest impactlike cabinets, a statement fridge, or colorful tiles.
One simple way to add that retro vibe without breaking the bank? Use peel-and-stick wallpaper or backsplash tiles. They’re affordable, easy to install, and come in all sorts of retro patterns, from polka dots to checkerboards. Plus, these wallpapers can be swapped out easily if you ever want to update the look down the line!
Step 2: Vintage-Inspired Appliances on a Budget
Ah, the appliancesthe heart of any kitchen. While vintage stoves and refrigerators are undeniably cool, they can also be downright expensive. But fear not! You don’t have to sell your soul to get that retro look. A great trick is to find modern appliances that mimic the retro style. Brands like Smeg, Big Chill, and even Frigidaire offer appliances that look straight out of the 1950s, but without the hefty price tag of true vintage models.
On the hunt for a vintage refrigerator? Consider buying a second-hand one! Sites like eBay, Craigslist, or Facebook Marketplace can yield some real gems. Just make sure to check the condition before making the purchase. Another budget-friendly option is to use appliance stickers that mimic the vintage look, transforming your ordinary fridge into an eye-catching statement piece.
Step 3: Mixing Old and NewThe Magic of Upcycling
One of the best ways to stay cost-conscious while still creating a retro kitchen is to embrace upcycling. Repurposing old furniture and fixtures can bring an authentic vintage vibe to your kitchen without the price tag of brand-new pieces. Keep an eye out for retro chairs, tables, and even light fixtures at thrift stores or antique shops.
Not sure where to begin? Start with something small like a vintage clock or a collection of old-school kitchenwarethink retro tea kettles, ceramic canisters, or colorful dishware. These small details can create the retro atmosphere you’re after while keeping costs low.
Upcycling Inspiration: Refinish Your Cabinets
If your kitchen cabinets are a bit outdated, don’t rush to replace them just yet. Consider sanding them down and giving them a fresh coat of paint. For that retro vibe, opt for glossy finishes and colors like mint green, pale yellow, or sky blue. If you’re feeling adventurous, add some vintage-inspired handles or knobs to complete the look. This is a great way to refresh your kitchen without forking out for expensive replacements.
Step 4: Flooring That Feels Like a Throwback
For a truly retro kitchen, the floor can make a huge difference. Classic checkerboard floors are a signature of retro style, and you don’t have to invest in high-end materials to get the same effect. Look for peel-and-stick vinyl tiles that you can lay down yourself. They’re affordable, easy to install, and can be found in a variety of patterns and colors.
If checkerboard isn’t your thing, there are other retro-style options availablethink terrazzo, linoleum, or even retro-inspired vinyl flooring that mimics the look of wood or tile. Many of these options are budget-friendly and durable, giving you the best of both worlds.
Step 5: Accessorizing with Retro Details
It’s the little things that bring your retro kitchen together. Accessories can make a world of difference when it comes to creating a cohesive look. Search for vintage kitchen gadgets that not only look cute but also serve a purpose. From mid-century kitchen scales to retro toasters and blenders, these nostalgic pieces can often be found at affordable prices at local thrift shops or online.
Another fun idea is to frame retro recipe cards or vintage advertisements and hang them as artwork. Not only will this bring the space together, but it’ll also add a personal touch to your retro kitchen.
Step 6: Final TouchesLighting for That Retro Glow
Lighting is crucial in any kitchen, but it’s especially important when trying to create a retro look. Vintage-style pendant lights or chandelier fixtures can add charm and warmth to your space. Look for affordable alternatives at big-box retailers or even at flea markets for genuine vintage finds.
Another clever way to add lighting without splurging? String lights! Hang them under cabinets or around windows for a soft, whimsical glow. It’s an easy and affordable way to add a touch of retro glam to your space.
Conclusion: Your Retro Dream Kitchen Awaits
Building your dream retro kitchen doesn’t have to be a financial burden. By following these tips, you can create a stunning, cost-conscious space that’s dripping with vintage charm. Whether you’re swapping out modern appliances for vintage-inspired ones or adding personal touches with thrifted accessories, it’s all about finding the right balance between nostalgic style and practical design.
So, roll up your sleeves, tap into your creative side, and get ready to cook up some memories in your very own retro kitchen. The best part? You’ll be able to enjoy all the retro goodness without maxing out your credit card. Happy decorating!
-
Instead, I went for the low-cost option: upcycling. I painted my cabinets a soft mint green, added new vintage-style handles, and swapped out the old hardware for new, retro-inspired pieces. I found a second-hand fridge that was close to the vintage style I was after but still functional. The real game-changer, though, was the backsplash. I used peel-and-stick tiles in a classic black-and-white checkerboard pattern. It was an easy update that instantly brought the space to life!
And let’s talk about accessories! I dug through local thrift stores and found the cutest mid-century kitchen gadgetsold-school blenders, a retro coffee maker, and even a vintage scale. It’s amazing how these small touches completely transformed the space without costing a fortune.
My final touch was lightinga gorgeous vintage-inspired pendant light I found at an antique market. The result? A fun, colorful, and functional retro kitchen that feels straight out of a ’50s diner, but without the hefty price tag. The whole process took time, but it was worth every penny saved.
If you’re thinking about giving your kitchen a retro makeover, don’t be afraid to think outside the box. With a little creativity and a lot of DIY, you can create a retro haven on any budget. The kitchen is the heart of the home, so why not make it a space that feels warm, welcoming, and packed with personality?