If Minecraft had a gym membership, it would be called Potion of Strength. One sip and suddenly your sword swings feel like they’re paying rent.
Whether you’re gearing up for a Wither fight, cleaning up a raid, or just trying to convince your friends you’re “totally not scared” of the Nether,
a Strength Potion is one of the most useful combat buffs you can brew.
In this guide, you’ll learn exactly how to make a Strength Potion in Minecraft, how to upgrade it to Strength II, how to extend the duration,
and how to turn it into splash and lingering versions for multiplayer chaos (the friendly kind… mostly).
Quick Snapshot: What a Strength Potion Does
A Strength Potion increases your melee damage for a limited time. It’s designed for close-range combatswords, axes, fists, and “I panicked and
punched the creeper” moments. It does not boost bow damage (sorry, archersyour glow-up is tipped arrows).
- Potion of Strength (default): solid melee damage boost for everyday fights.
- Potion of Strength (extended): same power, longer durationgreat for long trips or boss prep.
- Potion of Strength II: stronger boost, shorter durationbest when you need peak damage right now.
What You Need to Brew a Strength Potion
Brewing is basically cooking, except the kitchen is on fire, the ingredients are from another dimension, and you’re one mistake away from drinking a “Mundane Potion”
that’s about as exciting as unbuttered toast. Here’s the shopping list.
Core Gear
- Brewing Stand (your potion workstation)
- Blaze Powder (fuel for the Brewing Stand)
- Glass Bottles + Water (to make Water Bottles)
Core Ingredients
- Nether Wart (to create an Awkward Potion base)
- Blaze Powder (the effect ingredient for Strength)
Optional Modifiers (Highly Recommended)
- Redstone Dust (extends duration)
- Glowstone Dust (upgrades to Strength II)
- Gunpowder (turns it into a Splash Potion)
- Dragon’s Breath (turns Splash into Lingering)
Step-by-Step: How to Make a Strength Potion in Minecraft
The standard Strength Potion follows the classic potion “sandwich”: Water Bottle → Awkward Potion → Effect Potion.
You can brew up to three bottles at once, so don’t brew like a lonely wizardbrew like you’re running a tiny beverage company.
Step 1: Craft (or Place) a Brewing Stand
If you don’t already have one, craft a Brewing Stand using 1 Blaze Rod and 3 Cobblestone. Place it down somewhere safe.
(Pro tip: “somewhere safe” does not mean “right next to lava” even if it looks cool.)
Step 2: Make Water Bottles
- Craft Glass Bottles (3 glass in a “V” shape gives 3 bottles).
- Fill them with water by using the bottles on a water source block.
- Put up to three Water Bottles into the bottom slots of the Brewing Stand.
Step 3: Fuel the Brewing Stand
Add Blaze Powder to the fuel slot on the left side of the Brewing Stand interface. No fuel = no brewing.
Think of it like a coffee machine: the buttons are there, but without power it’s just a fancy plastic box.
Step 4: Brew an Awkward Potion (The Base)
- Place Nether Wart in the top ingredient slot.
- Wait for the brew cycle to finish.
- Your Water Bottles become Awkward Potions (the base for most effect potions).
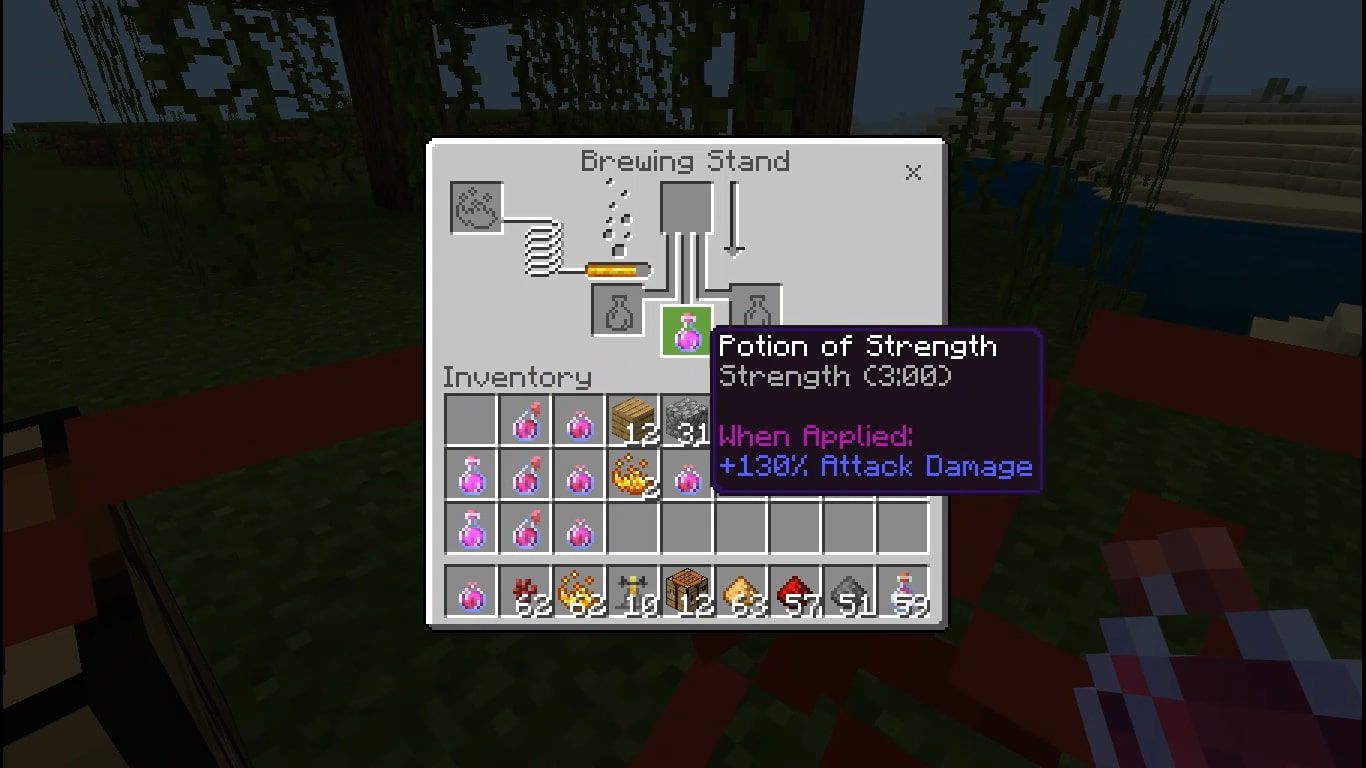
Step 5: Add Blaze Powder to Make a Potion of Strength
- Put Blaze Powder in the top ingredient slot (yes, it’s both fuel and an ingredientoverachiever behavior).
- Wait for brewing to complete.
- Congratulations: you now have a Potion of Strength.
Upgrade Paths: Make It Last Longer or Hit Harder
Option A: Extend Duration with Redstone (Strength “+”)
If you want your Strength Potion to last longerlike when you’re clearing a Nether Fortress, exploring caves, or picking a fight with everything that blinks
use Redstone Dust.
- Place your finished Potion of Strength in the bottom slot(s).
- Add Redstone Dust to the top ingredient slot.
- After brewing, you’ll get an extended Strength Potion (longer duration).
This is the “marathon mode” version: same power, more time to use it. Great for long combat sessions and multiplayer adventures where nobody agrees on
when to head home.
Option B: Upgrade to Strength II with Glowstone
If you want maximum punch-per-swing, use Glowstone Dust to upgrade your Strength Potion to Strength II.
This increases the effect but shortens the durationlike switching from “steady workout plan” to “one energy drink and bad decisions.”
- Place Potion of Strength in the bottom slot(s).
- Add Glowstone Dust to the top slot.
- After brewing, you’ll have Potion of Strength II.
Important: In most current versions, you generally can’t extend Strength II with Redstone. So pick your style:
longer (Strength extended) or stronger (Strength II).
Turn It Into a Weaponized Beverage: Splash, Lingering, and Tipped Arrows
How to Make a Splash Potion of Strength
A Splash Potion lets you throw the effect onto yourself or teammates. It’s the ultimate “stand still, I’m helping” tool.
- Place your Strength Potion (or Strength II) in the bottom slot(s).
- Add Gunpowder to the top slot.
- After brewing, you’ll get a Splash Potion of Strength.
How to Make a Lingering Potion of Strength
Lingering potions create a cloud that hangs around for a short time. Great for group fights, doorways, and that one friend who refuses to come closer
because “it might be trapped.”
- Start with a Splash Potion of Strength.
- Add Dragon’s Breath in the top slot.
- After brewing, you’ll get a Lingering Potion of Strength.
How Tipped Arrows Fit In
Tipped arrows are crafted using lingering potions and arrows, letting you deliver potion effects at range. If your playstyle is “archer first,
chaos second,” tipped arrows can be a strong upgradeespecially in PvP or when you want to apply effects from a safe distance.
Where to Find Ingredients Without Losing Your Mind
Nether Wart
Nether Wart commonly generates in Nether Fortresses (in soul sand gardens) and can also appear in bastion remnants.
Once you get even a small amount, you can farm it on soul sand. The best part: it can grow in any dimension and doesn’t
need sunlight or waterNether Wart truly lives outside the rules.
Blaze Rods and Blaze Powder
Blaze Powder comes from Blaze Rods, which come from Blazes, which come from Nether Fortresses, which come from the part of the Nether where your confidence
goes to die. Bring good food, a shield, and a plan. The upside: Blaze Powder is incredibly valuable because it’s both Brewing Stand fuel and a key ingredient
for Strength potions.
Glowstone Dust and Redstone Dust
Glowstone Dust is usually gathered in the Nether (Glowstone clusters), while Redstone is commonly mined underground in the Overworld.
If you’re early-game and low on Glowstone, prioritize extended Strength over Strength IIyou’ll still get a big combat boost without spending rarer supplies.
Combat Strategy: When to Use Strength vs. Strength II
The best potion is the one that matches the fight you’re about to start (on purpose) or accidentally start (because you looked at an Enderman “too intensely”).
Use Regular Strength (or Extended Strength) When…
- You’re clearing a long dungeon or stronghold and want consistent damage.
- You’re exploring the Nether and expect multiple fights.
- You’re running a raid or defending a village and need sustained power.
- You’re playing co-op and want everyone buffed for a while.
Use Strength II When…
- You’re about to fight a boss (Wither, Ender Dragon) and want peak damage.
- You’re doing a short, high-risk burst (like a PvP push or a quick fortress clear).
- You’ve got limited time and you want every hit to matter.
Common Brewing Mistakes (And How to Avoid Them)
“Why isn’t it brewing?”
Check the fuel slot. Brewing Stands need Blaze Powder as fuel. If the fuel meter is empty, nothing happensno bubbles, no progress, no magical chemistry.
“I added Blaze Powder and got something weird.”
Make sure you brewed Awkward Potions first. The Strength recipe expects an Awkward Potion base. Skipping Nether Wart often leads to potions
that don’t do what you wanted. Brewing is picky, and it will absolutely judge you silently.
“I upgraded to Strength II and it feels short.”
That’s normal. Strength II trades duration for power. If you want longer buff time, use Redstone on the regular Strength potion instead.
“My friends didn’t get the effect when I threw it.”
Splash potions work in a radius, but you still need decent aim. Try tossing it at the ground near players rather than directly at their faces (unless
your friendship is built on slapstick).
Efficiency Tips: Brew Smarter, Not Harder
- Brew three at a time: It costs the same ingredient to brew 1 or 3 bottles in a batch.
- Chain your steps: Do all your Awkward Potions first, then do all Strength potions, then modify (Redstone/Glowstone) in a final pass.
- Stockpile Blaze Powder: It fuels the stand and makes Strength. Your future self will thank you.
- Build a Nether Wart farm early: Once you have a farm, potion brewing becomes routine instead of a treasure hunt.
Conclusion
Brewing a Strength Potion in Minecraft is one of the best upgrades you can give your combat toolkit. The recipe is straightforward once you learn the pattern:
Water Bottle → Nether Wart → Blaze Powder. From there, you can customize your potion for your exact situationextend it with Redstone,
upgrade it with Glowstone, or turn it into splash and lingering versions for team fights and strategic setups.
Bottom line: if you’re heading into danger, a Strength Potion is like bringing confidence in a bottleexcept this confidence actually works.
Brew a few, stash them in your hotbar, and go introduce the local mobs to your new “personal growth journey.”
Player Experiences: What Brewing Strength Potions Feels Like in Real Gameplay
Brewing your first Strength Potion usually happens right after a classic Minecraft moment: you realize your sword is good, but “good” stops being enough
the second a pack of mobs decides you’re the main character in their group project. That’s when the Strength Potion becomes more than an itemit becomes a plan.
In a typical survival run, the journey starts in the Nether. You step through your portal feeling prepared… and immediately hear sounds that translate to,
“Welcome, please sign this waiver.” You’re hunting two things: Nether Wart and Blaze Rods. Nether Wart feels like a hidden ingredient from a fantasy cookbook,
tucked into Nether Fortresses or bastion areas like the game is daring you to find it. Once you spot it, you get that little adrenaline spikepart excitement,
part “don’t fall in lava while harvesting.”
Then come the Blazes. The first time you fight them, you learn quickly that “standing still” is not a strategy. Once you finally get Blaze Rods, crafting Blaze
Powder feels like converting danger into convenience. And when you place that first Brewing Stand, it feels like upgrading from “caveman survival” to “wizard
survival.” Suddenly you’re not just reactingyou’re preparing.
Brewing itself becomes a surprisingly satisfying rhythm. You line up three water bottles (because efficiency is the real endgame), drop in Nether Wart, and watch
the bubbles do their thing. The Awkward Potion stage always feels like a blank canvaslike the game saying, “Okay, now make it interesting.” Then you add Blaze
Powder andboomyou’ve got Strength. It’s a small moment, but it changes how you approach combat. You stop hesitating and start planning fights on your terms.
In actual use, a Strength Potion has that “now we’re serious” vibe. Before a boss fight, drinking Strength is like flipping a switch: you’re not just swinging
a sword; you’re trying to end the conversation quickly. Against the Wither, players often pair Strength with solid armor and healing supplies, because the potion
doesn’t make you invincibleit makes you effective. In raids, Strength helps you keep control when the fight gets messy and you’re juggling multiple threats.
Multiplayer adds another layer. Splash Strength is one of those teamwork tools that makes you feel like a tactical genius when it works… and a slapstick comedian
when it doesn’t. You’ll have games where you toss a splash potion perfectly and your whole team charges like heroes. And you’ll have games where you miss, hit a
wall, and buff exactly nobody except maybe the floor. Either way, it’s memorable.
Over time, many players develop their own “Strength routine.” Some keep extended Strength potions for exploration days. Others save Strength II for boss nights.
Some stash extra ingredients next to their Brewing Stand like a mini potion lab. And once you’ve got a Nether Wart farm running back home, brewing stops being a
stressful Nether expedition and turns into a reliable systemone that makes you feel prepared for whatever Minecraft throws at you next.