Chest hair is a lot like houseplants: a little shaping can make it look intentional, but overdo it and suddenly everyone can tell you had a “project night.” The good news is that trimming chest hair does not need to be dramatic, painful, or suspiciously shiny. You do not have to go from “rugged sweater vest” to “freshly waxed dolphin” unless that is truly your goal.
The most natural-looking chest hair trim keeps your original hair pattern while reducing bulk, uneven patches, and the occasional rogue strand that seems to be auditioning for its own zip code. Whether you want a clean beach-day look, a tidy neckline under open shirts, or simply less hair poking through T-shirts, the trick is restraint. Natural grooming is not about erasing every hair. It is about making your chest hair look like it grew that way on purpose.
This guide covers three practical ways to trim chest hair and make it look natural: using an electric body trimmer, blending with scissors and a comb, and shaping the edges for a soft, realistic finish. You will also learn how to prepare your skin, avoid irritation, prevent patchiness, and maintain the look without turning chest grooming into a second job.
Before You Start: What “Natural” Chest Hair Actually Means
A natural chest hair trim should not look freshly carved, squared off, or suspiciously symmetrical. Human hair patterns are rarely perfect. Some people have dense hair in the center, lighter growth near the collarbone, a trail toward the stomach, or a few random hairs around the shoulders. That is normal. The goal is not to fight your pattern but to clean it up.
The best natural trims usually follow three rules: keep some length, fade the edges, and avoid harsh lines. If you trim everything to the same ultra-short setting, your chest can look prickly or patchy, especially if the hair is coarse. If you shave only certain sections and leave others long, the contrast can look accidental. Think of chest grooming like lawn care: trim the grass, soften the border, and do not create a crop circle.
Tools You Need for a Natural Chest Hair Trim
You do not need a professional grooming studio, dramatic lighting, or a mirror that makes you question your life choices. A simple setup works best:
- An electric body trimmer with adjustable guards
- Small grooming scissors or mustache scissors
- A comb for lifting and blending longer hairs
- A handheld mirror for checking angles
- Gentle body wash or cleanser
- Fragrance-free moisturizer or soothing aftershave balm
- A towel and good lighting
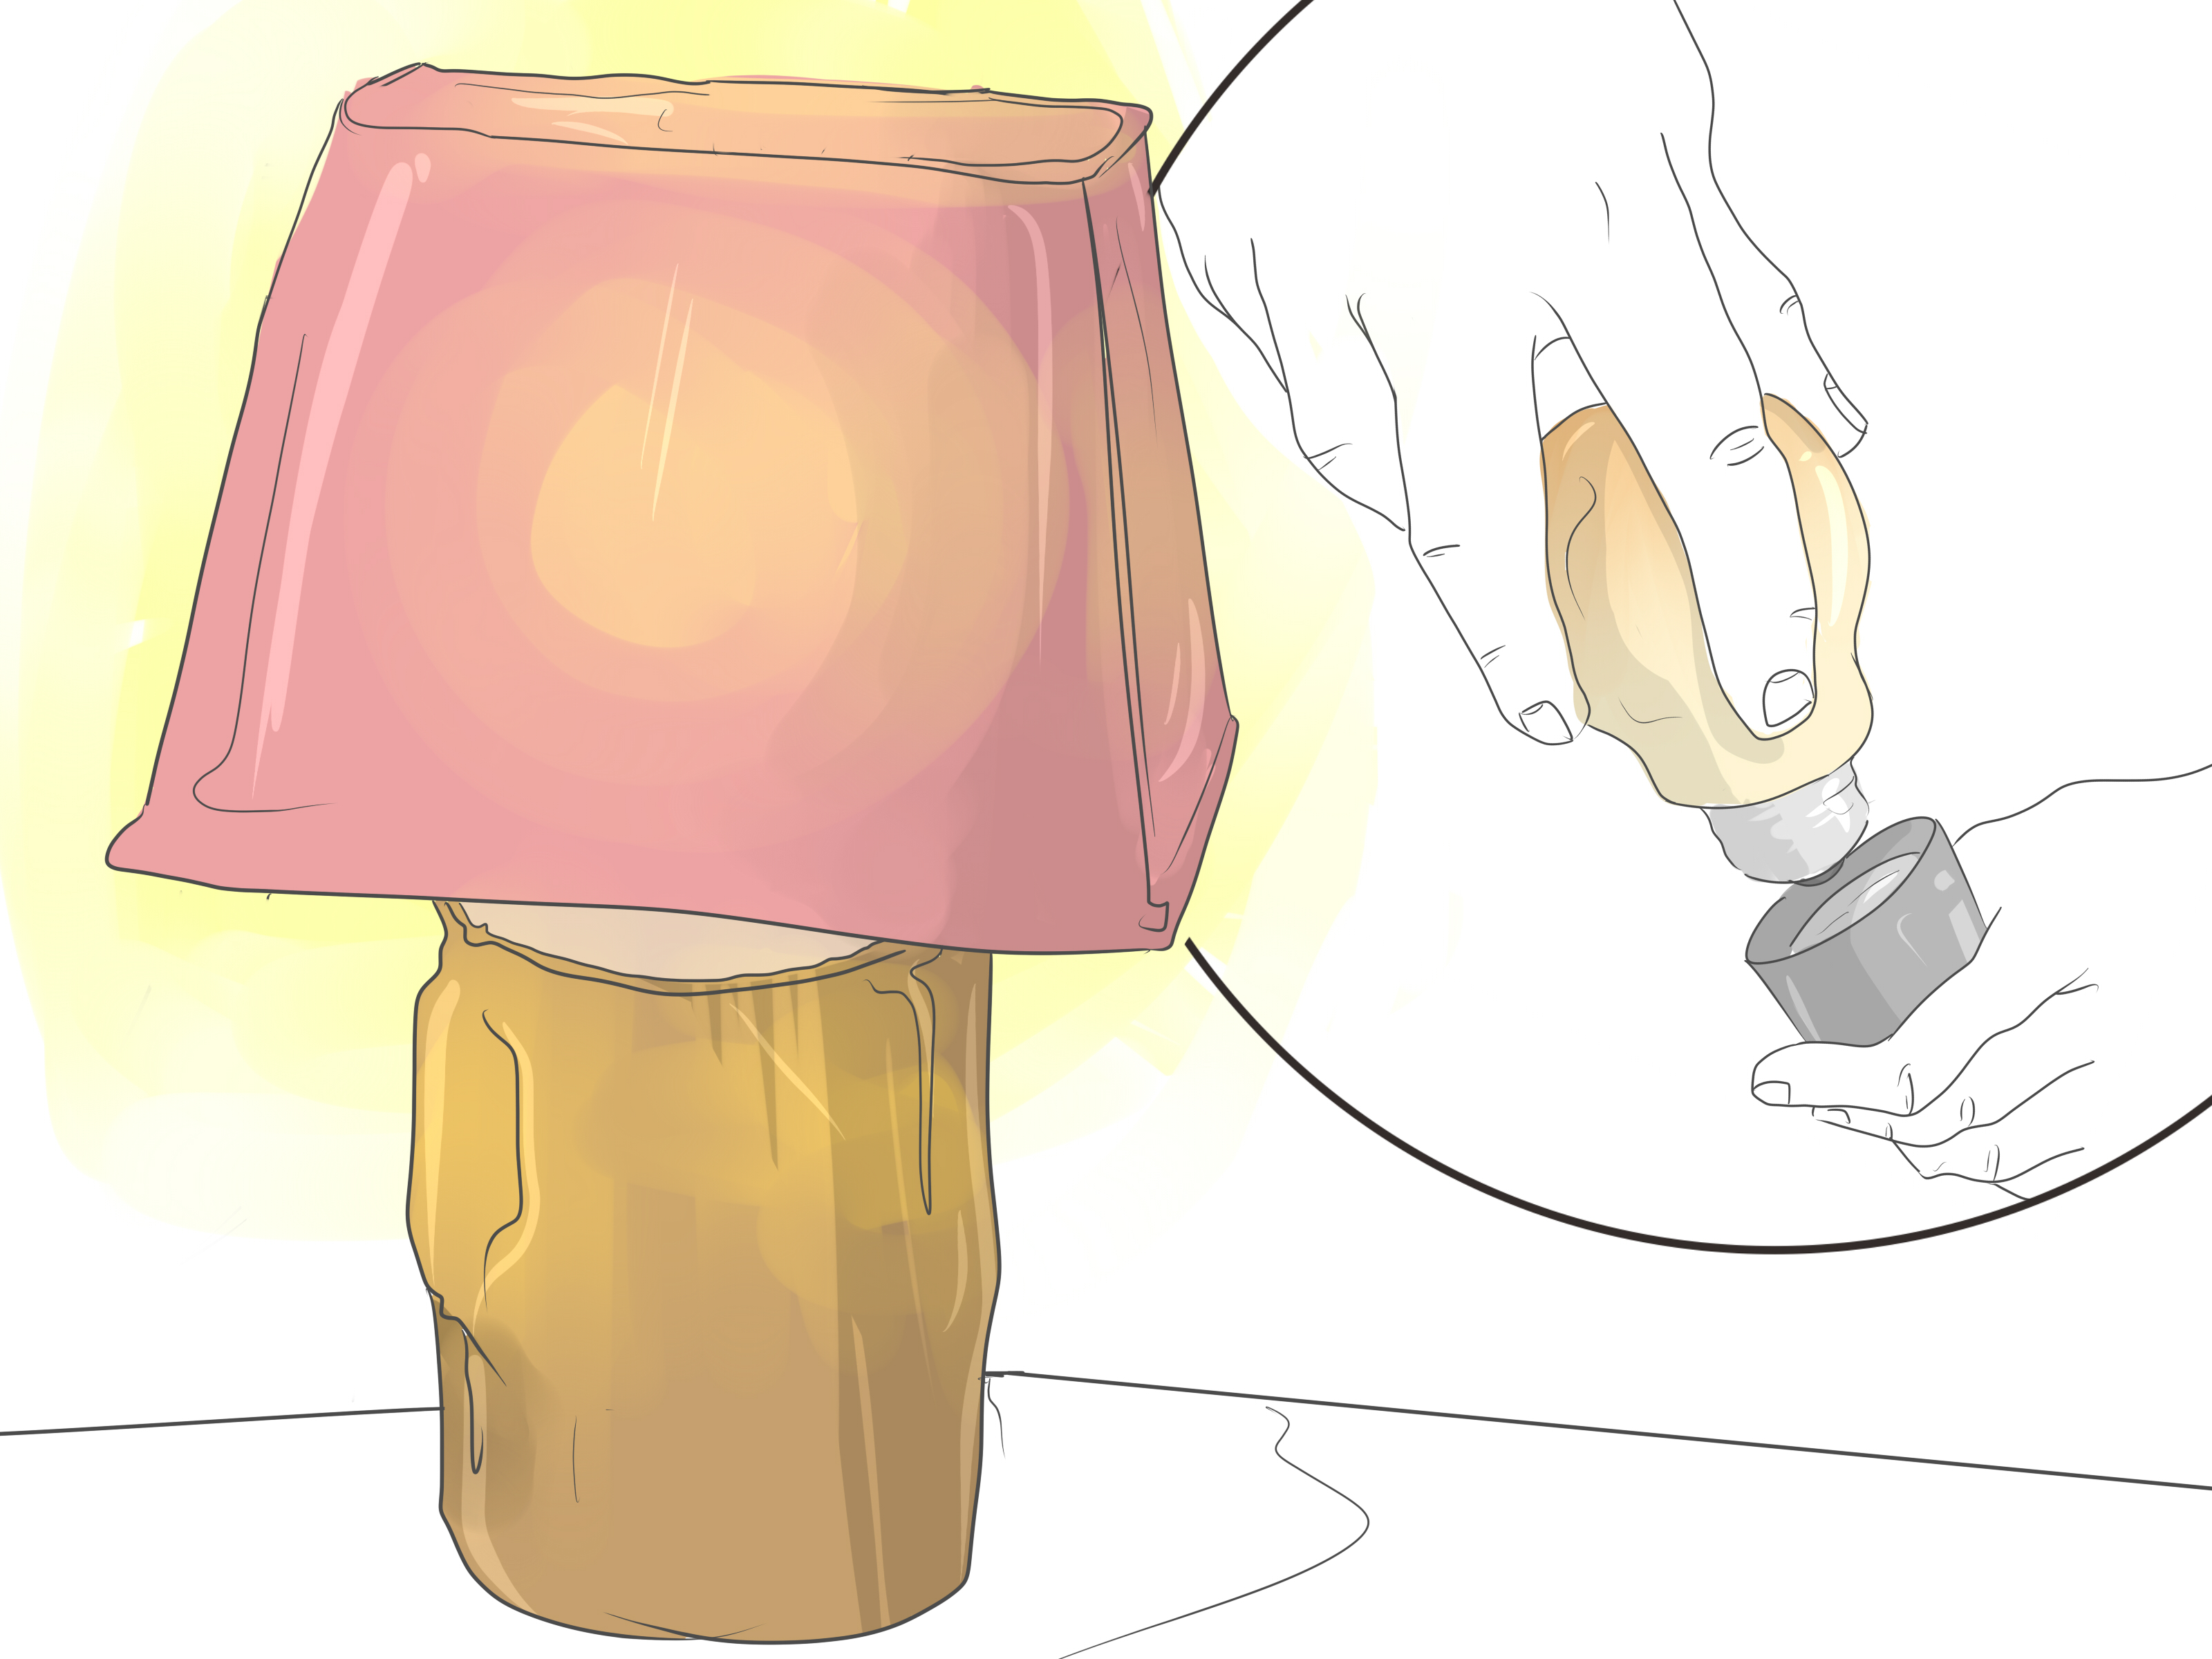
A body trimmer is usually better than a face razor for a natural chest look because it removes bulk without cutting hair down to the skin. Adjustable guards are especially helpful because they let you start longer and gradually shorten the hair. That is important because chest hair does not come with an undo button. Once it is too short, your only options are patience, shirts, and character development.
Way 1: Use an Electric Body Trimmer for an Even, Natural Length
The electric body trimmer is the easiest and most reliable method for most people. It is fast, beginner-friendly, and ideal if your chest hair is thick, curly, long, or uneven. The key is to start with a longer guard than you think you need. You can always go shorter, but you cannot politely ask your hair to return by Tuesday.
Step 1: Shower First, Then Dry Completely
Start with a warm shower to soften the hair and clean the skin. Warm water helps loosen oil, sweat, and product buildup so the trimmer glides more smoothly. After showering, dry your chest completely. Wet hair clumps together, which can cause uneven trimming. Dry hair stands more naturally, making it easier to see the real length and density.
Step 2: Choose a Longer Guard
For a natural look, begin with a guard around 6 mm to 10 mm if your chest hair is long or dense. If you already keep it short, start around 4 mm to 6 mm. The exact length depends on hair thickness. Coarse or dark hair often looks shorter than it is because it creates more contrast against the skin. Fine or lighter hair may need slightly less trimming to show a difference.
Do one pass across the densest area first, usually the center of the chest. Move slowly and avoid pressing the trimmer hard into the skin. Let the guard do the work. Pressing too firmly can create short patches and irritation.
Step 3: Trim With the Grain First
Trim in the direction your hair naturally grows. This usually gives a softer result than trimming aggressively against the grain. Going against the grain can remove more length and make the finish look sharper, which may be useful for very dense areas but risky for beginners. Start gentle. You are trimming chest hair, not clearing a forest road.
Step 4: Check the Result Before Going Shorter
After one full pass, brush the hair with your hand and step back from the mirror. Good grooming decisions are not made with your nose two inches from the glass. Look at the overall shape. If the hair still feels too bulky, drop the guard by one level and repeat only where needed. Avoid trimming the whole chest shorter unless the entire area truly needs it.
Best For
This method works best if you want a neat, low-maintenance trim that still looks like real chest hair. It is ideal for people who have dense growth, want less volume under shirts, or prefer a groomed but not shaved appearance.
Way 2: Use Scissors and a Comb for Subtle, Custom Blending
If your chest hair is not very thick or you only have a few longer areas, scissors and a comb can create the most natural result. This method is slower, but it gives you more control. It is perfect for trimming wild strands, softening uneven patches, or keeping a naturally hairy chest without making it look freshly mowed.
Step 1: Comb the Hair Upward
Use a small comb to lift the hair away from the skin. This helps you see which hairs are longer than the rest. Trim only the tips that stick out beyond the comb. The idea is not to cut everything down to one exact length. You are gently reducing the tallest hairs so the overall texture looks balanced.
Step 2: Work in Small Sections
Divide the chest into zones: upper chest, center chest, sides, and lower chest. Trim slowly. Snip a little, check the mirror, then snip again if needed. Large cuts create obvious gaps. Small cuts create a natural finish.
Be extra careful around sensitive areas and curved spots. Use the comb as a barrier between the scissors and skin. Never rush. There is no award for fastest chest trim, and if there were, the trophy would probably be shaped like a bandage.
Step 3: Leave Slight Variation
Natural hair has variation. Some strands should be a little longer and some a little shorter. If every hair is perfectly equal, the result may look artificial. With scissors, aim for balanced texture instead of military precision.
Step 4: Blend Into the Stomach Area
If you have hair that continues from the chest toward the stomach, avoid creating a hard stopping point. Lightly trim the upper stomach trail so it connects naturally with the chest. A sudden line at the ribs can look like you stopped grooming because the doorbell rang.
Best For
Scissors and comb trimming is best for people who want a very subtle cleanup. It is also great for maintaining a previous trim or fixing spots that a trimmer missed.
Way 3: Shape the Edges and Fade the Borders
The difference between “natural” and “obviously groomed” often comes down to the edges. Chest hair usually looks most realistic when it fades gradually at the collarbone, shoulders, sides, and stomach. Hard borders can make the trim look like a map. Soft borders make it look intentional.
Focus on the Collarbone
Hair near the collarbone can show when wearing open collars, tank tops, or V-neck shirts. Instead of shaving a sharp neckline, use a slightly shorter trimmer guard to reduce thickness in this area. For example, if the main chest is trimmed to 6 mm, use 4 mm near the collarbone and blend lightly downward.
Do not create a straight horizontal line. Follow your natural hair pattern and use short, gentle passes. The goal is a soft transition from less hair to more hair.
Clean Up the Shoulders
Shoulder hair can make chest grooming look unfinished if it is much longer or darker than the surrounding area. Use a short guard or careful scissors to reduce visible shoulder hair, then blend toward the upper chest. Avoid shaving the shoulders completely unless you also blend the nearby chest. A bare shoulder next to a dense chest can create a contrast that looks less natural.
Blend the Sides
The sides of the chest, near the ribs and underarms, often grow in different directions. Use a longer guard first, then shorten only the outer edges. Do not chase every single hair. A few lighter hairs at the sides help the trim look real.
Soften the Lower Chest and Stomach Trail
If you have a stomach trail, keep it proportionate. A thick chest with a shaved stomach can look disconnected. A lightly trimmed trail usually looks more natural. If you prefer less stomach hair, fade gradually by using shorter guards as you move downward.
Best For
Edge shaping is best for anyone who already trims but feels the result looks too blunt. It is also the secret weapon for making chest hair look natural under different shirts.
How Short Should You Trim Chest Hair?
The best chest hair length depends on your hair type, skin tone, and preferred style. As a general guide, 8 mm to 10 mm keeps a fuller natural look, 5 mm to 7 mm creates a tidy groomed look, and 3 mm to 4 mm gives a shorter athletic appearance while still leaving visible hair. Anything below 3 mm may start looking like stubble, especially on darker or coarse hair.
If you are unsure, start at the longest setting and work down gradually. This is the golden rule of body grooming: sneak up on the look. Do not attack it.
How to Avoid Patchiness
Patchiness usually happens for three reasons: trimming too short, pressing too hard, or using the same guard everywhere. Chest hair grows in different directions and densities, so a one-length approach can expose thin spots.
To avoid patchiness, use a longer guard on sparse areas and a shorter guard only on dense areas. Trim with light pressure. Brush hair with your hand between passes so it settles naturally. Check your work in different lighting before making more cuts. Bathroom lighting can be dramatic; it has ended many grooming sessions with unnecessary panic.
Skin Prep and Aftercare Matter More Than You Think
Even if you are trimming instead of shaving, your skin still deserves attention. Clean skin helps reduce irritation, clogged follicles, and post-trim itching. Before trimming, wash with a gentle cleanser and avoid heavy oils or lotions that can gum up the trimmer. After trimming, rinse off loose hair and apply a light, fragrance-free moisturizer.
If you shave any areas, use shaving cream or gel, shave in the direction of hair growth, and avoid stretching the skin too tightly. A sharp, clean blade is safer than a dull one. Dull blades tug, scrape, and generally behave like tiny villains. If you are prone to razor bumps or ingrown hairs, trimming with a guard is usually gentler than shaving close to the skin.
Common Chest Hair Trimming Mistakes
Mistake 1: Starting Too Short
This is the classic error. A short guard may seem efficient, but it can create stubble, irritation, and uneven contrast. Start longer and adjust slowly.
Mistake 2: Creating Sharp Lines
Hard borders around the collarbone, shoulders, or stomach rarely look natural. Blend edges with a slightly shorter guard instead of shaving lines.
Mistake 3: Trimming in Bad Lighting
Dim lighting hides uneven spots. Use bright, natural-looking light if possible. Check from a few feet away, not just close up.
Mistake 4: Ignoring Maintenance
A natural trim looks best when maintained before it becomes overgrown. Most people can touch up every one to three weeks, depending on growth speed.
Mistake 5: Using Dirty Tools
Clean your trimmer after each use. Hair, oil, and dead skin can collect in the blades. A clean tool performs better and is kinder to your skin.
Maintenance: How Often Should You Trim Chest Hair?
For most people, trimming chest hair every two weeks keeps the look tidy without making grooming feel like a subscription service. If your hair grows quickly or you prefer a shorter length, once a week may work better. If you keep a fuller natural look, every three to four weeks may be enough.
The best maintenance schedule is based on how the hair looks and feels, not a strict calendar. When the shape starts looking bulky, the collar area gets messy, or shirts begin catching longer hairs, it is time for a touch-up.
Real-Life Experiences: What Actually Works When Trimming Chest Hair Naturally
The first experience many people have with chest hair trimming is not exactly elegant. It often begins with confidence, a new trimmer, and the dangerous thought, “How hard can this be?” Five minutes later, one side looks neat, the other side looks like it lost a small argument with a lawn mower, and the bathroom floor resembles a tiny barbershop crime scene. This is why the first real lesson is simple: do less than you think you need to do.
One of the most practical experiences is learning that chest hair looks different up close than it does from normal conversation distance. When you stare into the mirror from three inches away, every strand looks enormous. From a few feet back, the same hair may look perfectly fine. Many people over-trim because they judge the result too closely. A better habit is to trim a little, step back, move around, and check how the hair looks when your body is relaxed. Natural grooming should pass the “normal mirror distance” test.
Another common lesson is that the center of the chest usually needs a different approach than the edges. The middle area may be dense and can handle a trimmer guard, while the collarbone or shoulder area may need lighter blending. Using the same setting everywhere can make the trim look flat. A natural result often comes from using two or three lengths: longer in the middle, slightly shorter near the upper chest, and shortest only where you want the edges to fade.
People with curly or coarse chest hair often discover that trimming too short creates itchiness. The hair ends can feel prickly as they rub against shirts. In that case, leaving a few extra millimeters can make a huge difference. The look is still cleaner, but the feel is much more comfortable. This is especially useful during hot weather, workouts, or any situation where fabric friction becomes annoying.
People with lighter or thinner chest hair often have the opposite experience. A tiny trim may not look noticeable at all. Instead of cutting shorter immediately, it helps to clean up the longest strands with scissors and lightly shape the edges. The result may be subtle, but subtle is exactly what makes it look natural.
The best long-term experience is building a routine. Trim after a shower, use the same guard settings that worked last time, clean the trimmer, moisturize, and stop before perfection becomes a trap. Chest hair is supposed to look human. A slightly uneven natural texture often looks better than an overworked trim that screams, “I spent 47 minutes negotiating with my torso.”
Conclusion: The Natural Look Is All About Control, Not Removal
Learning how to trim chest hair and make it look natural is mostly about patience, blending, and choosing the right length. An electric body trimmer gives you an even foundation. Scissors and a comb help with subtle custom shaping. Edge blending makes the whole result look realistic instead of freshly outlined.
Start longer, trim gradually, and respect your natural hair pattern. Keep the center slightly fuller, soften the collarbone and shoulder areas, and avoid sharp borders. With the right routine, chest hair grooming can be quick, comfortable, and surprisingly low-drama. The goal is not to look like someone else. The goal is to look like yourself, just a little more polished and a lot less likely to shed on a black T-shirt.