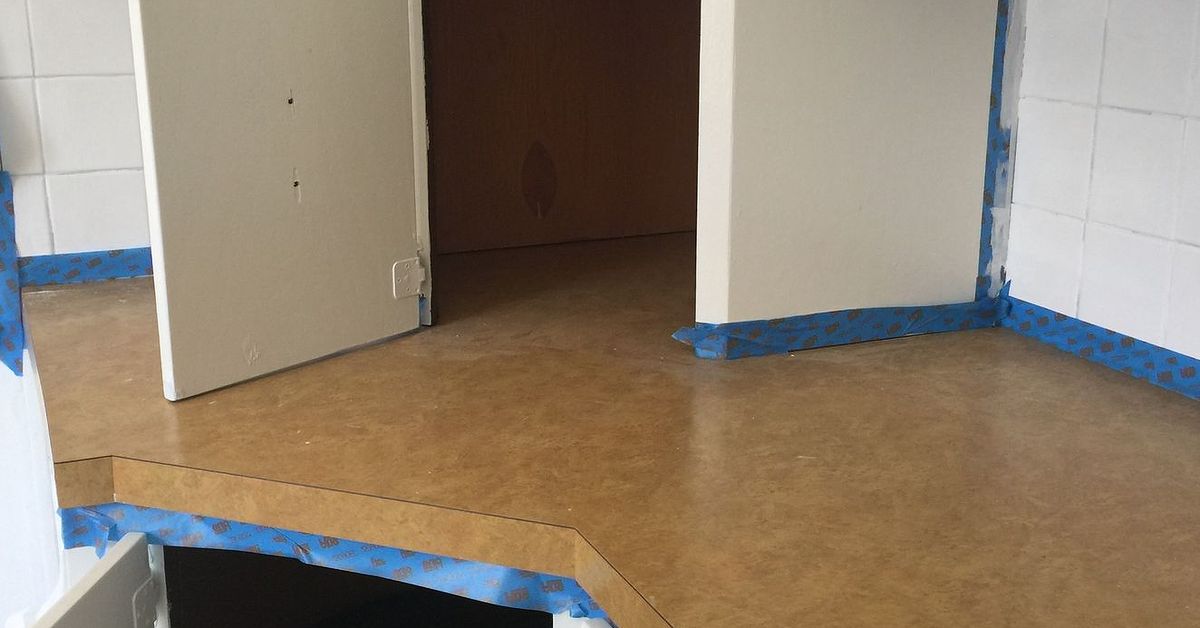
An orange Formica countertop can be charming in the same way a shag carpet can be charming: bold, nostalgic, and slightly suspicious under bright kitchen lighting. If your countertop has been shouting “1978 called and wants its breakfast bar back,” concrete may be the refresh that finally quiets it down.
Changing up an orange Formica countertop with concrete is a popular DIY-style makeover because it can give old laminate a modern, matte, stone-like finish without tearing out cabinets, hiring a demolition crew, or explaining to your budget why it suddenly needs therapy. The goal is not to pour a heavy slab on top of laminate. Instead, most homeowners use a thin concrete overlay, feather finish, microcement-style coating, or concrete-look resurfacing system to cover the existing countertop after careful cleaning, sanding, priming, layering, and sealing.
Done well, the result can look sleek, industrial, warm, rustic, or minimalist depending on the finish. Done badly, it can look like someone frosted the counter with sidewalk batter. The difference is preparation, patience, and a sealer tough enough to survive coffee, pasta sauce, and the occasional “I forgot this pan was hot” moment.
Why Concrete Works Over an Orange Formica Countertop
Formica is a brand of high-pressure laminate, a durable surface made to resist everyday stains and moisture. That is great when you are living with it. It is less great when you want something to stick to it. Laminate is smooth and nonporous, so concrete products need help gripping the surface. That help usually comes from degreasing, sanding, bonding primer, and thin coats rather than one heroic glob of material.
Concrete-look finishes are appealing because they hide loud colors fast. Orange laminate, especially the glossy kind, can dominate a kitchen. A gray, taupe, charcoal, warm beige, or soft white concrete finish calms the room visually and makes cabinets, backsplash tile, hardware, and flooring feel more current. It is like asking the countertop to stop playing the trumpet during dinner.
Concrete also offers texture. Laminate often has a printed pattern, while concrete has depth, movement, soft trowel marks, and subtle color variation. You can make it smooth and refined, or leave it slightly mottled for a handmade look. That flexibility is one reason DIYers love this type of countertop makeover.
Before You Start: Decide Whether Your Countertop Is a Good Candidate
Not every orange Formica countertop deserves a concrete makeover. Some deserve a polite goodbye and a trip to the landfill. Before buying supplies, inspect the surface carefully.
Good candidates include:
- Laminate that is firmly attached to the substrate
- Countertops with no major swelling around seams or sinks
- Surfaces that are structurally flat and stable
- Edges that are not peeling badly
- Cabinets strong enough to support the existing counter and thin overlay
Problem candidates include:
- Water-damaged particleboard underneath the laminate
- Large bubbles, loose laminate, or delamination
- Soft spots near the sink
- Cracked areas that flex when pressed
- Backsplashes or seams where water regularly gets trapped
A concrete overlay is only as good as what it sits on. If the laminate is loose, the concrete layer may crack or peel. If the counter has water damage, sealing the top will not magically heal the swollen core underneath. In that case, replacing the countertop may be smarter than trying to rescue it with decorative cement and optimism.
Materials and Tools You May Need
The exact product system matters, so always follow the manufacturer’s instructions. Still, most orange Formica-to-concrete countertop projects require similar supplies.
- Degreasing cleaner or mild detergent
- Nonabrasive cloths and clean water
- Painter’s tape and plastic sheeting
- 80- to 120-grit sandpaper or sanding block
- Vacuum with good dust control
- Bonding primer recommended for slick surfaces
- Concrete feather finish, microcement, or countertop resurfacing compound
- Mixing bucket and margin trowel
- Drywall knife, steel trowel, or plastic spreader
- Fine sanding pads for smoothing between coats
- Food-safe, water-resistant countertop sealer
- Foam roller or applicator pad for sealer
- Gloves, eye protection, and a properly rated dust mask or respirator
Because concrete products can produce fine dust when mixed or sanded, safety is not optional. Work with ventilation, control dust, and avoid dry sanding whenever possible. If the home was built before 1978, be extra cautious around old painted surfaces nearby, because renovation work can disturb lead-based paint dust.
Step 1: Clean the Orange Formica Like You Mean It
The first step is not glamorous, but it is powerful: clean the countertop thoroughly. Grease, wax, soap film, cooking oil, and mystery kitchen residue can block adhesion. You may not see the grime, but your concrete coating will find it, judge it, and possibly peel from it.
Use a mild detergent or degreasing cleaner, then rinse with clean water. Avoid flooding seams, especially around the sink and backsplash. Laminate itself is moisture resistant, but water can sneak into seams and swell the substrate beneath. Dry everything completely before moving on.
Pay special attention to the area near the stove. Even a tidy kitchen collects a thin film of airborne oil. If you are covering a countertop that has spent decades beside bacon, stir-fry, and spaghetti night, assume the surface needs more than one cleaning pass.
Step 2: Repair Loose Edges and Fill Trouble Spots
If any laminate edges are lifting, glue and clamp them before resurfacing. If small chips exist, fill them with an appropriate patching compound and sand smooth once cured. The concrete overlay should go over a stable, even base. It should not be asked to bridge gaps, hold down peeling laminate, or perform miracles normally reserved for home renovation television.
Check the front edge carefully. Orange Formica counters often have rounded or squared laminate edges that take daily abuse. If an edge feels loose, fix it first. A thin concrete finish can wrap over edges beautifully, but it cannot stay beautiful if the edge underneath is moving.
Step 3: Sand the Laminate for Better Grip
Sanding gives the slick Formica surface a rougher texture so primer and overlay products can bond. You are not trying to grind through the laminate. You are dulling the shine and creating tooth. Use steady, even pressure and scuff every area that will receive concrete, including edges and corners.
After sanding, vacuum thoroughly and wipe with a damp cloth. Dust left behind becomes a weak layer between the counter and the coating. Think of dust as tiny betrayal particles. Remove them.
Step 4: Tape, Protect, and Plan Your Edges
Concrete overlay work can be messy. Tape off the sink, walls, cabinets, appliances, and backsplash. Cover the floor and cabinet fronts. Remove anything from the countertop that you do not want decorated in gray freckles.
Edges require planning. Some DIYers coat the flat top first, then return to the vertical edges. Others work the edge and top together while the material is wet. A rounded laminate edge may need several thin passes to build a clean concrete profile. Do not rush this part. Countertop edges are at eye level when you open drawers, lean in for coffee, or admire your work like a proud raccoon with a trowel.
Step 5: Apply a Bonding Primer
A bonding primer made for slick surfaces can improve adhesion between laminate and concrete overlay. Some concrete resurfacing systems include their own primer, while others specify a compatible product. Follow the system instructions closely. Mixing random products can lead to adhesion problems, discoloration, or sealer issues later.
Let the primer dry fully. “Dry to the touch” does not always mean “ready for the next layer.” Temperature, humidity, and airflow can change drying time. When in doubt, follow the label rather than your impatience.
Step 6: Mix the Concrete Overlay in Small Batches
Thin concrete finishes often set quickly. Mix small batches so you can apply the material while it is workable. Aim for a smooth consistency similar to thick pancake batter, frosting, or spreadable peanut butter depending on the product. Avoid overwatering. Too much water can weaken the surface, cause shrinkage, and make the finish harder to control.
Measure carefully. Consistency between batches helps maintain a uniform color and texture. If one batch is soupy and the next is stiff, the countertop may dry with uneven tones. Some variation is part of the concrete charm, but accidental zebra-striping is less charming.
Step 7: Apply Thin Coats, Not One Thick Coat
The secret to a good concrete countertop overlay is thin layers. Spread the first coat across the laminate with a trowel, drywall knife, or spreader. Keep it thin enough to bond well and dry evenly. Do not worry if the orange Formica ghosts through the first pass. That is normal. The first coat is the handshake, not the final outfit.
Let the coat dry according to the product directions, then lightly sand high ridges. Wipe away dust before the next coat. Most projects need two to four thin layers to fully cover the old laminate and build a convincing concrete finish.
How to Get the Look Right
For a smooth modern finish, use long trowel strokes and sand carefully between coats. For a more rustic finish, allow subtle trowel marks and tonal variation to remain. For a warmer look, choose a concrete product that can be tinted beige, greige, or soft taupe instead of cold gray. Concrete does not have to look like a parking garage. Unless that is your design theme, in which case, please add excellent lighting.
Step 8: Sand and Refine the Surface
Once the final coat has cured enough to sand, smooth the surface gently. Use fine-grit sanding pads and avoid digging into corners. The goal is to remove rough ridges, not erase every handmade mark. A slightly varied surface often looks more natural than a perfectly flat one.
Run your hand lightly across the countertop. If it feels gritty, keep refining. If it feels smooth but still has subtle movement, you are in the sweet spot. Remember that sealer can highlight texture, so fix rough areas before sealing.
Step 9: Seal the Concrete for Real Kitchen Life
Concrete is naturally porous. In a kitchen, that means unsealed concrete can absorb water, oil, wine, coffee, tomato sauce, citrus juice, and whatever that sticky ring under the honey jar is. A durable countertop sealer is essential.
Choose a sealer designed for countertops and food-prep areas. Look for water resistance, stain resistance, low odor, non-yellowing performance, and compatibility with your concrete overlay. Apply thin, even coats as directed. More sealer is not always better; thick coats can bubble, cloud, or cure unevenly.
Even after sealing, concrete countertops should be treated with care. Use cutting boards. Use trivets. Wipe spills promptly. Avoid harsh abrasives, bleach-heavy cleaners, and acidic cleaners unless the sealer manufacturer says they are safe. Concrete may look tough, but a kitchen countertop finish still needs manners.
Design Ideas for Toning Down Orange Formica
Changing an orange Formica countertop with concrete is not only a surface repair. It is a design reset. Once the orange is covered, the entire kitchen palette changes. Here are a few directions that work especially well.
Soft Gray Concrete With White Cabinets
This is the clean, classic route. A soft gray countertop gives white cabinets definition without making the room feel heavy. Add brushed nickel or matte black hardware for a modern touch.
Warm Greige Concrete With Wood Cabinets
If your kitchen has oak, maple, or medium-toned wood cabinets, warm greige concrete can bridge old and new. It calms the orange undertone without clashing with wood grain.
Charcoal Concrete With Bold Hardware
Charcoal concrete can make a dated countertop look dramatic and intentional. It works best in kitchens with good natural light, lighter backsplashes, or open shelving. Otherwise, the room may feel like it joined a very serious rock band.
Light Concrete With Colorful Decor
If you still love color, keep it in accessories instead of the countertop. A pale concrete finish lets you bring in green plants, blue dishes, brass hardware, or patterned rugs without visual chaos.
Common Mistakes to Avoid
The most common mistake is poor prep. Skipping degreasing, sanding, or priming can cause peeling. Another mistake is applying the overlay too thickly. Thick coats can crack, cure poorly, or look lumpy. A third mistake is sealing too soon. Concrete products need proper drying or curing time before sealer traps moisture inside.
Also avoid using the countertop too quickly. Many sealers need several days to reach full hardness, even if they feel dry. During that time, be gentle. Do not set heavy appliances on the surface, slide dishes across it, or test its durability with a hot skillet like a kitchen daredevil.
How Durable Is a Concrete Overlay on Formica?
A concrete overlay can be durable enough for everyday use, but it is not identical to a professionally cast concrete slab or factory-made quartz countertop. Its performance depends on surface prep, product quality, thickness, curing, and sealer. In a lightly used kitchen, it can look good for years. In a busy family kitchen with kids, pets, hot pans, and one person who thinks cutting boards are decorative, it may need touch-ups sooner.
The best mindset is practical. This is a budget-friendly makeover, not an indestructible force field. Treat it well and it will reward you with a custom look at a fraction of replacement cost.
Cleaning and Maintenance After the Makeover
For daily cleaning, use a soft cloth, warm water, and mild dish soap unless your sealer instructions recommend something else. Dry the surface after cleaning to prevent water spots. Wipe spills quickly, especially acidic liquids like lemon juice, vinegar, wine, and tomato sauce.
Avoid abrasive pads, steel wool, harsh powders, and aggressive chemical cleaners. They can dull or damage the sealer. If the surface starts absorbing water instead of beading it, it may be time to reseal. Keep the product information for your sealer so you know how to maintain it correctly.
Budget Expectations
The cost of changing an orange Formica countertop with concrete depends on square footage, product choice, tools already owned, and the sealer selected. Many DIYers choose this approach because it can cost far less than replacing countertops with stone, quartz, or professionally poured concrete. However, do not buy the cheapest sealer just to save a few dollars. The sealer protects the entire project. It is the bouncer at the countertop nightclub.
If you are resurfacing a small kitchen, the biggest expenses are usually the overlay material, bonding primer, sandpaper, protective supplies, and sealer. For large kitchens or heavily damaged counters, replacement may become more competitive, especially if you need many repairs first.
Experience Notes: What It Feels Like to Change Orange Formica With Concrete
The first experience most people have with this project is emotional. You clean the orange Formica, sand it, and suddenly the glossy old surface looks worse before it looks better. This is normal. There is a moment when the kitchen appears to be losing a fight with a hardware store. Do not panic. The ugly middle is part of the process.
One useful lesson is that lighting changes everything. Concrete finishes look different in morning light, under warm bulbs, and beside stainless steel appliances. A gray that looks soft in the garage may look blue in the kitchen. Before coating the entire countertop, test a sample board if possible. Place it near the cabinets and backsplash for a day. Look at it while drinking coffee, while cooking dinner, and while wondering why one corner of the kitchen has the lighting of a dentist’s office.
Another experience worth mentioning is the rhythm of thin coats. Beginners often want full coverage immediately, especially when orange laminate is still peeking through the first layer like an unwanted party guest. Resist the urge to pile on material. Thin coats are easier to control, easier to sand, and less likely to crack. By the second or third coat, the transformation becomes obvious. The orange fades, the surface gains depth, and the kitchen starts to look less like a vintage diner and more like a room you chose on purpose.
Edges are the part that teaches patience. The flat countertop surface may go smoothly, but vertical edges can sag, ridge, or show trowel lines. The fix is usually not panic; it is another thin pass, careful sanding, and a steady hand. Many DIYers discover that small imperfections actually help the concrete look authentic. A perfectly uniform surface can look painted. A softly varied surface looks handmade.
Sealing is where excitement must slow down. After the final concrete coat, the countertop may look finished, but it is not ready for spaghetti sauce, coffee mugs, or a wet dish rack. The sealer needs proper application and curing time. This waiting period is not glamorous, but it protects all the work that came before it. If you use the counter too soon, you risk rings, dents, dull spots, or cloudy areas.
The biggest practical experience is learning how much a countertop affects the whole kitchen. Once the orange Formica is covered with concrete, old cabinet pulls may suddenly look dated. The backsplash may seem busier. The wall color may appear warmer or cooler. A countertop makeover can trigger a small design chain reaction. Fortunately, simple changes like new hardware, fresh caulk, updated lighting, or a neutral runner can make the whole room feel intentional.
Living with a concrete-coated Formica countertop also changes habits. You become a person who uses trivets. You wipe spills sooner. You stop dragging the toaster like it owes you money. This is not because the counter is fragile, but because the finish is handcrafted. It has character, and character appreciates basic respect.
For many homeowners, the final experience is satisfaction. The project takes effort, but the payoff is visible every day. A loud orange countertop becomes calm, modern, and textured. The kitchen feels updated without a full renovation. And when guests ask if the countertop is new, you get the rare pleasure of saying, “Actually, I resurfaced it,” while pretending you were not covered in sanding dust three days earlier.
Conclusion
Changing up an orange Formica countertop with concrete is one of those DIY projects that can completely shift the mood of a kitchen. It covers a dated color, adds a modern surface, and gives homeowners creative control over texture and tone. The key is respecting the process: clean deeply, sand thoroughly, prime correctly, apply thin coats, let each layer cure, and protect the finished surface with a high-quality countertop sealer.
This project is not about pretending laminate never existed. It is about giving it a second act. With the right prep and realistic expectations, that old orange counter can go from “retro surprise” to “custom concrete look” without a full remodel. And honestly, any project that lets you defeat orange Formica without removing cabinets deserves a small round of applause.