If you have ever wanted your writing paper to look like it belongs in a treasure chest, a wizard’s desk drawer, or a dramatically overfunded Renaissance festival, you are in the right place. Learning how to make parchment like paper for writing is one of those wonderfully low-tech DIY projects that feels oddly satisfying. You start with plain paper. You add a little stain, a little texture, a little patience, and suddenly your grocery-store sheet looks like it has seen things.
Let’s clear up one important detail before we begin: true parchment is not regular paper. Historically, parchment was made from prepared animal skin, which is a very different material from the faux “parchment-like” paper most people want for letters, journaling, invitations, props, calligraphy practice, poetry, maps, or themed crafts. In this article, we are making the modern, paper-based version that gives you the old-world look without requiring a medieval workshop and a suspicious amount of livestock.
This guide walks you through 8 practical steps to create parchment-like paper for writing, plus tips on choosing the best paper, staining it evenly, drying it without turning it into a sad wrinkled potato chip, and actually writing on it once you are done. If your goal is beautiful vintage paper that looks aged, warm, and handmade, this method delivers.
What “Parchment-Like” Paper Really Means
When people search for how to make parchment like paper for writing, they usually want one of three things: a vintage writing surface, an aged decorative paper, or a dramatic background for calligraphy, invitations, journaling, or school projects. In modern DIY terms, “parchment-like paper” usually means regular paper that has been altered to look older through color, texture, edges, and gentle wrinkling.
The trick is not to destroy the paper in the name of “authenticity.” You want it to look old, not crumble like a cookie when someone picks it up. That means choosing decent paper, using stain with some restraint, drying it carefully, and testing your pen before writing your masterpiece, grocery list, pirate oath, or wedding vow.
What You Need Before You Start
- White or off-white paper
- Brewed tea or coffee
- A shallow tray, baking sheet, or large dish
- A sponge, soft brush, or paper towel
- A wire rack, clean flat surface, or baking tray for drying
- Optional: cinnamon, vanilla, or a second darker brew for visual depth
- Optional: fine sandpaper, scissors, or careful hand-tearing for distressed edges
- Optional: heavy books for flattening after drying
Tea usually creates a softer golden-beige tone, while coffee often gives a darker brown tint. Neither is universally “better.” Tea is the quiet artist in a linen shirt. Coffee is the dramatic friend who arrives with opinions.
How to Make Parchment Like Paper for Writing: 8 Steps
Step 1: Choose the Right Paper
Your result starts with the paper itself. Thin printer paper will work in a pinch, but it tends to buckle more easily when wet. If you want a better final look, use a slightly heavier sheet, such as 24 lb or 32 lb printer paper, resume paper, mixed-media paper, or a cotton-blend writing sheet. Thicker paper usually handles moisture better and feels more substantial once dry.
If the paper is meant to become a keepsake, aim for paper that is smoother, stronger, and less flimsy. Bright white paper can work, but natural white or ivory paper often looks more convincing because it starts a little closer to the aged spectrum. If you plan to write with fountain pen, dip pen, or juicy markers, smoother paper usually gives cleaner lines than very absorbent stock.
Pro tip: Cut one test sheet first. This is the crafting equivalent of tasting the soup before serving it to your dinner guests.
Step 2: Brew a Strong Tea or Coffee Stain
Make your staining liquid stronger than anything you would happily drink. This is not beverage time. This is pigment time. Brew several tea bags in a small amount of hot water or make a concentrated cup of coffee. Let it cool until it is warm or room temperature.
If you want a lighter parchment look, use diluted tea. If you want darker “found in the attic beside a mysterious key” energy, use stronger coffee or multiple passes of stain. Keep in mind that paper usually dries lighter than it looks while wet, so do not panic if the first pass seems dramatic. Also do not get carried away and turn it into swamp paper. We are aging paper, not reenacting a flood.
Step 3: Crumple Lightly for Texture
If you want smooth vintage paper, you can skip this step. But if you want more texture and visual age, lightly crumple the sheet into a loose ball and unfold it again. The folds help create natural-looking variation once the stain settles into the creases.
The key word here is lightly. You want character, not structural collapse. Over-crumpling can weaken fibers and make the paper harder to write on neatly later. A few soft wrinkles go a long way.
Step 4: Apply the Stain Evenly
Place the paper on a tray or protected surface and apply the tea or coffee using a sponge, brush, or paper towel. You can also dip the sheet into a shallow tray if you want more complete coverage. For a more controlled result, brushing or dabbing usually works better than a full dunk.
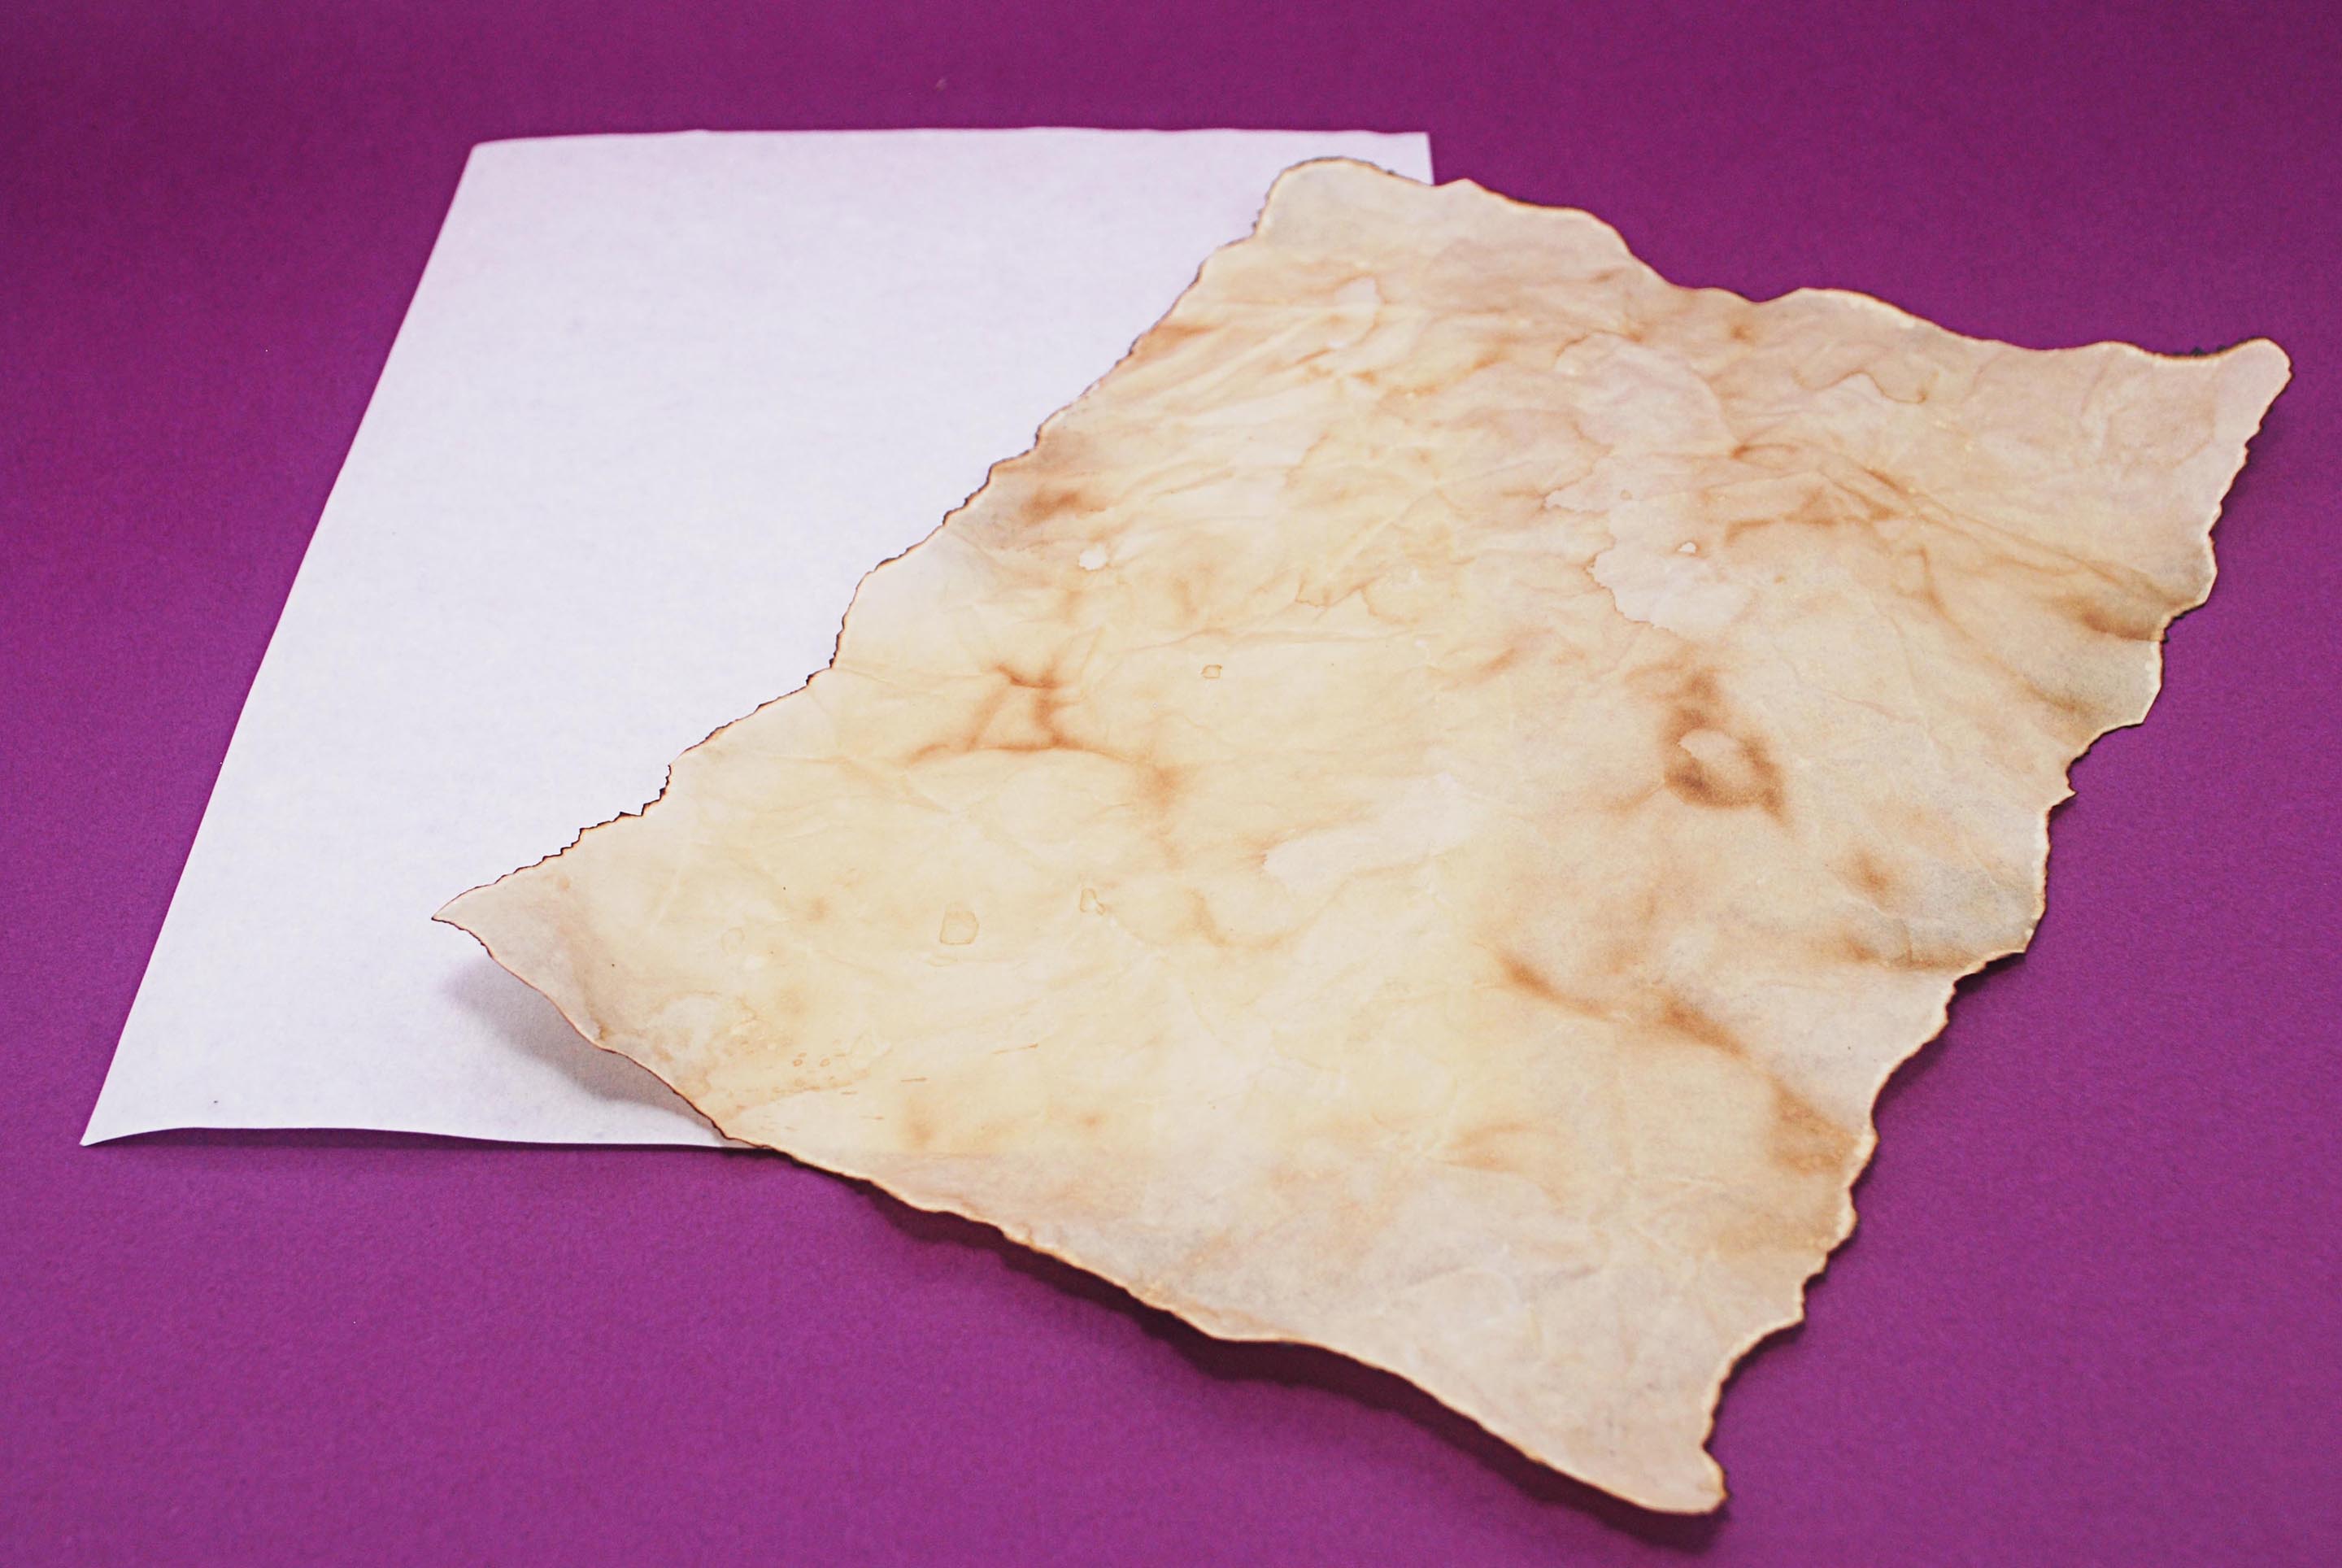
Want a natural aged look? Leave a few areas lighter and let others darken slightly. Perfectly even color can look flat and artificial. Slight mottling makes the sheet feel older and more interesting. If you want rings, splatters, or darker corners, add them deliberately after the base coat rather than by accident. “Accidental artistry” sounds romantic until it lands in the center of your quote.
Do not scrub the surface aggressively. Wet paper is more fragile than it looks, and rough handling can cause pilling, tears, or thin spots.
Step 5: Add Depth Around the Edges
This is where the paper starts looking convincingly old. Darken the perimeter slightly with a second pass of stain, especially around corners and edges. Many old papers look darker at the margins because wear, handling, oxidation, and dirt tend to collect there. You are recreating that effect in a clean, controlled way.
If you want a more decorative finish, dab a few darker spots or lightly drag a nearly dry brush across the page. Less is more. A little aging looks elegant. Too much makes it look like your paper lost a fight with breakfast.
For very subtle distressing, you can gently rough the edge with your fingers or tear it carefully by hand. If you want crisp control, trim first and distress second.
Step 6: Dry It Carefully
Air-drying is the safest method. Lay the sheet flat on a clean surface, hang it from clips, or place it on a rack so air can circulate. If you are in a hurry, you can use very low heat and close supervision, but slower drying usually gives you more control and less risk.
Why the caution? Paper reacts to moisture and temperature. Too much heat can make it more brittle, exaggerate curling, or create uneven texture that is harder to flatten later. If you use an oven, keep it very low, watch it constantly, and remove the sheet as soon as it dries. Never wander off as if this is a self-managing life lesson. It is not.
Some crafters prefer to let the paper dry halfway, then dab on a second stain layer for deeper tone. That works well if you want a richer, more complex finish.
Step 7: Flatten and Finish the Surface
Once the paper is completely dry, assess the texture. If it is more wrinkled than you want, place it between two clean sheets of plain paper and press it under heavy books for several hours. This helps flatten the page while preserving most of the aged look.
If the paper feels too rough for clean handwriting, smooth it very gently by hand or place it under weight overnight. You can also trim or distress the edges at this stage. Some people like slightly uneven edges for a handmade feel; others want a cleaner rectangle with only the color suggesting age. Both approaches work. The right choice depends on whether you are making stationery, props, menus, certificates, scrapbook inserts, or journal pages.
Step 8: Write on It the Smart Way
Before writing on the final sheet, test your pen on a corner or spare page. Stained paper can behave differently than fresh paper, especially if the sheet absorbed a lot of liquid. Ballpoint pens often work fine, gel pens can be hit or miss, and fountain pens may feather on more absorbent surfaces. Fine-tip pens or pigment liners usually offer the most control.
If you are using calligraphy ink, write with a light hand and allow extra drying time. If the paper is destined for display or gifting, let the writing dry fully before stacking, framing, or rolling it. Smudging your final quote in the last ten seconds is a very specific kind of heartbreak.
Common Mistakes to Avoid
Using Paper That Is Too Thin
Very thin paper can wrinkle excessively, tear when wet, or show bleed-through more easily. Heavier paper almost always gives a better result.
Making the Stain Too Weak
If your tea or coffee is barely colored, your paper will look mildly inconvenienced rather than beautifully aged. Go stronger than you think you need, then test.
Over-Saturating the Page
More liquid does not automatically mean a better vintage effect. Too much stain can make the paper floppy, fragile, and blotchy in unhelpful ways.
Skipping a Pen Test
This one matters. A page can look gorgeous and still write terribly. Always test first, especially if you are using fountain pens, markers, or wet ink.
Trying to Make It Look “Ancient” in One Pass
Layering creates depth. A believable aged-paper effect usually looks better when built gradually rather than blasted with dark stain all at once.
Best Uses for Parchment-Like Writing Paper
- Handwritten letters and notes
- Poetry pages and journaling spreads
- Calligraphy practice and quote art
- Treasure maps and themed party props
- Certificates, invitations, and menus
- Scrapbooking and mixed-media paper crafts
- School projects that need an old-world look
If the paper is purely decorative, you can lean harder into texture and distressing. If you actually plan to write on it, prioritize a smoother finish and moderate staining so the page still functions like paper instead of cosplay scenery.
How to Make the Result Last Longer
If you want your finished sheet to hold up well over time, store it flat in a cool, dry place away from direct sunlight and humidity. If it is especially meaningful, place it in an acid-free folder or protective sleeve. A good-looking page is nice. A good-looking page that still exists in five years is nicer.
For keepsake projects, start with better paper if possible. Cotton-rich or permanent writing papers usually age more gracefully than cheap sheets loaded with issues. Also avoid attaching sticky notes, damp decorations, or anything that could discolor the paper over time. Vintage style is charming. Actual preventable damage is not.
Experience: What It Feels Like to Make Parchment-Like Paper in Real Life
The first time most people try this project, they expect a quick craft and end up having a tiny emotional journey. It usually begins with confidence. You brew some tea, grab a sheet of paper, and think, “How hard can this be?” Five minutes later you are standing over a tray, holding a dripping page with the expression of someone trying to rescue a very old tax document from a puddle.
Then something interesting happens: the paper starts drying, the stain settles, and what looked like a soggy mistake begins to look intentional. The creases soften. The color warms up. The edges darken just enough. Suddenly the page has mood. It has backstory. It looks like it should contain a prophecy, a family recipe, or directions to buried treasure that may or may not be legally actionable.
One of the most useful lessons people learn from making parchment-like paper is patience. You cannot rush every stage and expect elegant results. If you apply stain too fast, the paper buckles more. If you dry it too aggressively, it can become stiff or overly curled. If you start writing before it is truly dry, the ink reminds you who is in charge. The process rewards slowing down, checking the page, and making small adjustments instead of trying to force the “old paper” look in one dramatic move.
There is also a surprising amount of personality in the final result. Tea-stained paper often looks softer, calmer, and a little more refined. Coffee-stained paper can feel bolder, moodier, and more theatrical. A smoother sheet creates a cleaner antique stationery vibe, while a crumpled and distressed sheet leans into map, journal, or fantasy prop territory. In other words, the project is simple, but it is not boring. Tiny choices change the whole mood.
Many people also discover that the most enjoyable part is not the staining itself, but the moment they finally write on the finished page. A handwritten note on parchment-like paper feels slower and more deliberate than writing on standard office paper. It makes even ordinary words seem a little more thoughtful. Your to-do list may still be a to-do list, but on aged paper it looks like a mission briefing. That is at least 20 percent more fun.
Another common experience is trial and error with pens. Some pens glide beautifully, while others feather, skip, or smudge. That sounds annoying, but it is actually part of the learning curve that helps you make better paper next time. After one or two attempts, most people start choosing sturdier paper, using less liquid, and testing ink before committing to the final page. The results improve quickly.
And that is really the charm of this project: it is accessible, inexpensive, creative, and forgiving enough that beginners can succeed without professional tools. You do not need a studio. You do not need a complicated supply list. You just need paper, stain, a flat surface, and a willingness to let the page become a little imperfect. In fact, imperfection is the point. That soft mottling, those gentle wrinkles, that slightly darker edge corner? Those are not flaws. They are the reason the paper looks alive.
So if your first sheet turns out a little too pale, too dark, too wrinkled, or too dramatic, congratulations. You are officially having the full parchment-like paper experience. Make another one. Adjust one variable. Test again. Before long, you will have a method that suits your style, whether your goal is elegant vintage stationery or a page that looks like it survived three kingdoms and one suspiciously cursed library.
Conclusion
Learning how to make parchment like paper for writing is really about balancing style and function. You want the paper to look aged and atmospheric, but you also want it to stay strong enough to write on cleanly. Start with decent paper, use concentrated tea or coffee, build color gradually, dry it carefully, flatten it if needed, and always test your pen before writing the final version. Do that, and you will end up with a page that looks wonderfully old without behaving like it belongs in a museum emergency.
In short: make it vintage, not victimized.