A fireplace in summer can feel a little like a celebrity in sweatpants: still charming, but not exactly performing. Once the cold months are over, that dark firebox often becomes a black rectangle collecting dust, old ash, and the occasional mystery cobweb with landlord energy. A faux log summer front solves that problem beautifully. It gives your fireplace the cozy look of stacked firewood without filling the room with heat, soot, or the dramatic responsibility of actually building a fire.
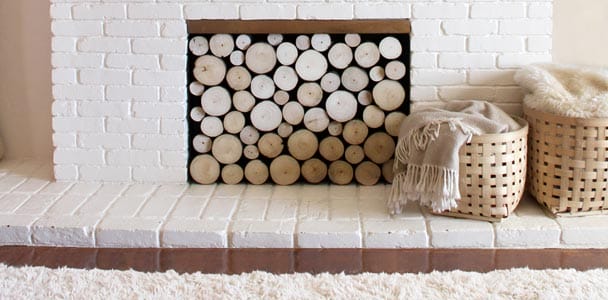
A faux log summer front is a removable decorative fireplace cover made to look like a stack of cut logs. It usually consists of a painted backing board fitted with sliced wood rounds, branches, or faux log pieces. When placed in front of or slightly inside the fireplace opening, it creates depth, texture, and a warm rustic focal point. Think of it as a fireplace screen with better hair.
This project is affordable, beginner-friendly, and flexible enough for modern farmhouse, cottage, cabin, traditional, or transitional interiors. Better yet, you can complete it with basic tools, a modest materials list, and a free afternoon. No masonry license required. No chimney sweep costume required either, though we support your creative journey.
What Is a Faux Log Summer Front?
A summer front is a decorative cover used when a fireplace is not in active use. Historically, fireplace summer covers helped conceal empty fireboxes during warm months. Today, homeowners use them for style, dust control, and seasonal decorating. A faux log summer front takes the idea further by creating the illusion of a neatly stacked woodpile.
The finished piece can be flat, framed, freestanding, magnetic, or inset into the fireplace opening. The most popular version uses a plywood or MDF panel painted matte black, then covered with thin slices of real branches. The dark background visually disappears, while the wood rounds appear to be full logs stacked deep inside the firebox.
Why Make One Instead of Buying One?
You can buy decorative fireplace screens, but making your own faux log fireplace insert gives you control over size, wood type, finish, and budget. Many older fireplaces have odd dimensions, especially if the home has been remodeled. A custom summer front lets you fit the exact width and height of your opening instead of pretending “close enough” is a design style.
DIY also lets you choose your mood. Birch slices create a clean Scandinavian look. Oak and maple feel classic and substantial. Cedar adds warm color. Weathered branches make the project look rustic and collected. You can even whitewash, stain, or seal the wood for a more polished finish.
Safety First: This Is Decorative Only
Before we get out the saw and start acting like a home improvement show host, let’s be clear: a faux log summer front is not fireproof, not heat-rated, and not designed for use with an active fireplace. It should only be installed when the fireplace is completely off, cold, clean, and out of service for the season.
If you have a wood-burning fireplace, remove cooled ashes safely before placing the insert. If you have a gas fireplace, do not block vents, controls, pilot lights, or manufacturer-required clearances. If your gas unit has a standing pilot or any heat source inside the firebox, do not place a wood or MDF insert inside it. When in doubt, ask a qualified fireplace professional. Your mantel deserves charm, not a surprise episode of “Why Is There Smoke?”
Tools and Materials You’ll Need
Materials
- One piece of 1/2-inch plywood or MDF cut to fit your fireplace opening
- Dry branches, logs, or wood rounds in mixed diameters
- Matte black paint or black chalk paint
- Construction adhesive suitable for wood
- Optional 1×2 boards for a rear support frame
- Optional cabinet handles, felt pads, magnetic strips, or small rubber feet
- Optional clear matte polyurethane or water-based sealer
- Sandpaper, 120- to 220-grit
Tools
- Tape measure
- Pencil
- Circular saw, jigsaw, or table saw
- Miter saw or handsaw for cutting branch slices
- Paintbrush or roller
- Caulk gun
- Clamps or heavy books for gentle pressure
- Drill, if adding handles or a frame
- Safety glasses, gloves, and a dust mask
Step 1: Measure the Fireplace Opening
Measure the width and height of the visible fireplace opening. Take measurements in at least three places: top, middle, and bottom for width; left, center, and right for height. Fireplaces are often less square than they look. They are charming like that.
Decide whether your faux log summer front will sit inside the opening or rest against the front of the fireplace. For an inset look, subtract about 1/4 inch from the smallest width and height measurements so the panel slides in easily. For an overlay style, make the panel slightly larger than the opening so it covers the edges like a decorative screen.
Step 2: Cut the Backing Board
Cut your plywood or MDF to size. Plywood is sturdy and handles screws well, while MDF gives a smooth, flat surface and is easy to paint. For a large opening, plywood is usually the better choice because it resists bending under the weight of the wood slices.
After cutting, sand the edges until smooth. Test-fit the board in or against the fireplace. If it sticks, trim a little at a time. This is not the moment to force it like you’re closing an overpacked suitcase. A good fit should feel secure but removable.
Step 3: Paint the Background Black
Paint the front of the backing board matte black. This small step makes a big visual difference. The black surface hides gaps between the log slices and creates the illusion of shadow behind stacked firewood. Glossy paint can catch light and reveal the trick, so choose matte or flat paint whenever possible.
Apply one or two coats and let the board dry fully. If you want the edges to disappear inside a dark firebox, paint the sides too. For an overlay front, you can paint the back black or leave it unfinished, depending on how visible it will be.
Step 4: Prepare the Wood Slices
Cut branches or small logs into slices between 1/2 inch and 2 inches thick. Mixed thicknesses create depth, while mixed diameters make the arrangement look natural. Aim for a variety of sizes: small rounds to fill gaps, medium rounds for rhythm, and a few large pieces for visual anchors.
Use dry wood whenever possible. Freshly cut wood can shrink, crack, ooze sap, or invite insects. If you gather wood from outside, inspect it carefully. Avoid pieces with active bugs, soft rot, mold, or suspicious holes. A rustic look is great; a tiny wildlife sanctuary in your living room is less ideal.
Lightly sand the cut faces to remove splinters. You do not need to make every slice perfectly smooth. In fact, slight imperfections help the finished summer front look authentic. Nature rarely uses a laser level, and frankly, she’s doing fine.
Step 5: Dry-Fit the Pattern
Lay the painted board flat on the floor or a worktable. Start arranging wood slices without glue. Place the largest rounds first, spacing them across the panel. Then add medium pieces, followed by small slices to fill gaps.
For a realistic stacked-log effect, avoid perfect rows. Real firewood settles unevenly, so rotate the pieces, vary the bark direction, and let the edges feel organic. Step back every few minutes and look at the whole board. If one area feels too heavy, move a few larger slices around until the balance looks right.
Leave a narrow border around the panel if it needs to slide into the fireplace opening. If your design will overlap the opening, you can cover the entire surface edge to edge.
Step 6: Glue the Wood Rounds in Place
Once the layout looks good, begin gluing one piece at a time. Lift each slice, apply construction adhesive to the back, and press it firmly onto the painted board. Use enough adhesive for a strong bond, but not so much that it squeezes out dramatically like frosting from an overfilled cupcake.
Continue until every wood piece is attached. If some slices are thick or uneven, add a little extra adhesive where the wood touches the board. You can place a flat scrap board over sections and add light weight while the adhesive cures, but avoid crushing bark or shifting the pattern.
Let the adhesive cure according to the product directions, usually at least 24 hours. Do not rush this part. A faux log front with falling wood slices is no longer “decor.” It is just a very slow indoor avalanche.
Step 7: Add a Support Frame if Needed
Wood rounds add weight quickly. If your fireplace cover is large, add a simple support frame to the back using 1×2 boards. Attach the frame around the perimeter with screws and wood glue. This helps prevent warping and gives the insert a sturdier structure.
If the summer front will stand on the hearth, you can add small triangular braces or rubber feet on the bottom. If it will rest against glass fireplace doors, felt pads can help prevent scratches. For some metal fireplace surrounds, heavy-duty magnetic strips may help hold a lightweight front in place, but they should not be your only safety strategy for a heavy panel.
Step 8: Add Handles for Easy Removal
A faux log summer front should be easy to remove before fireplace season. Small cabinet pulls or discreet handles on the back make the panel easier to lift out. If the front sits flush inside the opening, consider adding a hidden finger pull at the top or sides.
Do not make the insert so tight that removing it becomes a wrestling match. Seasonal decor should not require a pre-workout stretch.
Step 9: Seal the Wood, If Desired
Sealing is optional, but it can help reduce dust and protect the cut faces of the wood. Use a clear matte water-based polyurethane for a natural finish. Test the sealer on a spare slice first because some finishes darken wood more than expected.
Avoid high-gloss finishes unless your room leans glamorous. Glossy log slices can look less like stacked firewood and more like a craft project that discovered lip gloss.
Step 10: Install the Summer Front
Make sure the fireplace is completely cold and not in use. Place the faux log summer front into the opening or set it against the fireplace face. Check that it sits level, stable, and secure. It should not wobble, lean forward, or block anything that must remain accessible.
Once installed, style the mantel lightly. A vase of greenery, a mirror, framed art, or a few ceramic pieces can complement the texture of the logs without making the fireplace look overcrowded. The faux logs should be the star, not the background actor buried behind twelve candlesticks and a ceramic squirrel named Kevin.
Design Ideas for Different Home Styles
Modern Farmhouse
Use pale birch rounds, a crisp black background, and a simple white mantel. Add a woven basket nearby for texture. Keep the styling clean and relaxed.
Rustic Cabin
Choose darker bark, thicker slices, and visible knots. Pair the fireplace with leather, wool, iron accents, and warm wood furniture.
Coastal Cottage
Whitewash the log faces lightly and use driftwood-inspired tones. Style the mantel with glass, linen, shells, or soft blue-gray accents.
Traditional Living Room
Use uniform log rounds and a framed panel for a neater look. A symmetrical mantel arrangement will help the project feel intentional and elegant.
Common Mistakes To Avoid
Using Damp Wood
Damp wood may shrink, crack, smell musty, or loosen from the adhesive. Dry wood gives the best result and helps the summer front last longer.
Skipping the Black Paint
The black background is what creates the illusion of depth. Without it, the spaces between slices may show raw plywood, which breaks the stacked-log effect.
Making the Panel Too Heavy
A huge board covered with thick hardwood slices can become surprisingly heavy. Keep slices thin, use a sturdy backing, and add supports if needed.
Forgetting Fire Safety
This project is decorative only. Remove it before using the fireplace. Keep combustible materials away from heat sources, and never place candles or open flames directly in front of the wood insert.
Maintenance Tips
Dust the faux logs with a soft brush, microfiber cloth, or vacuum brush attachment. Avoid soaking the wood with water. If a slice loosens, remove old adhesive from the area and reattach it with fresh construction adhesive.
Before the first fire of the season, remove the summer front and store it in a dry place. Inspect your fireplace and chimney as recommended for your fireplace type. When warm weather returns, clean the fireplace, confirm everything is off and cool, and reinstall the decorative front.
Budget-Friendly Variations
If you do not have access to real branches, you can use craft wood slices from a hobby store. They cost more per piece but save cutting time. For a lighter version, cut faux rounds from cork or foam and paint the edges to resemble bark. For a renter-friendly option, build a freestanding panel that rests on the hearth without screws, anchors, or permanent changes.
You can also make a half-depth version by covering only the visible lower portion of the fireplace opening and painting the upper area black. This uses fewer wood slices while still delivering the stacked-log illusion.
Conclusion
Creating a faux log summer front is one of those rare DIY projects that looks expensive, feels custom, and does not require you to remodel half the house. With a backing board, black paint, dry wood slices, and strong adhesive, you can turn an empty fireplace into a warm design feature for the off-season.
The key is balance: measure carefully, vary the log sizes, secure the pieces well, and treat the insert as decorative only. Done right, your fireplace will look cozy in July without raising the room temperature one degree. That is the kind of summer magic every living room deserves.
Experience Notes: What This Project Teaches You in Real Life
The first thing you learn when making a faux log summer front is that fireplaces are rarely as square as they appear. You may measure the top and feel confident, then measure the bottom and discover your fireplace has been quietly living its own architectural truth. That is why taking several measurements matters. A small gap is easy to disguise with shadow, but a panel that is too large will not fit, no matter how encouragingly you stare at it.
The second lesson is that wood slices multiply in your imagination but disappear on the board. A pile that looks enormous on the garage floor can cover only half the panel once you begin arranging the pattern. Gather or cut more than you think you need, especially small pieces. The tiny rounds are the secret heroes because they fill awkward gaps and make the whole design look intentional.
Another useful experience is learning not to chase perfection. At first, it is tempting to line up every round neatly, like cookies on a baking tray. But the best faux log fronts look slightly irregular. A few angled pieces, uneven bark edges, and varied thicknesses create depth. The project becomes more convincing when it looks like nature had a vote.
Adhesive patience is also a major character-building exercise. Once the slices are glued, leave them alone. Do not keep poking them to “check.” Do not lift the panel after three hours because you are excited. Strong adhesive needs curing time, and gravity has no sympathy for impatience. Let the front rest flat overnight, or longer if the adhesive label recommends it.
Finally, the finished piece changes the room more than expected. A dark, empty fireplace can make a living room feel unfinished during summer, especially when the mantel is decorated. Once the faux logs are in place, the fireplace looks styled, warm, and complete. It gives the eye something natural to land on without requiring a real fire. Guests may even ask if the logs go all the way back. That is when you smile politely and accept your award for Best Supporting Illusion in a Domestic Setting.
Note: This faux log summer front is a removable decorative accessory. Always remove it before using the fireplace, and do not install it where heat, flame, embers, pilot lights, or required ventilation may contact the wood or backing board.