You finished the puzzle. You admired it. You took at least one photo like a proud parent at a school recital. Now comes the big question: should you break it apart and put it back in the box, or preserve that masterpiece forever? If you picked option two, welcome to the wonderfully sticky world of puzzle glue.
Learning how to glue a puzzle is not hard, but it does reward patience, a steady hand, and a healthy respect for drying time. Done well, a glued puzzle can become wall art, a keepsake, or proof that yes, you really did survive 1,000 tiny cardboard pieces of sky. Done poorly, it can become a warped monument to overconfidence. The good news is that avoiding disaster is easier than it sounds.
This guide walks you through exactly how to glue a puzzle, what supplies you need, which methods work best, how to avoid common mistakes, and how to get your finished puzzle ready for framing. Whether you are preserving a family favorite, a travel souvenir puzzle, or the one that nearly made you question your life choices, this step-by-step article will help you do it right.
Why Glue a Puzzle in the First Place?
Some puzzles are fun for a weekend and then happily return to the box. Others feel worth saving. Maybe the artwork is gorgeous. Maybe it was a group project with your family. Maybe it took you three straight Sundays and enough coffee to power a small city. Gluing turns that finished puzzle into a display piece you can keep instead of a memory you accidentally vacuum up.
It also helps stabilize the puzzle for mounting and framing. Without glue or adhesive backing, the pieces can shift during transport, especially with larger puzzles. If you want to hang your puzzle on the wall, gluing is often the simplest route.
That said, not every puzzle should be glued. If you want to rebuild it someday, lend it to a friend, or keep a collectible puzzle in original condition, skip the glue and use a nonpermanent display method instead. There is no shame in putting it back in the box. Sometimes the greatest art is temporary. Sometimes it also lives under your couch for six months.
What You Need Before You Start
Basic Supplies
- A completed puzzle
- Puzzle glue or a clear-drying craft glue made for sealing surfaces
- Wax paper or parchment paper
- A foam brush, spreader, plastic card, or applicator
- A rolling pin or flat object for gently pressing the puzzle flat
- A clean, flat work surface
- Optional: adhesive sheets, foam board, cardboard, frame, clean cloth, and books for weighting
The best glue for puzzles is usually specialty puzzle glue or a puzzle saver product because it is designed to seal and hold pieces together while drying clear. Some people also use products like Mod Podge Puzzle Saver. If you are nervous about brushing glue over the image, adhesive sheets are another option. These attach to the back of the puzzle and reduce the mess factor considerably.
Choosing the Best Glue Method
1. Liquid Puzzle Glue
This is the classic method. You pour or brush the glue onto the front of the puzzle, spread it evenly, let it dry, and optionally repeat on the back. Liquid puzzle glue works well when you want a sealed surface and a firm hold. It is widely available, beginner-friendly, and effective for puzzles you plan to frame.
2. Adhesive Sheets
Adhesive sheets stick to the back of the puzzle, which means the front image stays untouched. This is a great choice for puzzlers who dislike sticky brushes, glossy finishes, or panic-inducing puddles of glue. The trade-off is that applying sheets neatly on a large puzzle can be a little fiddly.
3. Spray Adhesive
Some people use spray adhesive for mounting, especially when attaching a glued puzzle to foam board. This method can work well, but it requires careful handling, ventilation, and precise application. For most beginners, liquid glue or adhesive sheets are easier to control.
How to Glue a Puzzle Step by Step
Step 1: Pick the Right Spot
Choose a flat surface with enough room around the puzzle so you are not working like a surgeon in a broom closet. A dining table, craft table, or large desk works well. Slide wax paper or parchment paper under the puzzle. This step matters more than you think. Glue can seep through the seams, and your table does not deserve that kind of betrayal.
Step 2: Flatten the Puzzle
Before you apply glue, make sure the puzzle is lying as flat as possible. Run a rolling pin lightly over the top or gently press with a flat object. You are not making pie crust. The goal is simply to level raised pieces and improve contact between the seams.
Step 3: Apply a Thin, Even Coat
Pour a small amount of puzzle glue onto the center of the puzzle. Spread it outward using a foam brush, plastic spreader, or even an old gift card. Work slowly and cover the entire surface, including the edges. The keyword here is thin. Too much glue can cause warping, swelling, or a cloudy finish.
Make sure the glue reaches the seams between pieces. That is what turns a pile of cardboard into one solid piece. A thin, even coat is almost always better than a thick, dramatic coat that looks like you are frosting a cake.
Step 4: Let It Dry Completely
Drying times vary by product, room humidity, and how generously you applied the glue. Some light coats may dry within 15 to 30 minutes, while larger or wetter applications can take several hours. For safe handling and especially for framing, giving the puzzle a full day to dry is the smart move. Patience is annoying, but it is cheaper than ruining the corner with one impatient grab.
Step 5: Decide Whether to Glue the Back
You can stop after gluing the front, especially if the puzzle already feels stable. But if you want extra strength, flip the puzzle carefully after the front is fully dry and add a thin coat to the back. Gluing both sides can help with long-term durability and may reduce edge curl in puzzles that try to act dramatic.
Step 6: Press It Flat if Needed
If the puzzle buckles slightly after drying, place wax paper over it, cover it with a clean cloth if desired, and gently weigh it down with a few books or another flat object overnight. This helps the puzzle settle into a flatter shape before framing.
How to Flip a Puzzle Without Losing Your Mind
Flipping a glued puzzle sounds simple until you imagine 1,000 pieces turning into modern art on the floor. Here is the safer method:
- Wait until the front is fully dry.
- Place a large piece of cardboard, poster board, or foam board over the top.
- Hold the puzzle and board firmly together.
- Flip the entire sandwich in one smooth motion.
- Remove the original backing from the new top side.
This method works especially well if you plan to apply adhesive sheets or back glue. It is not glamorous, but it gets the job done without requiring supernatural confidence.
Common Mistakes to Avoid
Using Too Much Glue
The number one mistake is overdoing it. More glue does not mean more security. It usually means longer drying time, more seepage, and a greater chance of warping.
Skipping Surface Protection
If you forget the wax paper or parchment paper underneath, excess glue can bond to your table. That turns your craft project into a furniture crisis.
Not Reading the Product Instructions
Different puzzle glues have different coverage, applicators, and dry times. Always check the label before starting. This is especially important with larger puzzles, metallic finishes, or unusual surfaces.
Rushing the Dry Time
If the puzzle feels dry on top but the seams are still soft underneath, moving it too soon can create cracks, bends, or lifting edges. Let it dry thoroughly before flipping, mounting, or framing.
Ignoring the Edges
The edges are often the first place where trouble starts. Make sure they are fully covered but not drowned. Think “well sealed,” not “accidentally laminated forever.”
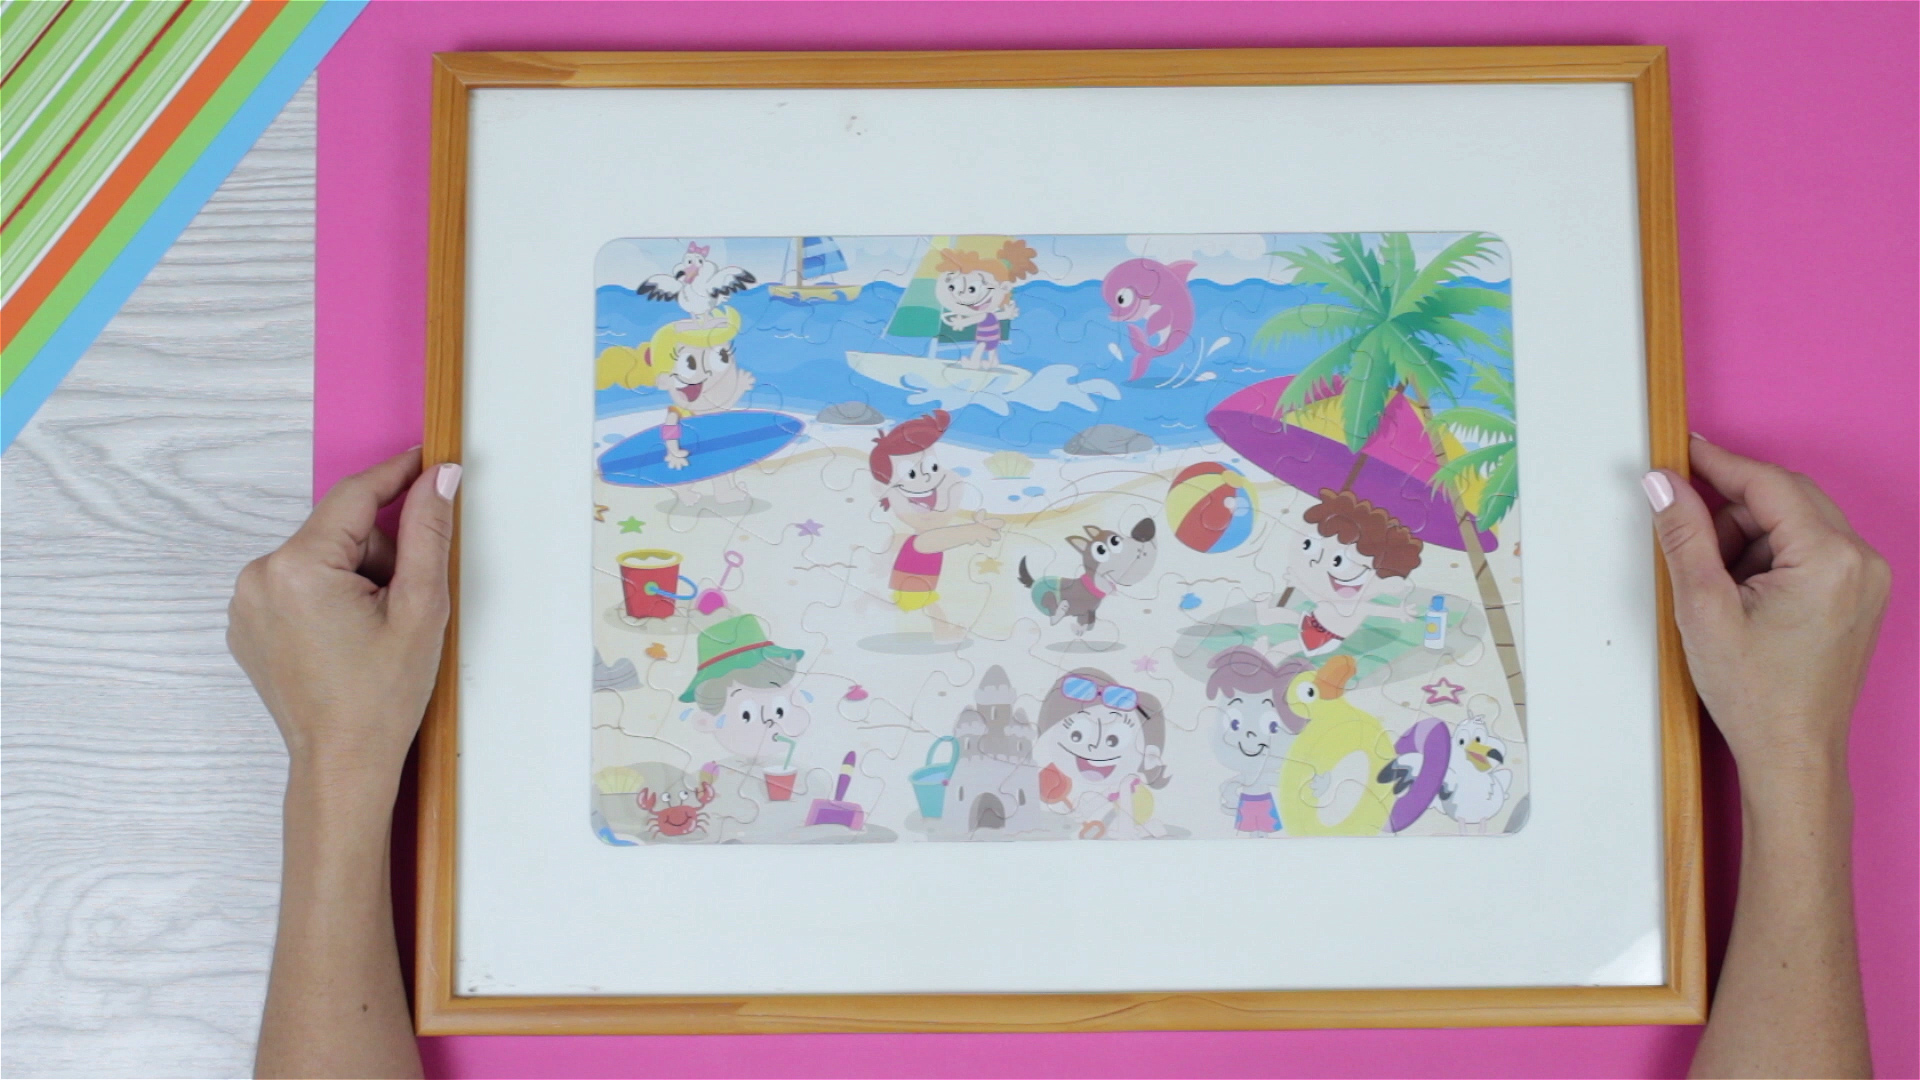
How to Mount and Frame a Glued Puzzle
Once your puzzle is dry, you can frame it as-is or mount it to a backing board first. Foam board is a popular choice because it adds support without too much weight. Cut the board to fit your frame, apply adhesive to the back of the puzzle or directly to the board, align it carefully, and let it dry flat.
Then place the mounted puzzle into a frame that matches the puzzle dimensions. A puzzle-specific frame is convenient, but standard frames can work too if the size is right. If you want a more polished look, add a mat around the edges. If the puzzle is thick, make sure the frame has enough depth so it does not feel squished.
Some people prefer framing without glass, especially if they want to preserve the surface texture and avoid glare. Others like the added protection of glass or acrylic. Neither choice is wrong. It depends on where the puzzle will hang and the look you want.
When Adhesive Sheets May Be Better Than Liquid Glue
Liquid glue is popular, but it is not always the best option. Adhesive sheets can be the smarter choice when:
- You do not want to alter the front finish of the puzzle
- The puzzle has glitter, metallic, lenticular, or glossy special effects
- You want a lower-mess method
- You are worried about visible brush marks or cloudy drying
For specialty finishes, preserving the look of the artwork matters. In those cases, sticking the support on the back may be the cleaner solution.
Should You Glue the Front or the Back?
This question comes up a lot, and the honest answer is: it depends on your goal.
If you want the easiest preservation method, gluing the front is usually enough. It seals the image and holds the seams together. If you want extra stability, especially for a large puzzle, gluing the back as well can make the finished piece sturdier.
If you are trying to avoid changing the front finish, use adhesive sheets on the back instead. That gives you structure without brushing sealant across the artwork. For many people, the best compromise is front glue plus back support. It is the puzzle equivalent of wearing both a belt and suspenders, but sometimes that is exactly the energy a 2,000-piece landscape demands.
Practical Examples
Example 1: A Standard 500-Piece Puzzle
A basic 500-piece puzzle is usually easy to glue with one thin coat on the front and a second light coat after the first dries. If you are framing it right away, that may be all you need.
Example 2: A Large 1,000-Piece Puzzle
For a 1,000-piece puzzle, use a generous work area, flatten it carefully, and consider a back coat or foam board mounting for extra support. Larger puzzles are more likely to flex when moved, so reinforcement helps.
Example 3: A Puzzle with a Fancy Finish
If the puzzle has foil, glitter, or a textured effect, test your glue on the box insert or choose adhesive sheets instead. Specialty surfaces can react differently, and you do not want your beautiful shimmering night sky to end up looking like it lost an argument with craft gloss.
Real-Life Experiences and Lessons From Gluing Puzzles
The first time I glued a puzzle, I was wildly overconfident. I had finished a 1,000-piece cityscape and assumed puzzle preservation would be a quick victory lap. I slid some paper under it, grabbed the glue, and started spreading with the enthusiasm of someone icing a birthday cake. Within minutes, I learned two things: one, puzzle glue travels farther than you think, and two, “thin and even” is not decorative advice. It is the whole game.
That first attempt turned out fine in the center but a little too glossy around the edges because I had used too much product there. The puzzle survived, but it taught me that careful application matters more than speed. Since then, I have glued several puzzles of different sizes, and every one of them has behaved a little differently.
A 500-piece floral puzzle was easy. It lay flat, took one coat beautifully, and dried fast enough that I started feeling suspicious. A larger 1,500-piece map puzzle, on the other hand, was basically a cardboard diva. One corner kept lifting, and after drying, the edges curled slightly. The fix was simple: I flipped it once the front was dry, added a light coat to the back, and pressed it flat overnight with wax paper and a stack of books. The next morning, it looked dramatically better. Apparently, books can solve more than one kind of problem.
I have also learned that mood matters. Gluing a puzzle is not the moment to multitask, answer five texts, and reheat pizza. It goes better when you set aside a calm half hour and treat it like the final step of the project instead of an afterthought. The puzzle can sense panic. I cannot prove that scientifically, but I stand by it emotionally.
One of the smartest habits I picked up was checking the frame before gluing. That sounds obvious, yet many people finish the preservation step and only then realize the puzzle dimensions are slightly odd. Knowing where the puzzle is going helps you decide whether to mount it on foam board, whether to leave room for a mat, and whether the thickness will work inside the frame.
Another lesson is that not every finished puzzle needs to become wall decor. Some are worth saving forever because of the artwork or the memory attached to them. Others are better photographed, admired, and returned to the box. That choice actually makes the whole hobby more enjoyable. You do not need to preserve every puzzle like it belongs in a museum. Sometimes the joy is in solving it once. Sometimes the joy is in hanging it over the couch and casually waiting for compliments.
In the end, the best puzzle-gluing experience comes from keeping expectations practical. Aim for secure, flat, and display-ready rather than flawless under a magnifying glass. If your puzzle looks great from a normal viewing distance, hangs straight, and stays together, you have done the job well. That is not cheating. That is craftsmanship with better snacks.
Conclusion
If you have been wondering how to glue a puzzle, the process is refreshingly doable once you know the right steps. Protect your work surface, flatten the puzzle, use a thin and even coat of glue, let it dry fully, and add backing or framing support if needed. The method is simple, but the results can be surprisingly satisfying.
A glued puzzle is more than preserved cardboard. It is a finished project, a memory, and sometimes a surprisingly stylish piece of DIY decor. So go ahead and save that masterpiece. You already did the hard part by finding all those identical blue pieces.