Spackle is one of those tiny home-repair heroes that looks boring on the shelf but saves your walls from looking like they survived a dart tournament, a moving day, and one very enthusiastic doorknob. But once you smear that paste into a nail hole or dent, the big question arrives: How long does spackle take to dry?
The practical answer is this: most spackle takes about 30 minutes to 2 hours to dry enough for light sanding, while deeper repairs may need several hours or even overnight. Some patches may feel dry on the surface before they are ready underneath, which is why patience matters. Drying time depends on the product, patch depth, room temperature, humidity, airflow, and whether you applied one neat coat or created a tiny drywall volcano.
This guide explains real-world spackle dry time, when to sand, when to paint, how to speed things up safely, and how to avoid the classic mistake of painting too soon and discovering your wall now has the texture of a sad pancake.
Quick Answer: Average Spackle Dry Time
For small nail holes, pinholes, shallow dents, and tiny wall imperfections, lightweight or fast-dry spackle can often dry in 30 minutes to 1 hour. Standard premixed spackle usually needs around 1 to 2 hours. Larger or deeper patches may need 4 to 24 hours, especially if the spackle is thick or the room is humid.
Typical Drying Times by Repair Type
| Repair Type | Estimated Dry Time | Best Next Step |
|---|---|---|
| Tiny nail hole | 30 minutes to 1 hour | Sand lightly, then paint or prime if needed |
| Small screw hole | 1 to 2 hours | Check for shrinkage before sanding |
| Shallow dent or gouge | 1 to 3 hours | Apply a second coat if recessed |
| Medium hole with mesh patch | Overnight is safest | Sand, recoat, and feather edges |
| Deep patch or thick application | 12 to 24 hours or more | Let dry fully before sanding or painting |
These are useful estimates, not magic spells. Always check the label on the spackle container because formulas vary. A fast-dry wall repair product may be ready much sooner than a heavy-duty patching compound.
What Spackle Actually Is
Spackle is a paste-like patching compound used to fill small holes, dents, cracks, and surface flaws in drywall, plaster, wood, and sometimes masonry. It is thicker than joint compound and is usually designed for smaller repairs. That thicker texture is why it stays put in a nail hole instead of sliding down the wall like frosting on a hot cupcake.
Spackle is popular because it is simple: open the tub or tube, scoop some onto a putty knife, press it into the damaged area, smooth it out, let it dry, sand, and paint. For minor wall repairs, it is faster and more convenient than mixing drywall mud.
Spackle Dry Time vs. Cure Time
One common misunderstanding is the difference between “dry” and “cured.” Dry means the spackle has lost enough moisture at the surface to feel firm and accept sanding. Cured means it has hardened more completely throughout the patch.
For everyday wall touch-ups, you usually only need the spackle to be dry enough to sand and paint. However, for thicker patches, high-traffic areas, exterior repairs, or repairs that need strength, full curing matters more. A patch may be sandable after a couple of hours but still benefit from more time before heavy use or exterior exposure.
Factors That Affect How Long Spackle Takes to Dry
1. The Type of Spackle
Lightweight spackle dries quickly and is ideal for tiny nail holes, small dents, and quick paint prep. Standard spackle is a bit heavier and may take longer, but it can handle slightly larger repairs. Vinyl or acrylic spackle may be more flexible and durable, especially for cracks or exterior-friendly applications, but it often needs more drying time.
Color-changing spackle is especially beginner-friendly. Some formulas go on pink or blue and dry white, giving you a visual clue that the surface is ready. This is perfect for people who do not want to stand in front of a wall whispering, “Are you dry yet?” like the house is going to answer.
2. Patch Thickness
Thickness is the biggest reason spackle takes longer than expected. A paper-thin smear over a nail hole may dry fast. A deep glob stuffed into a gouge may stay damp inside for hours.
For the best result, apply spackle in thin layers. If the damage is deep, fill it gradually instead of trying to finish the whole repair in one heroic scoop. Thick spackle can shrink, crack, or sand unevenly. Thin coats dry more evenly and usually produce a smoother finish.
3. Hole Size
A pinhole and a doorknob dent are not the same project. Small holes dry quickly because there is less material. Medium holes, especially those using mesh patches, require more compound and often multiple coats. Larger holes may need drywall patching, tape, joint compound, and longer drying periods.
As a rule, use spackle for small repairs and shallow damage. For large holes, seams, or broad repairs, joint compound or a drywall patch system is usually the better choice.
4. Temperature
Spackle dries by releasing moisture. In a comfortable indoor room, drying is usually predictable. In cold spaces, drying slows down. In very hot spaces, the surface may dry too quickly while the inside stays soft. Most indoor wall repairs behave best in moderate temperatures, roughly the kind of room where humans are comfortable too.
5. Humidity
Humidity is the sneaky villain of dry time. If the air is already full of moisture, the water in the spackle has nowhere to go quickly. Bathrooms, basements, laundry rooms, and rainy-day projects often need extra drying time.
If the patch feels cool, soft, darker than the surrounding wall, or clogs sandpaper, it is not ready. Give it more time. Your wall is not being dramatic; it is just damp.
6. Airflow
Good airflow helps spackle dry faster. Opening a window, running a fan nearby, or using a dehumidifier can help. The key word is “nearby.” Do not blast the patch like you are trying to launch it into space. Gentle air movement is enough.
How Long Should Spackle Dry Before Sanding?
Spackle should be completely dry before sanding. For small repairs, this may be 30 minutes to 2 hours. For deeper repairs, wait several hours or overnight. Sanding too early creates a gummy mess, clogs sandpaper, tears the patch, and may force you to start over.
A dry patch should feel firm, powder slightly when sanded, and match the color described by the product label. If your sandpaper loads up with sticky paste, stop immediately. Let the spackle dry longer, then come back like a wiser, calmer version of yourself.
How Long Should Spackle Dry Before Painting?
Most spackle should be dry, sanded smooth, and dust-free before painting. For tiny holes, painting the same day is usually possible. For medium repairs, waiting overnight is safer. If the spackle is still damp when painted, the paint may flash, peel, bubble, or reveal a dull patchy spot.
Primer is often a smart step, especially on larger repairs or flat walls where every flaw shows. Some spackling products include primer-enhanced formulas, but even then, priming may help create a uniform finish if the surrounding paint is glossy, dark, or older.
How to Tell If Spackle Is Dry
Do not rely only on the clock. Instead, check the patch using a few simple signs:
- Color: Many patches dry lighter than they look when wet.
- Touch: The surface should feel firm, not cool or soft.
- Sanding test: Dry spackle sands into fine dust, not paste.
- No dark center: A darker middle often means moisture remains inside.
- No clogging: If sandpaper gums up, wait longer.
Color-changing spackle makes this easier because the product changes color as it dries. But even then, thick repairs may need extra time beyond the color shift.
Can You Make Spackle Dry Faster?
Yes, but with manners. The safest ways to speed up spackle drying are improving airflow, lowering humidity, and applying thinner coats.
Use a Fan
A fan can help move moist air away from the patch. Keep it on a gentle or medium setting and aim it across the room rather than directly at one wet blob.
Run a Dehumidifier
In humid rooms, a dehumidifier can make a noticeable difference. This is especially useful in basements, bathrooms, and rainy climates.
Apply Thin Coats
This is the best “speed trick” of all. Two thin coats often dry better and look smoother than one thick coat. It feels slower at first, but it saves time when you are not sanding a mountain range off your wall.
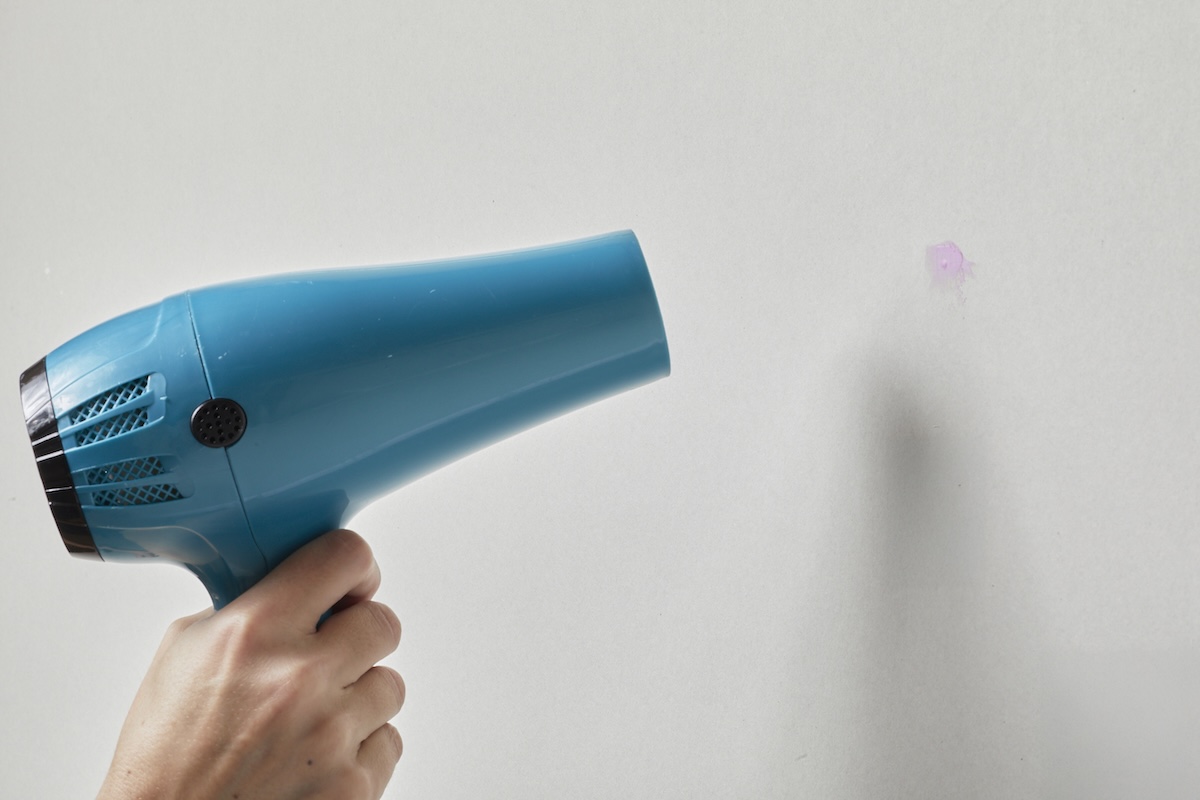
Avoid Too Much Heat
A hair dryer or heat gun may seem tempting, but direct heat can dry the surface too fast, causing cracking or trapping moisture inside. If you use warm air, keep it gentle and brief. Do not cook the wall. Drywall is not toast.
Spackle vs. Joint Compound Dry Time
Spackle usually dries faster than joint compound. That is why it is great for small repairs before painting. Joint compound, also called drywall mud, is better for seams, larger patches, skim coating, and repairs that need feathering over a wider area.
Premixed joint compound can take about 24 hours to dry under typical conditions, and humidity or cool temperatures can stretch that time. Setting-type compounds, sometimes called hot mud, harden chemically and come in timed versions such as 20-minute, 45-minute, or 90-minute formulas. However, setting time is not always the same as full dry time for sanding and painting.
Common Spackle Mistakes That Slow Drying
Applying Too Much at Once
The classic beginner mistake is loading the hole with a giant scoop and hoping for the best. Spackle shrinks as it dries, and thick patches are more likely to crack or stay soft inside. Thin layers win.
Skipping Surface Prep
Dust, loose paint, grease, and crumbly drywall can stop spackle from bonding well. Clean the area first. A patch on a dirty surface is like a sticker on a dusty window: technically possible, emotionally disappointing.
Sanding Too Early
If you sand wet spackle, you will smear it, damage it, and clog the sandpaper. Wait until it is fully dry and firm.
Painting Without Priming
Paint can absorb differently into raw spackle than into the surrounding wall. This can create flashing, where the repaired spot looks dull or obvious after painting. Primer helps even out the surface.
Best Practice: A Simple Spackling Timeline
For a small wall repair, start by cleaning the damaged area. Apply spackle with a putty knife and slightly overfill the hole because some shrinking may happen. Scrape away excess material so the patch is as smooth as possible. Let it dry according to the product label and the size of the repair.
After drying, sand lightly with fine-grit sandpaper. Wipe away dust with a clean cloth. If the patch has sunk below the wall surface, apply another thin coat and repeat the drying process. Once smooth, prime if needed, then paint.
When Should You Wait Overnight?
Waiting overnight is smart when the patch is deeper than a tiny nail hole, the room is humid, the repair uses mesh, the wall is plaster, or the final paint finish is glossy. Glossy paint shows flaws more easily, so extra drying and careful sanding are worth it.
Overnight drying is also wise before repainting a highly visible wall. Nobody wants a perfect living room wall except for one mysterious spot that says, “Someone rushed me.”
of Real-World Experience: What Spackle Teaches You After a Few Wall Repairs
After you have patched a few walls, you learn that spackle is less about brute force and more about timing. The first repair many people make is a nail hole from a picture frame. That job feels easy because it is easy: press in a tiny bit of lightweight spackle, swipe the putty knife, wait a little while, sand, and paint. The wall forgives you. You feel powerful. You may even look at other walls and think, “I am basically a contractor now.”
Then comes the second project: a deeper dent behind a chair, a screw anchor hole, or a spot where someone removed a towel bar with the delicacy of a raccoon opening a snack drawer. Suddenly the same drying time does not work. The surface turns white, but the center still feels cool. You sand too soon, and instead of a smooth patch, you get a soft crater. This is when spackle teaches lesson number one: the surface can lie.
The best experience-based trick is to treat drying time as a range, not a promise. A label might say 30 minutes, but that usually assumes a small, shallow repair under friendly conditions. If the patch is thick, the room is damp, or the air is still, give it more time. Extra drying time rarely ruins a project. Rushing often does.
Another lesson is that thin coats look more professional. Beginners often try to fill the whole damaged area in one pass because they want to be done. Experienced DIYers know that a thin first coat, a little shrinkage, and a thin second coat usually create a better finish. It also means less sanding, and less sanding means less dust on your floor, your baseboards, your shirt, and somehow your coffee.
Color-changing spackle is helpful, especially for quick repairs before painting. It removes some guesswork, but it does not replace common sense. If the repair is deep, wait longer even after the color changes. If your sandpaper clogs, stop. If the patch feels cold, stop. If the room feels like a rainforest because someone just took a shower, definitely stop.
One of the most useful habits is checking the wall under good light before painting. Shine a lamp sideways across the repair. This reveals ridges, dips, and rough edges that overhead lighting hides. A patch that looks perfect in dim light can become very dramatic once paint hits it. Sand gently, feather the edges, wipe away dust, and prime if the repair is larger than a tiny hole.
In the end, spackle is simple, but it rewards patience. The difference between an invisible repair and an obvious one is usually not talent. It is waiting long enough, applying less product than your instincts suggest, and sanding only when the patch is truly ready. Respect the dry time, and your wall will keep your secrets.
Conclusion
So, how long does spackle take to dry? For small nail holes and shallow dents, expect about 30 minutes to 2 hours. For deeper holes, thicker applications, humid rooms, or patches that need multiple coats, plan for several hours or overnight. The exact answer depends on the spackle formula, repair depth, temperature, humidity, and airflow.
The smartest approach is simple: apply thin coats, let each coat dry completely, sand only when the patch is firm, and prime before painting when the repair is noticeable. Spackle may be humble, but when used correctly, it can make wall damage disappear like it was never there. And unlike most home improvement wins, this one does not require a truck, a permit, or a mysterious tool named after someone’s uncle.
Note: Drying times are practical estimates for typical home repairs. Always read the product label because formulas differ, and allow extra drying time for thick patches, cool rooms, humid spaces, or exterior repairs.