If chocolate cake had a “little black dress,” this would be it: simple, classic, and suspiciously good at making people think you went to culinary school. These mini flourless chocolate cakes are rich and fudgy with a glossy, crackly topand because they’re baked in ramekins, everyone gets their own personal chocolate situation. No slicing. No sharing. No awkward “is this piece too big?” negotiations.
Flourless cakes work their magic with a small cast of characterschocolate, butter, eggs, and sugarand technique does the heavy lifting. You whip eggs and sugar until airy (hello, lift!), then fold in warm melted chocolate and butter (hello, decadence!). The result lands somewhere between a brownie, a souffle, and a chocolate truffle that got a job and pays taxes.
Why You’ll Love These Mini Flourless Chocolate Cakes
- Gluten-free by design: No flour neededjust check your chocolate/cocoa labels if gluten sensitivity is a concern.
- Perfect portions: Individual ramekins = built-in portion control… or at least portion suggestion.
- Flexible texture: Bake them a little less for gooey centers, a little more for sliceable fudgy cake.
- Fancy without the fuss: The ingredient list is short, but the payoff is “special occasion” energy.
Mini Flourless Chocolate Cakes: Ingredients
This recipe makes 4 mini cakes (6-ounce ramekins). If your ramekins are smaller (4–5 ounces), you may get 5–6 cakes and a slightly shorter bake time.
What You’ll Need
- 4 ounces (113 g) bittersweet chocolate (60–70% cacao), chopped
- 6 tablespoons (85 g) unsalted butter, plus more for greasing
- 1/3 cup (67 g) granulated sugar
- 2 large eggs + 1 large egg yolk (room temp helps)
- 1 teaspoon vanilla extract
- 1/4 teaspoon fine salt
- 2 tablespoons (10 g) unsweetened cocoa powder (natural or Dutch-processed)
- Optional but excellent: 1/2 teaspoon espresso powder (it won’t taste like coffee; it tastes like more chocolate)
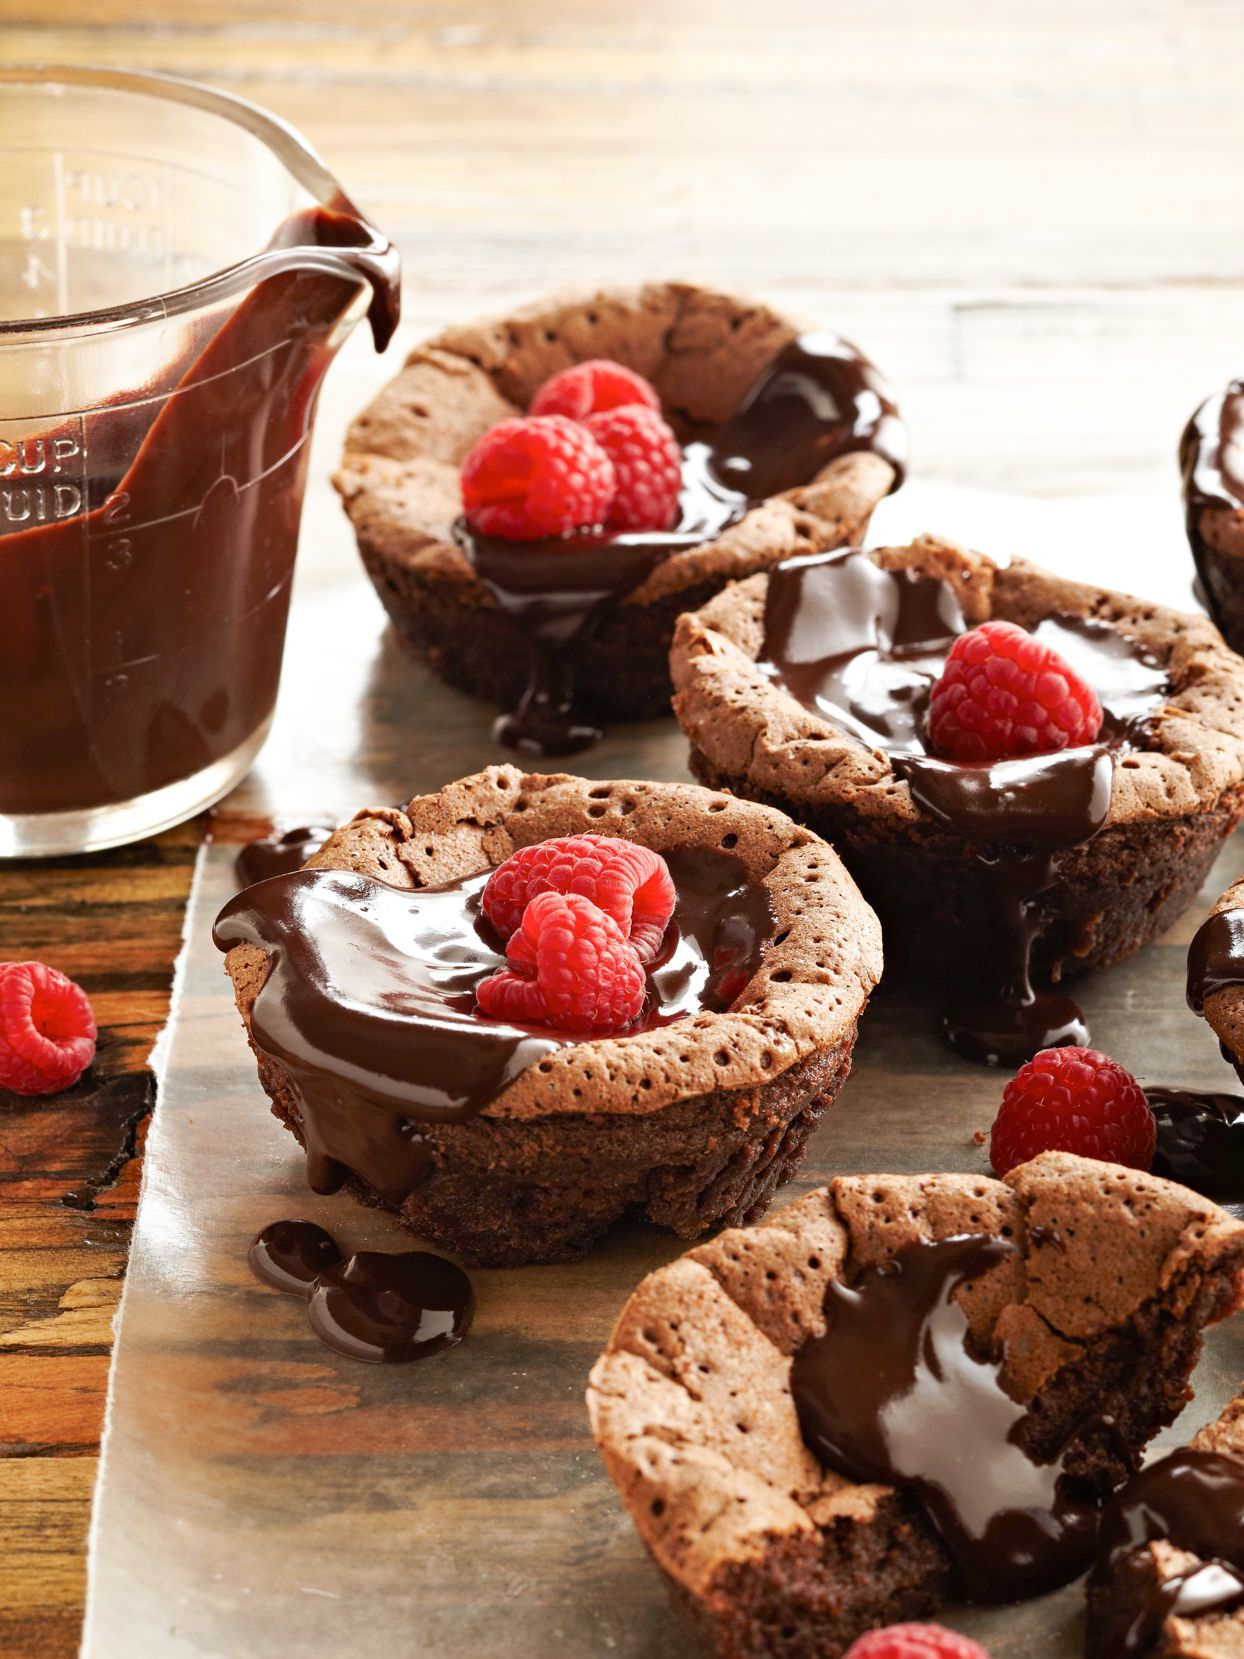
Optional Toppings (Choose Your Adventure)
- Powdered sugar or cocoa powder for dusting
- Whipped cream, crème fraîche, or Greek yogurt (for a tangy contrast)
- Fresh raspberries, strawberries, or cherries
- Vanilla ice cream (a classic for a reason)
- Salted caramel or berry sauce
Equipment
- 4 (6-ounce) ramekins
- Mixing bowl + whisk (or hand mixer/stand mixer)
- Rubber spatula (folding is a love language)
- Microwave-safe bowl (or double boiler)
- Baking sheet (for easy ramekin transport)
- Optional: Instant-read thermometer (helpful for dialing in doneness)
How to Make Mini Flourless Chocolate Cakes
Step 1: Prep the Oven and Ramekins
Preheat your oven to 375°F. Place a rack in the middle.
Grease the ramekins generously with butter. For extra insurance (and a bakery-style finish), dust the insides with cocoa powder and tap out the excess. Set ramekins on a baking sheet.
Step 2: Melt Chocolate + Butter (Gently!)
In a microwave-safe bowl, combine chopped chocolate and butter. Microwave in 30-second bursts, stirring well between each burst, until smooth and glossy. Stop while there are still a few small pieces and let residual heat finish the jobchocolate hates drama and high heat.
Let the mixture cool for about 2 minutes. You want it warm, not scorching (we’re making cake, not scrambled eggs).
Step 3: Whip Eggs + Sugar Until Thick and Airy
In a mixing bowl, combine eggs, egg yolk, sugar, and salt. Whisk vigorously by hand for a solid minute, then switch to a hand mixer (or stand mixer) and beat on medium-high until the mixture becomes pale, thick, and ribbon-y.
- Hand mixer: about 3–5 minutes
- Stand mixer: about 4–6 minutes
What you’re looking for: when you lift the whisk, the batter falls in ribbons that sit on the surface for a couple seconds before disappearing. That trapped air helps your cakes rise and creates that crackly top.
Step 4: Fold in Chocolate (Don’t Bulldoze the Air)
Add vanilla extract to the egg mixture. Then pour the warm chocolate-butter mixture in a steady stream while gently folding with a spatula. Fold until no streaks remain.
Sift in cocoa powder (and espresso powder if using) and fold just until combined. Overmixing deflates the batter, which is the baking equivalent of letting the air out of a party balloon.
Step 5: Fill and Bake
Divide batter evenly among the ramekins (they’ll be about 3/4 full). Bake at 375°F for:
- 10–12 minutes for gooier centers (lava-adjacent)
- 12–14 minutes for fudgy centers (spoonable, not runny)
- 14–16 minutes for fully set mini cakes (still rich, more sliceable)
Visual cues: the tops should look set and slightly crackly, the edges firm, and the center should have a gentle jigglelike gelatin that went to the gym.
Step 6: Cool Briefly, Then Serve
Cool the ramekins on a rack for 5 minutes. You can serve them directly in the ramekins (cozy and low-risk) or unmold for a restaurant-style look.
How to Unmold (Optional, But Impressive)
- Run a thin knife around the edge.
- Place a plate over the ramekin.
- Flip confidently in one motion (hesitation is how desserts end up on the floor).
- Lift ramekin; if it sticks, give it a gentle shake and a pep talk.
Doneness, Food Safety, and the “Molten Middle” Question
Flourless chocolate cakes can look gooey and still be cooked through. If you want extra reassurance, use an instant-read thermometer and aim for about 160°F in the center. If you prefer a more molten texture but feel uneasy about undercooked eggs, consider using pasteurized eggs.
Pro Tips for the Best Mini Flourless Chocolate Cakes
Use Good Chocolate (This Recipe Can’t Hide Mediocre)
With so few ingredients, flavor quality matters. Choose a chocolate you’d happily eat straight from the bar. A cacao percentage in the 60–70% range usually gives the best balance of deep flavor and smooth texture.
Don’t Overheat Chocolate
Chocolate can scorch or seize if overheated or exposed to moisture. Keep bowls and utensils dry, melt slowly, and stir often. If it starts looking grainy, stop heating and stirit may smooth out as the butter helps emulsify.
Whipping Eggs + Sugar Is Not Optional
That airy egg foam is your structure. Under-whip, and the cakes bake up flatter and denser. Over-whip isn’t as common, but if the foam looks dry or clumpy, you’ve gone too faraim for thick ribbons, not stiff peaks.
Ovens Lie (Sometimes Boldly)
If your oven runs hot, these can overbake quickly. An oven thermometer helps, but at minimum: start checking at 10 minutes. The difference between “perfectly fudgy” and “oops, brownie” is basically one email notification.
Flavor Variations (Because You Deserve Options)
1) Espresso-Chocolate
Add 1/2 teaspoon espresso powder to intensify chocolate flavor without making it taste like coffee.
2) Orange-Zest Chocolate
Fold in 1 teaspoon finely grated orange zest. Serve with whipped cream and a few orange segments for a bright contrast.
3) Spicy “Mexican Hot Chocolate” Vibes
Add 1/8 teaspoon cinnamon and a pinch of cayenne. It should whisper, not shout.
4) Peanut Butter “Center Surprise”
Spoon batter halfway into ramekins, add 1 teaspoon peanut butter, then top with remaining batter. Bake as directed. Your future self will thank you.
Make-Ahead, Storage, and Reheating
Can I Make These Ahead?
Yeswith a few caveats:
- Best texture: bake right after mixing.
- Make-ahead workaround: fill greased ramekins, cover, refrigerate up to 24 hours. Bring to room temp for 20 minutes before baking. You may need an extra 1–2 minutes in the oven.
Storing Leftovers
Let cakes cool completely, cover, and refrigerate for up to 3 days. They’ll firm up (still deliciousmore like truffle cake).
Reheating
Microwave a cake in its ramekin for 10–20 seconds to take the chill off and soften the center. Avoid blasting it; you’re warming chocolate, not soldering pipes.
Serving Ideas: Dress Them Up or Keep It Simple
These cakes are great plain, but toppings turn them into a full event. A few crowd-pleasers:
- Classic: powdered sugar + raspberries
- Comfort mode: vanilla ice cream + hot fudge
- Fancy mode: crème fraîche + flaky sea salt + shaved chocolate
- Holiday mode: whipped cream + peppermint pieces
Troubleshooting (Because Chocolate Deserves a Safety Net)
My Cakes Sank in the Middle
Some settling is normal. If they collapsed dramatically, you may have underbaked or deflated the batter by overmixing after whipping. Next time: fold gently and bake 1–2 minutes longer for more structure.
They’re Dry
That’s usually overbaking. Start checking early and pull them when edges are set but the center still jiggles slightly.
They Stuck to the Ramekins
Grease more generously, dust with cocoa powder, and let them cool 5 minutes before unmolding. Hot cakes are fragile (like your willpower near a dessert table).
The Chocolate Turned Grainy
Likely overheating or moisture. Melt in shorter bursts, stir often, and keep tools dry.
Mini Flourless Chocolate Cakes: A Longer “Experience” Section (The Real-Life Stuff)
Let’s talk about what it’s actually like to make these mini flourless chocolate cakesbecause recipes are neat and tidy, but kitchens are where chaos wears an apron.
First experience: you will absolutely doubt the batter. Flourless batter looks like glossy chocolate mousse that’s trying to pass as cake. Your brain will whisper, “This can’t possibly bake into a cake.” Your brain is wrong. This is one of those rare desserts where the batter looks like dessert, tastes like dessert, and then bakes into… a different dessert. It’s the chocolate version of a magic trick.
Second experience: the “Is it done?” stare-down. You’ll open the oven at minute 10 and see a top that’s puffed and crackly, and you’ll think, “Great, it’s done!” Then you’ll jiggle the pan and the center will wobble like it’s waving hello. This is the moment where patience earns interest. Give it another minute, then another, until the edges look confidently set. With mini cakes, seconds matter. One text message can take you from fudgy to firm. (Ask me how I knowno, seriously, don’t.)
Third experience: the unmolding gamble. If you serve them in ramekins, you’ll feel smug, safe, and correct. If you unmold them, you’ll feel like a contestant on a baking show with dramatic background music. Here’s the secret: unmolding works best when you’ve buttered like you mean it. When it goes well, it’s gorgeousthis tidy little dome of chocolate with a crackly top. When it goes poorly, it’s still delicious, just… “deconstructed.” Congratulations, you’re now serving “Rustic Mini Flourless Chocolate Cake.”
Fourth experience: toppings become a personality test. Powdered sugar people are minimalists. Whipped cream people are romantics. Ice cream people are realists who know balance is important. Berry people are optimists who believe fruit counts as a serving of health. Salted caramel people are here for a good time, not a long time.
Fifth experience: you will learn your oven’s personality. These cakes are like a polite lie detector for temperature accuracy. If your oven runs hot, they bake faster and set more firmly; if it runs cool, you’ll wonder why they’re still jiggly at minute 14. After two rounds, you’ll have your own perfect time windowand you’ll start casually telling friends things like, “In my oven, 11 minutes is the sweet spot,” as if you were born in a test kitchen.
Sixth experience: the leftovers glow-up. Day one: warm, gooey, spoonable. Day two: chilled, fudgy, truffle-like. Day three: still great, especially with coffee, and now you’re the kind of person who eats chocolate cake for breakfast and calls it “balance.” Flourless cakes age differently than fluffy layer cakes; they get denser and more intense in the best way.
And finally, the best experience: watching someone take that first bite. There’s a little pauseeyes widen, shoulders relaxlike their nervous system just got a warm blanket. Mini flourless chocolate cakes are small, yes, but emotionally? They’re doing the most.
Conclusion
This mini flourless chocolate cakes recipe is proof that you don’t need flour (or a million ingredients) to make a dessert that feels special. With a good chocolate base, properly whipped eggs, and a careful bake, you get individual cakes that are rich, dramatic, and surprisingly easy to pull off. Make them for date night, dinner parties, holidays, or for the very serious occasion of “I had a Tuesday.”