Good news: modern smartphones are no longer tiny glass rectangles designed only for people with superhero eyesight. Whether you are blind, have low vision, experience fluctuating vision, or simply need your phone to stop whispering in microscopic font, today’s iPhone and Android devices include powerful accessibility tools that can read the screen, enlarge text, describe the world through the camera, respond to voice commands, and even connect to braille displays.
This guide explains how to use a phone if you’re blind or visually impaired in 14 practical steps. It covers screen readers like VoiceOver and TalkBack, magnification, voice control, braille input, camera-based visual assistance, navigation, messaging, privacy, and daily-use tips. Think of it as a friendly mapnot the kind that says “turn left in 800 feet” while you are clearly standing in a kitchen, but the useful kind.
Why Smartphones Are Useful for Blind and Visually Impaired Users
A smartphone can be a communication device, magnifier, scanner, audiobook player, GPS navigator, label reader, calendar, wallet, and personal assistant. For blind and visually impaired users, the key is not buying the “perfect” phone. The key is turning on the right accessibility features and practicing them until the phone feels less like a slippery puzzle and more like a reliable tool.
Most users choose between iPhone and Android. iPhone includes VoiceOver, Zoom, Magnifier, Siri, Voice Control, Spoken Content, Display Accommodations, and braille display support. Android includes TalkBack, Select to Speak, Magnification, Lookout, Voice Access, Google Assistant, Accessibility Menu, and braille keyboard options. Both platforms can work very well. The best phone is the one that matches your budget, comfort level, support network, and preferred apps.
How to Use a Phone if You’re Blind or Visually Impaired: 14 Steps
1. Choose a Phone That Supports Strong Accessibility Features
Before anything else, make sure the phone has built-in accessibility tools. iPhones are known for consistent VoiceOver support across Apple apps. Many Android phones, especially Google Pixel and Samsung Galaxy models, offer strong TalkBack support and excellent customization.
If you are buying a new phone, test it in the store if possible. Try turning on the screen reader, increasing text size, adjusting contrast, and using voice commands. Also check physical comfort: Can you hold it securely? Are the buttons easy to find? Does the speaker sound clear? A phone with a bright display, good battery life, strong speakers, and reliable updates is usually a better long-term choice than the fanciest model with a camera bump large enough to qualify as furniture.
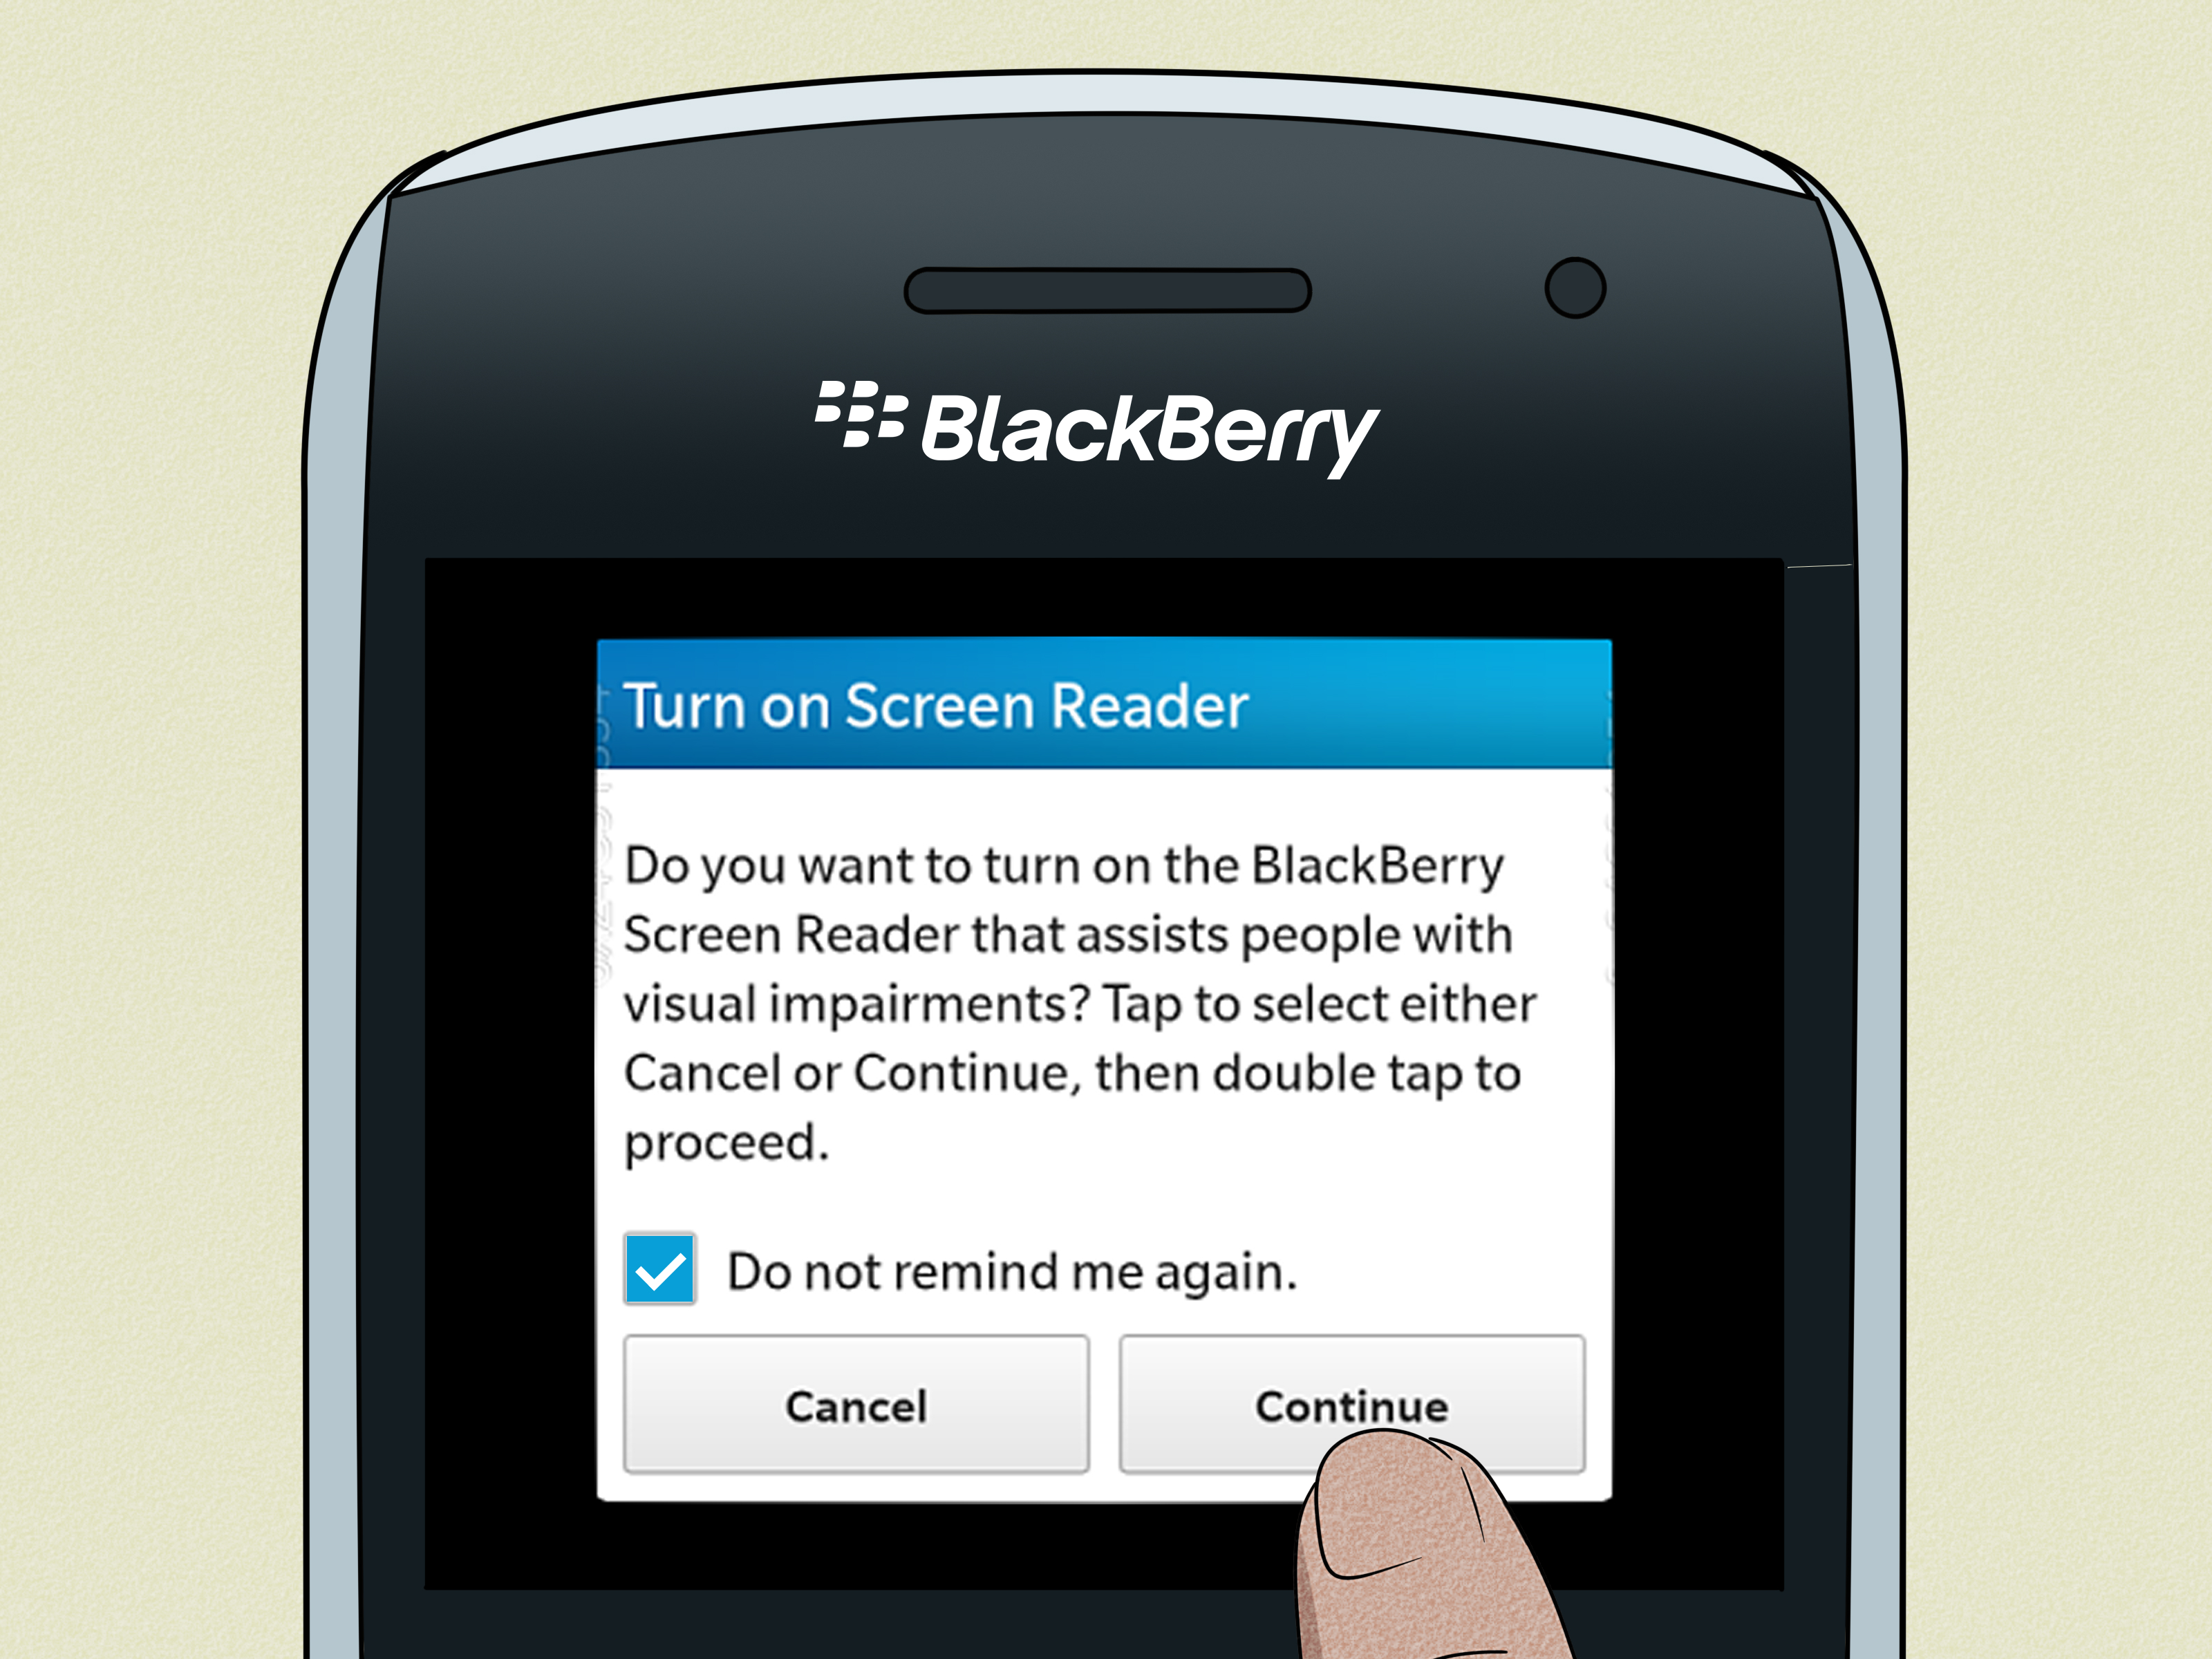
2. Turn On the Screen Reader
A screen reader is the main tool many blind users rely on. It speaks what is on the screen and lets you navigate using gestures.
On iPhone, the screen reader is called VoiceOver. Go to Settings > Accessibility > VoiceOver and turn it on. You can also ask Siri to turn on VoiceOver. Once enabled, tapping an item selects it and double-tapping activates it.
On Android, the screen reader is called TalkBack. Go to Settings > Accessibility > TalkBack and turn it on. Many Android phones also let you hold both volume buttons to activate TalkBack during setup. TalkBack announces items as you move around the screen and uses special gestures for navigation.
Important: when a screen reader is on, the phone’s gestures change. That is normal. Your phone is not broken. It has simply switched from “tap what you see” mode to “listen, select, and confirm” mode.
3. Practice the Basic Gestures Until They Feel Natural
Screen reader gestures are like learning a new keyboard shortcut system. At first, they feel strange. Then one day your fingers know what to do before your brain finishes complaining.
Common gestures include swiping left or right to move between items, double-tapping to activate the selected item, swiping up or down to change values, and using two or three fingers for scrolling. iPhone users can practice inside VoiceOver settings. Android users can use the TalkBack tutorial.
Start with five daily tasks: unlock the phone, open messages, answer a call, open settings, and return to the home screen. Once these feel comfortable, add more complex tasks like moving apps, editing text, browsing websites, and managing notifications.
4. Set Up Quick Accessibility Shortcuts
You should be able to turn accessibility tools on and off quickly. This is especially useful if a sighted friend or family member needs to help, or if you use different settings in different situations.
On iPhone, use the Accessibility Shortcut to triple-click the Side button or Home button. You can assign VoiceOver, Zoom, Magnifier, Voice Control, Color Filters, or other tools.
On Android, use accessibility shortcuts such as holding both volume keys, tapping the accessibility button, or using a gesture. You can assign TalkBack, Magnification, Voice Access, or the Accessibility Menu depending on your phone.
A shortcut is like a panic button, except calmer and more useful. Set it up before you need it.
5. Adjust Speech Rate, Voice, Volume, and Audio Feedback
The default screen reader voice may be too fast, too slow, too quiet, or too robotic. Customize it. A comfortable voice makes a huge difference, especially if you use your phone for hours each day.
In VoiceOver settings, adjust speaking rate, verbosity, pronunciation, rotor options, and audio ducking. In TalkBack settings, adjust speech rate, pitch, verbosity, sound feedback, vibration feedback, and spoken passwords.
Many experienced users increase speech speed over time. New users should begin slower and focus on accuracy. Speed is nice, but understanding your phone is nicer. Nobody wins a trophy for accidentally sending “banana passport toaster” to their boss because dictation was moving too fast.
6. Use Magnification, Large Text, and High Contrast for Low Vision
If you have partial sight, you may not need a screen reader all the time. Magnification and display settings can make the screen easier to see.
On iPhone, explore Zoom, Display & Text Size, Bold Text, Increase Contrast, Color Filters, Reduce Transparency, and Magnifier. On Android, try Magnification, Font Size, Display Size, High Contrast Text, Color Correction, Color Inversion, and Extra Dim if available.
For reading comfort, increase font size before increasing display size. Font size affects text; display size makes buttons and interface elements bigger. Try both and keep what feels easiest. Your phone should not require squinting, guessing, or holding it at arm’s length like a mysterious treasure map.
7. Learn Voice Commands and Dictation
Voice tools can reduce typing and make the phone faster. Siri, Google Assistant, Voice Control, and Voice Access can open apps, make calls, send texts, set reminders, start timers, and answer questions.
On iPhone, Siri handles quick requests like “Call Mom,” “Send a message,” or “Set a timer for 10 minutes.” Voice Control goes further by letting you navigate the phone with spoken commands such as “Open Mail,” “Swipe down,” “Tap Send,” or “Show numbers.”
On Android, Google Assistant handles everyday voice tasks. Voice Access allows more complete hands-free control, including opening apps, tapping buttons, scrolling, editing text, and using numbered screen labels.
Dictation is also useful for messages, notes, and searches. Speak punctuation clearly: “Hi comma I’m on my way period.” It may feel silly at first, but so did talking to a phone in public, and now everyone does it while standing next to avocados.
8. Make Text Entry Easier
Typing on a touchscreen without sight can be challenging, but there are several options. You can use standard on-screen keyboards with VoiceOver or TalkBack, dictate text, connect a Bluetooth keyboard, use braille screen input, or connect a refreshable braille display.
iPhone supports Braille Screen Input and external braille displays with VoiceOver. Android includes the TalkBack braille keyboard, which lets users type six-dot braille directly on the screen. Both platforms also support external keyboards, which can be faster for long emails or documents.
For beginners, try dictation for short messages and a Bluetooth keyboard for longer writing. For braille users, braille input can be efficient and private once practiced. The goal is not to use one method forever. The goal is to build a small toolbox and choose the right tool for the moment.
9. Organize the Home Screen for Speed
A cluttered home screen can slow anyone down, but it is especially frustrating when using a screen reader or magnification. Put your most-used apps on the first page: Phone, Messages, Email, Calendar, Camera, Notes, Maps, Magnifier, Settings, and any visual assistance apps.
Use folders carefully. A folder named “Useful Stuff” may seem charming today, but next week it becomes a digital junk drawer. Use clear names like “Reading,” “Travel,” “Banking,” “Health,” and “Shopping.”
Delete or hide apps you never use. Turn off unnecessary notifications. Arrange apps in a consistent order. Predictability is accessibility’s best friend.
10. Use Camera-Based Tools to Read and Identify Things
Your phone camera can do far more than take selfies where the ceiling fan becomes the star. It can read text, identify objects, scan documents, detect labels, describe scenes, and help with daily tasks.
iPhone users can use Magnifier to enlarge objects, adjust contrast, freeze frames, detect text, and have nearby text read aloud. Some models support advanced detection features that help identify doors, people, and objects.
Android users can try Google Lookout, which uses the camera to help read text, recognize documents, identify food labels, and provide environmental information. Microsoft Seeing AI is another popular app that reads text, describes people, identifies currency, recognizes products, and describes scenes. Be My Eyes connects blind or low vision users with volunteers, companies, and AI-powered image descriptions. Aira connects users with professional visual interpreters for more detailed assistance.
These tools are powerful, but they are not perfect. Use them for information, not for high-risk decisions. If a medicine label, legal document, or safety warning matters, verify it carefully.
11. Make Calling, Messaging, and Contacts Simple
Communication is the heart of phone use. Set up favorite contacts for quick calling. Add clear contact names, not “Dad New,” “Dad Old,” and “Dad Maybe Work?” unless you enjoy mystery novels.
Use voice commands to place calls and send texts. Create contact shortcuts if your phone supports them. Turn on caller ID announcements if useful. For messaging, try dictation, audio messages, and screen reader review before sending.
For video calls, learn where the camera is and use audio cues if available. Some apps provide accessibility labels for buttons like mute, camera, speaker, and end call. Practice with a trusted person first so you do not accidentally hang up while saying, “Wait, I think I found the button.”
12. Use Navigation and Location Features Carefully
Maps and GPS apps can be helpful for travel, but they should not replace orientation and mobility skills, a white cane, a guide dog, or common sense. GPS can drift, especially indoors, near tall buildings, or in crowded areas.
Use Apple Maps, Google Maps, public transit apps, ride-share apps, and specialized navigation apps with audio directions. Save important addresses such as home, work, school, doctor’s office, and emergency contacts. Check walking directions before leaving. Use headphones that allow environmental awareness, such as bone conduction headphones or one-ear listening, when appropriate.
For unfamiliar areas, combine tools: GPS for general direction, environmental sounds for awareness, mobility skills for safety, and visual assistance apps when you need details like signs, entrances, or product labels.
13. Protect Privacy and Security
Accessibility should never mean giving up privacy. Use a strong passcode, Face ID, Touch ID, fingerprint unlock, or another secure method that works for you. Be careful when screen readers speak passwords or private messages aloud in public.
Use headphones in shared spaces. Review app permissions, especially camera, microphone, location, and contacts. Only install apps from trusted app stores. Keep your phone updated. Turn on Find My iPhone or Find My Device so you can locate, lock, or erase your phone if it is lost.
When using visual assistance apps with live video or AI image descriptions, avoid showing sensitive information unless necessary. For banking, medical records, identification cards, or private mail, choose secure settings and trusted services.
14. Build a Practice Routine and Ask for Training When Needed
Learning phone accessibility takes time. Start with one feature, one task, and one success. Then build from there. A good first-week routine might include answering calls, sending texts, checking the time, setting reminders, opening the camera, and using the screen reader tutorial.
Many people benefit from training through vision rehabilitation services, assistive technology instructors, local blindness organizations, online tutorials, Apple Store accessibility sessions, Android help resources, or peer communities. Do not treat training as a last resort. It is a shortcut to confidence.
The goal is not to master every hidden feature. The goal is independence, comfort, and choice. If your phone helps you order groceries, read a menu, call a friend, join a meeting, listen to a book, and find your bus stop, that is already a small miracle disguised as a rectangle.
Best Apps for Blind and Visually Impaired Phone Users
Built-in tools are the foundation, but apps can expand what your phone can do. Consider adding:
- Seeing AI: Useful for reading text, identifying objects, recognizing currency, and describing scenes.
- Be My Eyes: Connects users with volunteers, company support, and AI-powered visual descriptions.
- Aira: Provides professional visual interpreting for navigation, shopping, travel, documents, and work tasks.
- Google Lookout: Helps Android users read text, scan documents, identify products, and understand surroundings.
- Voice Dream Reader or similar reading apps: Helpful for listening to documents, PDFs, articles, and books.
- Audible, Libby, or BARD Mobile: Great for audiobooks, library books, and accessible reading.
Do not install everything at once. Too many apps can create confusion. Start with one reading app, one visual assistance app, and one navigation tool. Add more only when you know what problem you want to solve.
Common Mistakes to Avoid
The first mistake is trying to learn everything in one day. Accessibility features are powerful, but they can feel overwhelming. Learn gradually.
The second mistake is leaving default settings unchanged. Speech rate, contrast, text size, gestures, shortcuts, and notifications should match your needs.
The third mistake is ignoring privacy. A screen reader can speak sensitive information out loud, and camera-based apps may process visual data. Use headphones, review permissions, and be thoughtful about what you share.
The fourth mistake is assuming one tool works for every situation. Sometimes VoiceOver is best. Sometimes magnification is faster. Sometimes dictation wins. Sometimes a human visual interpreter is the right choice. Flexibility is the secret sauce.
Real-World Experiences: What Using a Phone Can Feel Like
For many blind and visually impaired users, the first experience with a smartphone is a mix of excitement and mild betrayal. The device promises independence, but the first few minutes can feel like trying to operate a microwave that has joined a debate club. You touch the screen, it talks. You swipe, it moves somewhere unexpected. You double-tap and hope for the best. This stage is normal.
One helpful approach is to connect phone skills to real-life routines. For example, a user with low vision may begin each morning by asking the phone for the weather, using magnification to check medication instructions, dictating a text to a family member, and listening to news headlines. A blind user may start the day with a screen reader, check calendar appointments, use a braille display to review email, then use a navigation app for transit directions. These are not “special” tasks. They are ordinary tasks made accessible.
Shopping is another common example. A phone can read a grocery list, identify a product barcode, magnify a price tag, or connect to a visual assistant when packaging looks similar. Anyone who has confused cinnamon with cumin knows that labels matter. Your dinner can survive many things, but surprise cumin oatmeal is not one of them.
At work or school, smartphones can help manage documents, reminders, meetings, and communication. Screen readers can read emails and web pages. Dictation can speed up replies. Scanning apps can turn printed handouts into readable text. Calendar alerts can keep the day organized. The phone becomes less of a gadget and more of a portable command center.
Social life matters too. A phone can make it easier to join group chats, share photos, post online, listen to voice messages, and participate in video calls. Camera tools may help frame a picture or understand what is in an image someone sent. Accessibility is not only about productivity. It is also about jokes, friendships, hobbies, music, sports scores, family photos, and sending the perfect “I told you so” message at exactly the right time.
Travel can be both empowering and stressful. Audio navigation, ride-share apps, transit alerts, and location sharing can increase confidence, but users should still plan ahead. Save important places, check routes before leaving, keep battery power available, and know how to call for help. A portable power bank is not glamorous, but neither is a dead phone at 9 p.m. outside the wrong entrance.
Many users also describe a confidence shift. At first, they use accessibility features only when necessary. Later, they customize the phone deeply: faster speech, favorite gestures, organized apps, braille shortcuts, custom voice commands, and automation. The phone becomes personal. It stops being “technology for blind people” and becomes “my phone, my way.”
The biggest lesson from real-world use is simple: independence grows through repetition. The first time you use a screen reader to send a message, it may take five minutes. Later, it takes ten seconds. The first time you scan a document, you may need help aligning the page. Later, audio cues guide you. The first time you use a visual assistance app, it may feel awkward. Later, it becomes another everyday tool, like keys or headphones.
Most importantly, there is no single correct way to use a phone if you are blind or visually impaired. Some people rely mainly on audio. Some prefer magnification. Some use braille. Some combine everything. The best setup is the one that helps you do what you want with less frustration and more control.
Conclusion
Learning how to use a phone if you’re blind or visually impaired is not about memorizing every feature. It is about building a practical system. Start with the screen reader or magnification tools. Add shortcuts. Customize speech and display settings. Practice voice commands, text entry, camera-based reading, navigation, and privacy habits. Then keep improving your setup as your needs change.
Modern smartphones are powerful accessibility tools, but the magic comes from personalization. With the right settings and a bit of practice, your phone can read, speak, magnify, describe, guide, remind, connect, and entertain. That is a lot of responsibility for something that still occasionally falls between couch cushions, but overall, it is a pretty impressive little companion.