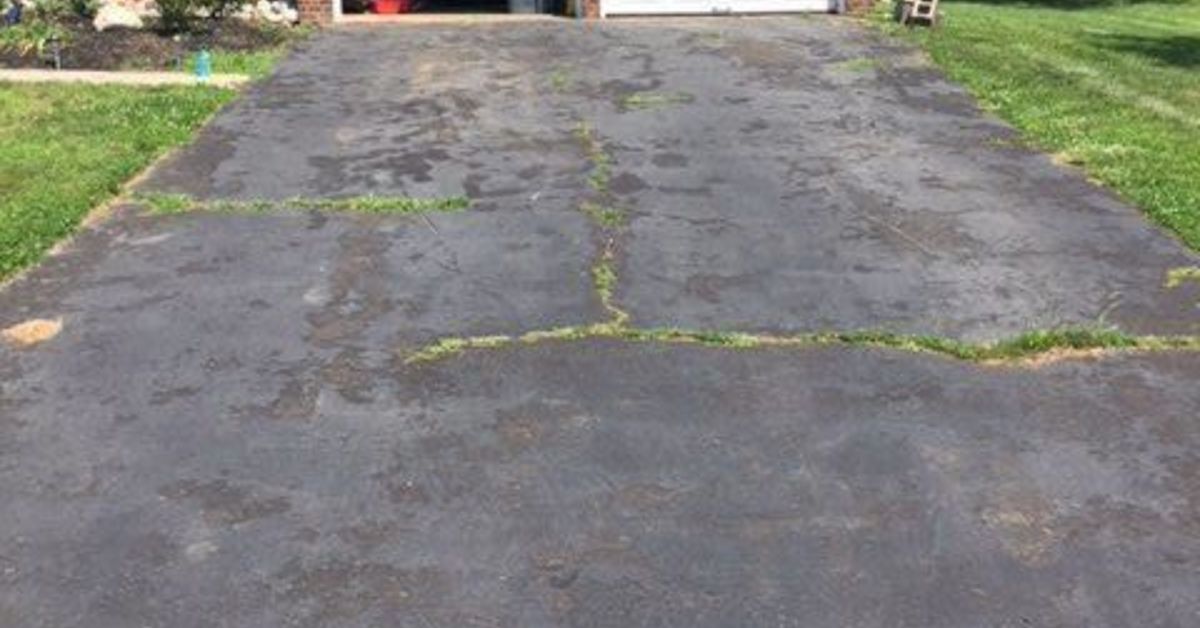
Driveway cracks have a sneaky way of starting small and acting innocent. One day, you notice a skinny little line near the garage. The next season, it looks like your driveway is trying to draw a map of the Mississippi River. The good news? Learning how to fill driveway cracks is one of the most approachable home maintenance projects you can do without renting a bulldozer, calling your uncle with “construction opinions,” or pretending you understand every aisle at the hardware store.
Whether your driveway is asphalt or concrete, cracks usually mean the same thing: water, temperature swings, soil movement, heavy vehicles, or plain old age have started picking a fight with the surface. Filling cracks early helps keep water out, slows further damage, improves curb appeal, and prevents tiny gaps from becoming expensive repairs. Think of it as dental flossing for your driveway. Not glamorous, but future-you will be grateful.
This guide explains how to inspect, clean, choose the right filler, apply it correctly, and avoid the common mistakes that turn a quick DIY repair into a sticky driveway soap opera.
Why Driveway Cracks Should Not Be Ignored
A small driveway crack is not always an emergency, but it is an invitation. Water slips into the opening, settles below the surface, and expands when temperatures drop. Even in warmer climates, moisture can weaken the base layer under asphalt or concrete. Add car tires, delivery trucks, tree roots, and summer heat, and that little crack can widen into a pothole, sunken slab, or broken edge.
Crack filling is not magic. It will not lift a sunken driveway, rebuild a failing foundation, or make a badly crumbled surface look factory-new. But for stable cracks, it is a smart maintenance step. The goal is simple: seal the opening, block water and debris, and give the driveway a better chance of aging gracefully instead of dramatically.
First, Identify Your Driveway Type
Before you buy anything labeled “driveway miracle goo,” identify whether you have an asphalt driveway or a concrete driveway. The repair products are different, and mixing them up is one of the fastest ways to create a patch that fails before your coffee gets cold.
Asphalt Driveways
Asphalt is black, slightly flexible, and often has a textured, gravel-like surface. Asphalt crack filler is usually black and may come as a pourable liquid, caulk-style tube, rubberized rope, or hot-applied filler. Because asphalt expands and contracts with temperature changes, the filler must stay flexible.
Concrete Driveways
Concrete is usually gray, harder, and divided into slabs or sections. Concrete crack filler may be a flexible masonry sealant, self-leveling polyurethane sealant, latex-based crack filler, vinyl patcher, or cement-based repair product. Concrete repairs are often more visible than asphalt repairs, so neat application matters.
Inspect the Crack Before You Fill It
Not every crack deserves the same treatment. Walk the entire driveway and look at the width, depth, pattern, and movement. A straight, narrow crack is usually a good DIY candidate. A wide, jagged crack with sinking sections may point to base failure. A web of cracks that looks like alligator skin often means the surface is failing over a larger area, especially on asphalt.
Here is a practical way to sort the damage:
- Hairline cracks: Very narrow cracks that may only need flexible crack filler or concrete crack sealant.
- Small cracks: Cracks under about 1/2 inch wide are usually good candidates for DIY filling.
- Medium cracks: Cracks around 1/2 to 3/4 inch wide may require backer rod, sand, or a thicker repair product before sealing.
- Large cracks or gaps: Cracks wider than about 1 inch, sunken sections, or broken edges may need patching, resurfacing, slab repair, or professional help.
- Alligator cracking: A network of small connected cracks usually means the surface or base is failing and needs more than simple crack filler.
If one side of a crack is higher than the other, or if the slab moves when driven over, filling the surface is only a temporary cosmetic fix. You can still seal it to slow water entry, but the underlying movement should be addressed.
Tools and Materials You May Need
The exact shopping list depends on the surface and crack size, but most driveway crack repair projects use simple tools. You do not need a truck full of contractor gear. You do need patience, dry weather, and clothes you are willing to sacrifice to the DIY gods.
Basic Tools
- Broom or leaf blower
- Wire brush
- Putty knife or margin trowel
- Flat screwdriver or crack-cleaning tool
- Shop vacuum
- Caulk gun, if using tubes
- Utility knife
- Gloves and safety glasses
- Pressure washer or garden hose, if the driveway needs deep cleaning
Possible Fillers and Repair Products
- Rubberized asphalt crack filler for asphalt driveways
- Asphalt crack repair caulk for narrow asphalt cracks
- Asphalt filler rope for medium asphalt cracks
- Concrete crack filler for small concrete cracks
- Self-leveling polyurethane sealant for concrete cracks and joints
- Backer rod for deep concrete cracks
- Clean sand for deep asphalt cracks before topping with filler
- Concrete patching compound for chipped or wider concrete damage
Best Weather for Filling Driveway Cracks
Weather can make or break this project. Most driveway fillers work best when the surface is dry and the temperature is mild, often around 50°F or higher depending on the product. Avoid rainy days, freezing nights, extreme heat, and windy conditions that blow dust into fresh filler.
Plan for at least 24 hours of dry weather when possible. Some products cure faster, while others need longer before foot traffic, vehicle traffic, or sealing. Always read the label. The label is not decorative; it is the tiny instruction manual standing between you and a repair that peels out like old chewing gum.
How to Fill Asphalt Driveway Cracks
Asphalt driveway crack repair is usually forgiving because black filler blends into the black surface. Still, preparation is everything. Filler sticks to clean asphalt, not weeds, dust, mud, or mystery crumbs from last summer’s barbecue.
Step 1: Remove Weeds and Loose Debris
Pull out grass, weeds, roots, and loose stones from the crack. Use a screwdriver, putty knife, or crack-cleaning tool to scrape the sides. If weeds keep coming back, remove as much root material as possible. Do not fill over living vegetation unless you enjoy watching plants win arguments against home improvement products.
Step 2: Clean the Crack Thoroughly
Brush the crack with a wire brush, sweep the area, and use a blower or shop vacuum to remove dust. The cleaner the crack, the better the filler bonds. If oil or grease is nearby, clean it with a driveway-safe degreaser before repairing.
Step 3: Make Sure the Crack Is Dry
Asphalt crack filler generally performs best on a dry surface. If you washed the driveway, let it dry completely. Moisture trapped under filler can weaken adhesion and shorten the life of the repair.
Step 4: Fill Deep Cracks First
For deeper asphalt cracks, add clean sand until the remaining depth is appropriate for your filler. This prevents wasting product and gives the filler a stable base. Do not pack the crack all the way to the surface with sand; leave room for the asphalt crack filler to create a proper seal.
Step 5: Apply Asphalt Crack Filler
For pourable filler, cut the tip or open the spout and slowly pour along the crack. For caulk-style asphalt filler, load the tube into a caulk gun and apply steady pressure. For rubberized crack filler rope, press the rope into the crack and heat it according to the product directions.
Slightly overfill the crack, then smooth it with a putty knife or squeegee if the product allows. Avoid creating a tall ridge, because car tires and snow shovels will not treat that ridge kindly.
Step 6: Let It Cure
Block off the repaired area until the filler cures. Cure time varies from product to product. Some fillers are ready for light use within hours; others need a full day or more before vehicle traffic. If you plan to sealcoat the driveway, wait until the crack filler is fully cured and compatible with the sealer.
How to Fill Concrete Driveway Cracks
Concrete crack repair is a little less forgiving visually, but the process is still manageable. The main rule is to use a concrete-compatible filler that can handle outdoor movement, moisture, and temperature changes.
Step 1: Chip Away Loose Concrete
Use a chisel and hammer to remove crumbling edges or weak material. For some cracks, slightly widening the opening creates better bonding space. Do not attack the driveway like you are auditioning for a demolition show. Remove only unsound material and create clean edges.
Step 2: Clean the Crack
Scrub with a wire brush, sweep away debris, and vacuum dust from the crack. If the surface has dirt, mildew, oil, or old coating, clean it before applying filler. Concrete dust is sneaky; it can make a repair look secure while quietly preventing proper adhesion.
Step 3: Use Backer Rod for Deep Cracks
If the crack is deep, press foam backer rod into the opening before applying sealant. Backer rod controls the depth of the sealant, saves material, and helps the filler flex properly. The sealant should bond to the sides of the crack, not become a bottomless plug of expensive goo.
Step 4: Apply Concrete Crack Filler
For narrow cracks, use a concrete crack filler or masonry repair caulk. For wider cracks or expansion joints, a self-leveling polyurethane sealant may be the better option. Cut the nozzle to match the crack width, apply steadily, and keep the bead even.
Step 5: Smooth the Surface
Some concrete fillers can be tooled with a putty knife or trowel. Others are self-leveling and should be left alone after application. Read the directions before touching the product. Overworking self-leveling sealant can turn a neat repair into something that looks like frosting applied during an earthquake.
Step 6: Protect the Repair While It Cures
Keep people, pets, bikes, and vehicles away until the filler cures. If the driveway slopes, watch for sagging or runoff during application. Work slowly and fill in manageable sections.
What About Expansion Joints?
Expansion joints are intentional gaps between concrete slabs. They allow concrete to expand and contract without cracking randomly. If an expansion joint has opened up, lost its old filler, or started collecting weeds, clean it and reseal it with backer rod and flexible concrete joint sealant.
Do not fill expansion joints with rigid cement. That defeats the purpose of the joint. Concrete needs room to move, just like people need room after eating a giant plate of nachos.
Common Mistakes to Avoid
Filling driveway cracks is simple, but the shortcuts are where trouble begins. Avoid these common mistakes:
- Filling dirty cracks: Dust, weeds, and loose grit prevent bonding.
- Repairing wet surfaces: Moisture can weaken adhesion and curing.
- Using the wrong filler: Asphalt and concrete need different products.
- Ignoring deep cracks: Use sand or backer rod when needed so filler does not sink.
- Overfilling: Raised filler can be damaged by tires, snow shovels, and foot traffic.
- Sealing too soon: Fresh crack filler needs time to cure before sealcoating.
- Expecting filler to fix structural failure: Sunken, shifting, or heavily cracked areas need deeper repair.
Should You Seal the Driveway After Filling Cracks?
For asphalt driveways, sealcoating after crack repair can improve appearance and add a protective layer against sun, water, and everyday wear. However, sealcoating is not a substitute for crack filling. Cracks should be repaired first, allowed to cure, and then sealed if the overall surface is in good condition.
For concrete driveways, sealing can help reduce water absorption, staining, and freeze-thaw damage. Use a concrete sealer suited for driveways, and make sure all crack repairs are fully cured before applying it.
One safety note: be cautious with coal-tar-based asphalt sealers, which have raised environmental and health concerns because of high PAH content. Many homeowners choose asphalt-emulsion or other lower-PAH alternatives, and some areas restrict coal-tar sealants. Check local rules before buying sealer.
When to Call a Professional
DIY driveway crack filling is best for stable, surface-level damage. Call a professional if your driveway has severe alligator cracking, large potholes, drainage problems, major settling, tree-root lifting, multiple broken concrete slabs, or cracks that keep reopening after repair.
A professional may recommend slab leveling, asphalt patching, resurfacing, drainage correction, or replacement. That may not sound as fun as squeezing crack filler from a tube, but sometimes the driveway is telling you the problem is below the surface.
Maintenance Tips to Keep Cracks From Coming Back
No driveway lasts forever, but regular maintenance can delay expensive repairs. Keep the surface clean, remove weeds quickly, direct downspouts away from the driveway, avoid parking heavy vehicles near weak edges, and repair small cracks once or twice a year. Spring and early fall are often good times because temperatures are moderate.
Also watch drainage. Water pooling on a driveway is not harmless. If puddles sit in the same spot after every rain, that area may crack faster. Improving grading, extending downspouts, or adding drainage may protect the driveway more than any filler ever could.
Real-World Experience: What Actually Makes Driveway Crack Filling Easier
After you have filled a few driveway cracks, you learn that the project is less about strength and more about preparation. The first practical lesson is this: cleaning takes longer than filling. Many homeowners expect the filler step to be the main event, but the real work is scraping out grit, removing weeds, brushing the sides, vacuuming dust, and waiting for everything to dry. If you rush that part, the repair may look fine for a few weeks and then peel, sink, or separate. A clean crack is boring, but boring is beautiful in driveway repair.
The second lesson is to buy slightly more filler than you think you need. Cracks are deceptive. A gap that looks shallow from above may be deep enough to swallow half a bottle of product. For asphalt, keeping clean sand nearby is helpful for deeper cracks. For concrete, backer rod is one of those small items that makes you feel oddly professional. It is cheap, easy to press into place, and saves sealant. More importantly, it helps the sealant sit at the right depth so it can flex instead of tearing loose.
The third lesson is to respect gravity. If your driveway slopes, thin filler will move. Start at the higher end and work downward in small sections. Do not dump a large amount into a sloped crack and walk away proudly. You may return to find a shiny puddle at the bottom, looking like your driveway had a bad cold. Use a product thick enough for the slope, or apply in layers if the instructions allow.
The fourth lesson is that neatness matters more on concrete than asphalt. Black asphalt filler blends in naturally, but gray concrete repairs can stand out. On concrete, use painter’s tape along very straight joints if you want cleaner lines, especially near the garage or walkway. Remove the tape before the sealant fully skins over. Keep a rag handy, but remember that some sealants are not water-cleanup products. Check the label before smearing anything around with confidence.
The fifth lesson is to block off the area like you mean it. A chair, trash can, or bright bucket can prevent someone from driving over fresh filler. Pets are especially talented at discovering wet repair materials. Children are curious. Adults are not always better. Give the repair the full cure time recommended by the manufacturer, even if it looks dry on top.
Finally, do not treat crack filling as a once-in-a-lifetime ceremony. Driveways move. Seasons change. New cracks appear. A quick inspection every spring and fall can save money and keep the driveway looking cared for. The best driveway repair is the one you do while the crack is still small enough to be boring.
Conclusion
So, how do you fill driveway cracks the right way? Start by identifying whether the driveway is asphalt or concrete, inspect the crack size and condition, clean the area thoroughly, choose the correct flexible filler, use sand or backer rod for deeper openings, apply the product carefully, and give it enough time to cure. The process is not complicated, but it does reward patience. Skip the prep and your repair may fail early. Do the prep well and your driveway gets a cleaner look, better water protection, and a longer service life.
Driveway crack repair is one of those home projects that feels small but pays off quietly. It improves curb appeal, reduces trip hazards, slows deterioration, and helps you avoid bigger repairs later. Plus, there is a special satisfaction in standing back and seeing those ugly cracks sealed up. It is not exactly a spa day for your house, but it is close enough for concrete.