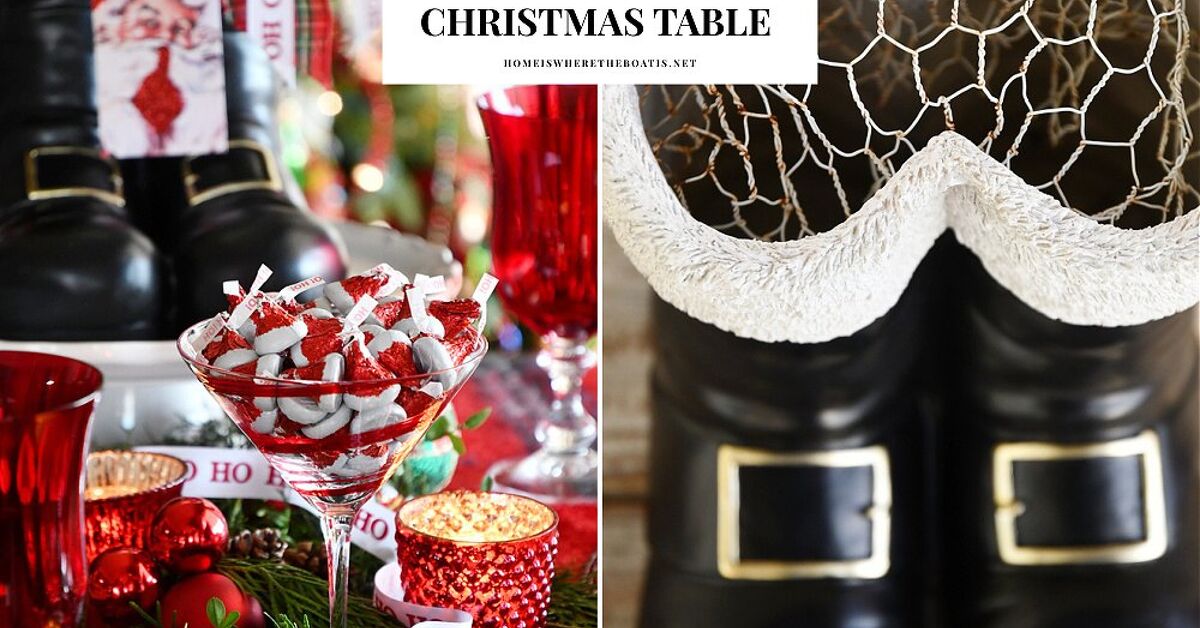
A Christmas table without a centerpiece can feel a little like Santa without cookies: technically possible, but emotionally suspicious. That is where a DIY Santa Boots Floral Centerpiece comes jingling into the room. It is playful, festive, easy to customize, and charming enough to make guests pause before reaching for the mashed potatoes.
This project turns a pair of decorative Santa boots into a bright holiday floral arrangement filled with evergreens, red blooms, berries, ornaments, ribbon, and a generous dose of Christmas cheer. It works beautifully for a dining table, buffet, entryway console, kitchen island, mantel, coffee table, or holiday party display. Best of all, you do not need to be a professional florist. If you can trim stems, tuck greenery into foam, and resist adding “just one more bow” seventeen times, you can make this centerpiece.
Note: For best results, use a waterproof liner inside the boots, keep fresh stems hydrated, and choose flameless candles if the centerpiece will sit near greenery, ribbon, paper decorations, pets, or enthusiastic children with cookie-fueled energy.
Why a Santa Boots Centerpiece Works So Well
The magic of this arrangement is the container. A standard vase is lovely, but Santa boots instantly tell a story. They feel nostalgic, whimsical, and a tiny bit mischievous, as if Santa kicked them off by the buffet after a long night of chimney gymnastics.
From a design perspective, the boots also create height, color, and structure. Their bright red shape acts like a built-in holiday accent, while the openings provide the perfect place to anchor floral foam, faux stems, or small containers of water. You can make the arrangement lush and traditional with pine, cedar, roses, and berries, or modern and frosty with white flowers, eucalyptus, silver ornaments, and snowy flocked branches.
This project is also budget-friendly because it allows you to mix fresh and faux materials. Fresh evergreen clippings add fragrance and movement, while artificial berries, ornaments, and ribbon bring long-lasting color. That combination keeps the centerpiece looking full without making your wallet scream louder than a toddler seeing Santa for the first time.
Supplies You Will Need
Before you start, gather everything in one place. Floral projects go much more smoothly when you are not hunting for scissors with sticky ribbon on one hand and a pine branch in the other.
Basic Materials
- One pair of decorative Santa boots, ceramic boots, metal boots, fabric boots with a liner, or a Santa boot vase
- Waterproof plastic cups, small jars, floral liners, or a watertight insert
- Wet floral foam for fresh flowers, or dry floral foam for faux stems
- Sharp floral snips, garden pruners, or a floral knife
- Water and flower food, if using fresh flowers
- Floral tape, clear tape, or waterproof tape
- Optional: plastic wrap or a zip-top bag to protect non-waterproof boots
Fresh Greenery Options
- Pine
- Cedar
- Fir
- Boxwood
- Magnolia leaves
- Juniper
- Spruce
- Eucalyptus
Flower and Accent Ideas
- Red roses
- White carnations
- Red carnations
- Mini carnations
- White mums
- Alstroemeria
- Hypericum berries
- Amaryllis blooms
- Faux poinsettias
- Mini ornaments
- Pinecones
- Candy canes
- Velvet ribbon
- Faux snow picks
- Gold bells
If you have pets, be thoughtful with plant choices. Some popular holiday plants can irritate or harm pets if chewed. Faux poinsettias, faux holly berries, and artificial amaryllis can give you the festive look without inviting your cat to conduct a botanical taste test.
Choosing the Right Santa Boots
The best Santa boots for a floral centerpiece are sturdy, balanced, and wide enough to hold a liner. Ceramic boots are excellent because they usually have enough weight to stay upright. Metal boots are lightweight and charming, but they may need extra support at the base. Fabric boots can work too, but they must be protected from water.
For a dining table, look for boots that are festive but not enormous. You want guests to see the centerpiece, not conduct conversation through a forest of pine. A finished height of about 12 to 18 inches works well for many tables. For an entryway or buffet, you can go taller and more dramatic.
If your Santa boots are purely decorative and not watertight, do not pour water directly into them. Place a small glass jar, plastic cup, or floral liner inside each boot. This protects the container and keeps the flowers hydrated. It also makes cleanup much easier when the holidays are over and you are emotionally ready to remove glitter from your life.
How to Make a DIY Santa Boots Floral Centerpiece
Step 1: Prepare the Boots
Start by wiping the boots clean. If they are ceramic or metal, check for cracks, leaks, or sharp edges. If they are fabric, line the inside with plastic wrap, a waterproof bag, or a fitted container. The goal is simple: flowers get water, boots stay dry, everyone remains cheerful.
Place a small jar or cup inside each boot. If the boots are deep, add crumpled paper, floral foam scraps, or small stones underneath the cup to lift it closer to the opening. This keeps the flowers from disappearing into the boot like they found a secret Christmas tunnel.
Step 2: Soak and Fit the Floral Foam
If you are using fresh flowers, choose wet floral foam. Let it absorb water naturally rather than forcing it under the surface. Once soaked, cut it to fit snugly inside the liner or cup. The foam should rise slightly above the boot opening so you can insert stems at outward angles.
For faux arrangements, use dry floral foam instead. It is firmer and better suited for artificial stems. You can also skip foam and use a grid of clear tape across the top of the liner, especially if you prefer a looser fresh-flower arrangement.
Step 3: Create a Greenery Base
Greenery gives the arrangement its shape. Begin with your longest evergreen pieces and insert them around the outer edges of the foam. Angle some stems downward to soften the boot opening, then add upright stems for height. Work around both boots so the arrangement looks balanced from every side.
Mix textures for a fuller look. Pine adds classic Christmas fragrance, cedar drapes beautifully, fir provides structure, and magnolia leaves bring glossy drama. If you are using fresh greenery from your yard, cut cleanly with sharp pruners, place the stems in water before arranging, and avoid stripping one side of a shrub so it does not look like it lost a fight with holiday enthusiasm.
Step 4: Add Focal Flowers
Now add the larger flowers. Red roses create a romantic Christmas look, carnations are affordable and long-lasting, and white mums add snowy brightness. Place focal blooms in small groups rather than scattering them randomly. For example, tuck three red roses near the front of one boot and two white carnations on the opposite side to create movement.
Cut each stem at an angle before inserting it into the foam. Remove any leaves that would sit below the waterline because submerged leaves can break down and make the water cloudy. A clean arrangement is a longer-lasting arrangement, and it smells much better than mystery swamp water in Santa’s footwear.
Step 5: Layer in Secondary Flowers
Secondary flowers fill gaps and add softness. Mini carnations, alstroemeria, button mums, waxflower, and small faux poinsettias all work well. Keep the color palette tight for a polished look. Red, white, and green is timeless. Red, gold, and evergreen feels warm and traditional. White, silver, and blue-green eucalyptus gives the centerpiece a wintry farmhouse feel.
A helpful rule is to repeat each color at least three times. If you add one gold ornament, it may look accidental. Add three or five, and suddenly it looks like a design decision. This is also an excellent life philosophy for cookies.
Step 6: Add Berries, Pinecones, and Ornaments
Once the flowers are in place, add the personality pieces. Red berry picks bring color and height. Pinecones add rustic texture. Mini ornaments catch light. Candy canes make the arrangement playful, especially for a kids’ table or hot cocoa bar.
If your ornaments do not have stems, attach them to floral picks, wooden skewers, or short pieces of floral wire. Tuck them into the foam at different depths so they feel nestled into the greenery instead of balanced on top like tiny disco balls that missed their exit.
Step 7: Finish with Ribbon
Ribbon is optional, but it can make the centerpiece feel complete. Use wired ribbon because it holds its shape. Velvet ribbon looks elegant, plaid ribbon feels cozy, and red-and-white striped ribbon gives a candy-cane effect.
Instead of tying one giant bow that dominates the entire arrangement, try smaller loops tucked between flowers. This creates movement without turning the boots into a ribbon avalanche. If you do use a large bow, place it slightly off-center for a designer look.
Design Ideas for Different Holiday Styles
Classic Santa Workshop
Use red roses, white carnations, pine, cedar, red berry picks, and gold bells. Add a red velvet bow and a few mini candy canes. This style is cheerful, nostalgic, and perfect for a family Christmas dinner.
Farmhouse Christmas
Choose white mums, eucalyptus, cedar, pinecones, burlap ribbon, and matte red ornaments. Keep the arrangement loose and natural. This version looks lovely on a wooden table with linen napkins and simple white dishes.
Elegant North Pole
Use white roses, silver ornaments, flocked greenery, eucalyptus, pearl picks, and satin ribbon. This is the centerpiece equivalent of Santa attending a black-tie gala. It works beautifully for formal dinners or winter weddings.
Whimsical Candy Cane
Combine red and white flowers, striped ribbon, candy canes, peppermint ornaments, and bright green picks. This style is fun for children, holiday brunches, dessert tables, and anyone who believes Christmas décor should wink at you.
Fresh vs. Faux: Which Should You Use?
Fresh flowers and greenery bring fragrance, softness, and natural beauty. They are ideal when you are making the centerpiece a few days before an event. Fresh arrangements need water, cool placement, and occasional maintenance, but the payoff is worth it.
Faux flowers are better if you want to make the centerpiece weeks ahead of time or reuse it year after year. High-quality artificial stems can look surprisingly realistic, especially when mixed with real pinecones, ribbon, and ornaments. You can also create a hybrid arrangement: fresh evergreens for scent, faux poinsettias for color, and artificial berries for durability.
If you are creating the centerpiece for a busy holiday table, faux accents are practical. They do not wilt under warm lights, and they will not judge you if dinner runs late because the rolls took longer than expected.
How to Keep the Centerpiece Fresh Longer
Fresh floral centerpieces last longer when they stay hydrated and cool. Check the water level daily, especially if you use floral foam. Foam can dry out faster than expected, and once it becomes too dry, stems may struggle to rehydrate.
Keep the centerpiece away from heat vents, fireplaces, direct sunlight, and hot serving dishes. Warm air speeds up moisture loss, which can make greenery brittle and flowers droopy. If possible, store the arrangement in a cool room overnight until the day of your gathering.
Misting evergreen foliage lightly can help it stay fresh, but avoid soaking ribbon, ornaments, or anything that may stain. Remove fading flowers as they age. One tired bloom can make the whole arrangement look like it stayed up wrapping gifts until 3 a.m.
Safety Tips for Holiday Centerpieces
A Santa boots floral centerpiece is decorative, but it should still be practical. If you plan to use candles nearby, choose battery-operated flameless candles. Fresh greenery can dry over time, and dried greenery, ribbon, paper tags, and faux snow should never be placed near an open flame.
Keep the arrangement stable. If your boots feel top-heavy, add floral stones, glass gems, or small weights to the bottom before inserting the liner. This is especially important for buffet tables, narrow consoles, and homes with pets who believe every new decoration is a personal investigation.
For pet-friendly decorating, avoid placing potentially irritating or toxic holiday plants within reach. Use faux holly, faux mistletoe, and faux poinsettias when needed. Also skip small loose ornaments if you have pets or young children who might mistake decorations for snacks.
Common Mistakes to Avoid
Using Too Many Colors
Christmas offers many tempting colors, but a centerpiece looks best with a focused palette. Choose two or three main colors, then use metallics as accents. Red, green, and gold is classic. White, green, and silver is crisp. Red, white, and black buffalo check is cozy and modern.
Forgetting the View Across the Table
A centerpiece should not block conversation. If it is going on a dining table, keep the tallest stems slightly off-center or under eye level when seated. Save the dramatic height for sideboards, foyers, and dessert stations.
Skipping the Waterproof Liner
This is the big one. Decorative boots are not always made to hold water. Always test or line them before adding fresh stems. A leak on the tablecloth is not festive. It is just a puddle wearing Christmas colors.
Overcrowding the Foam
Floral foam can hold many stems, but too many insertions can weaken it. Plan your placement before poking holes everywhere. Start with greenery, then focal flowers, then smaller fillers and accents.
Where to Display Your Santa Boots Floral Centerpiece
The dining table is the obvious choice, but it is not the only one. Place the centerpiece on an entry table to greet guests as soon as they arrive. Use it on a mantel with garland, stockings, and twinkle lights. Set it on a kitchen island for a cheerful holiday breakfast scene. Add it to a buffet table beside serving platters for instant Christmas charm.
You can also make mini versions for guest rooms, bathrooms, office desks, or gift tables. A small Santa boot with a few sprigs of cedar, one red carnation, and a candy cane makes a sweet hostess gift. Wrap it in cellophane, tie it with ribbon, and suddenly you are the person who “just threw this together,” which is holiday code for “I am secretly very impressive.”
Budget-Friendly Tips
You do not need expensive flowers to make this centerpiece beautiful. Carnations, mums, alstroemeria, and supermarket roses are reliable choices. Fresh evergreen clippings can often come from your yard or leftover Christmas tree trimmings. Pinecones can be collected, cleaned, and reused. Ornaments from previous years can become floral picks with a little wire.
Dollar stores, craft stores, thrift shops, and post-season sales are excellent places to find Santa boots, ribbon, berry stems, and mini decorations. If you buy quality faux stems, store them carefully after Christmas so they are ready for next year. Future you will be delighted, especially when December arrives and everything suddenly costs more than expected.
Personal Experience: What I Learned Making a DIY Santa Boots Floral Centerpiece
The first time I made a Santa boots floral centerpiece, I underestimated two things: how much greenery I needed and how determined floral foam is to shed tiny green crumbs everywhere. I started with a pair of red ceramic boots, a few grocery-store flowers, some pine branches, and the confidence of someone who had watched exactly enough holiday decorating videos to become dangerous.
My original plan was simple: place foam in the boots, add flowers, admire masterpiece. Reality had other ideas. The boots were deeper than expected, so the flowers sank too low and looked like they were hiding from the holidays. The fix was easy, though. I added crumpled paper and a small plastic cup inside each boot to lift the foam closer to the top. Instantly, the arrangement looked fuller and more intentional.
The next lesson was about greenery. I began with a few pine sprigs and thought they would be enough. They were not. A good Christmas floral arrangement needs more greenery than you think because the foliage creates the shape, hides the mechanics, and makes the flowers look abundant. Once I added cedar, fir, and a few glossy magnolia leaves, the whole piece came alive. The boots no longer looked like containers with flowers stuck in them; they looked like part of a festive little story.
I also learned that red flowers can disappear against red boots if there is not enough contrast. White carnations, pale eucalyptus, gold ornaments, and flocked pine picks helped separate the colors. That contrast made the red roses look richer instead of blending into the container. If your boots are bright red, add white, cream, silver, green, or gold elements near the opening to give the eye a place to rest.
Ribbon was another adventure. I started with a huge bow because Christmas encourages big feelings. Unfortunately, the bow swallowed the front of the arrangement like a festive sea monster. I removed it and replaced it with smaller ribbon loops tucked throughout the greenery. Much better. The ribbon became an accent instead of the main character.
One of my favorite discoveries was how useful mini ornaments can be. I wired small red and gold balls to wooden picks and placed them at different heights. They filled empty spaces, reflected light, and made the centerpiece look more expensive than it was. Pinecones did the same thing, especially when I brushed the tips with a little white paint for a snowy effect.
For a dinner table, I found that two boots arranged close together looked fuller than separating them. When placed side by side, the greenery connected them visually and created one centerpiece instead of two small arrangements. For a long table, however, separating the boots and linking them with loose garland, votives, or ornaments can create a beautiful runner effect.
The biggest practical tip from experience is to build the centerpiece where you plan to display it, or at least move it very carefully. Once filled with water, foam, stems, and decorations, Santa boots can become surprisingly heavy. Also, check the back side. A centerpiece may have a “front,” but guests often see it from multiple angles. Rotate it as you work so every side gets a little holiday sparkle.
Most importantly, do not chase perfection. A DIY Santa Boots Floral Centerpiece should feel joyful, not stiff. A slightly crooked berry pick, a pine sprig reaching in a funny direction, or a candy cane peeking out at an odd angle can make the whole arrangement more charming. Christmas decorating is not a courtroom. The greenery does not need to testify.
By the end, the centerpiece became one of those decorations people asked about before they asked about dinner. That is the real success of this project. It is not just flowers in a container. It is a conversation starter, a photo opportunity, a handmade holiday detail, and a cheerful reminder that seasonal decorating can be creative without being complicated.
Conclusion
A DIY Santa Boots Floral Centerpiece is the perfect mix of playful Christmas décor and classic floral design. With a sturdy pair of boots, a waterproof liner, fresh or faux greenery, bold flowers, and a few festive accents, you can create a holiday arrangement that feels personal, polished, and full of cheer. Whether your style is rustic farmhouse, elegant winter white, candy-cane whimsical, or traditional red and green, this project is easy to adapt and fun to display.
Keep the mechanics simple, hydrate fresh materials properly, avoid open flames near greenery, and let the Santa boots do what they do best: bring instant Christmas personality to the table. The result is a centerpiece that looks festive, smells wonderful if you use fresh evergreens, and makes your holiday setup feel thoughtfully finished without requiring a professional florist or a North Pole workshop badge.