
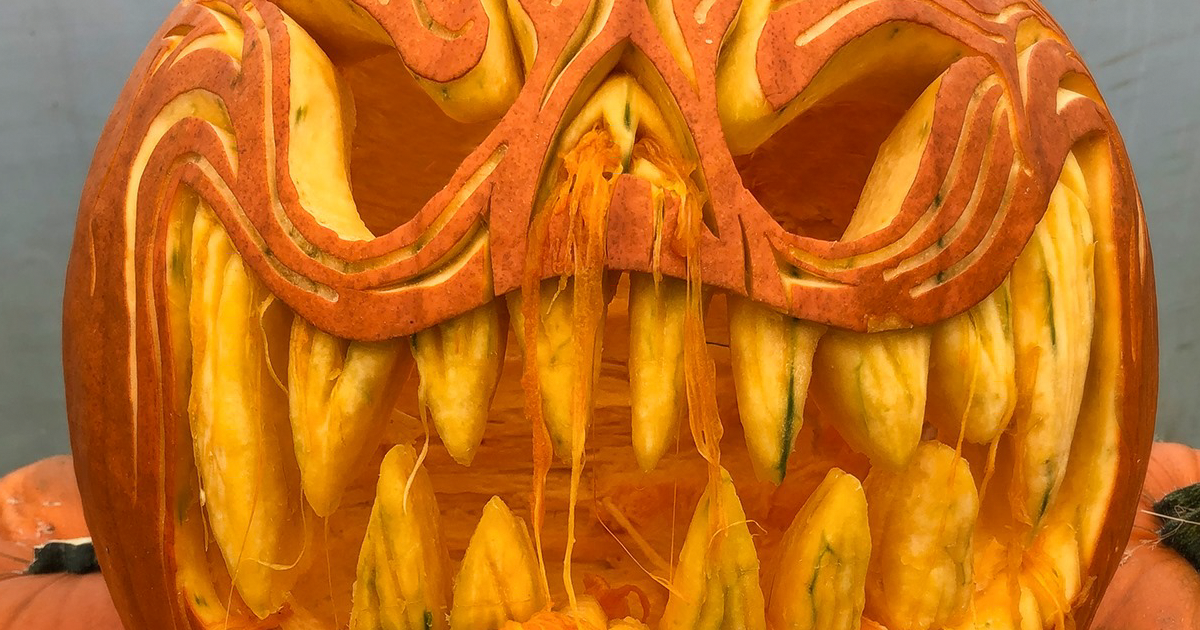
Some people welcome fall with a cinnamon latte. Others buy a cozy sweater and pretend they are about to become “a person who hikes.” Me? I start looking at pumpkins the way a sculptor looks at marble: suspiciously, lovingly, and with the quiet certainty that one of them is hiding a monster face inside.
After more than a decade of carving pumpkins, I have learned one important truth: the best jack-o’-lanterns are not always the cleanest, neatest, or most symmetrical. They are the ones with personality. A crooked grin can beat a perfect triangle smile. A lumpy pumpkin can become a troll. A giant pumpkin with scars, bumps, and weird ridges can become a swamp beast that looks like it has unpaid parking tickets from 1742.
This guide brings together years of hands-on pumpkin carving experience, classic Halloween design wisdom, safety advice, and practical preservation tricks. Whether you want easy pumpkin carving ideas, advanced monster pumpkin designs, or a front porch display that makes trick-or-treaters pause before ringing the doorbell, these 23 monster pumpkins are my favorites for a reason.
Why Monster Pumpkins Never Get Old
Traditional jack-o’-lantern faces are charming, but monster pumpkins allow more freedom. A monster can be silly, scary, gross, elegant, cartoonish, or deeply offended by neighborhood children. You are not carving a perfect portrait. You are building a creature.
That means you can use every “flaw” in the pumpkin. A dent becomes a cheekbone. A scar becomes battle damage. A twisted stem becomes a horn. Uneven coloring can look like ancient monster skin. Once you stop searching for the perfect pumpkin and start searching for the right personality, carving becomes much more fun.
Before You Carve: Choosing the Right Pumpkin
A great monster pumpkin starts at the patch, grocery store, farm stand, or suspiciously festive supermarket bin. For detailed monster faces, choose a pumpkin that feels firm and heavy for its size, has no soft spots, and sits steadily on a flat surface. A strong stem is a bonus, but do not carry the pumpkin by the stem unless you enjoy tragedy in slow motion.
For classic cut-through designs, medium pumpkins are easier to manage. For sculpted monster faces, bigger pumpkins give you more rind thickness and more room for expression. Giant pumpkins are spectacular, but they require patience, sharper tools, and a willingness to explain to your neighbors why you are wrestling an orange boulder in the driveway.
Tools That Make Monster Pumpkin Carving Easier
You do not need a professional studio to carve a memorable monster pumpkin, but the right tools help. A sturdy serrated pumpkin saw works well for cutting openings and large shapes. A small detail saw is useful for teeth, claws, nostrils, and jagged edges. A metal spoon or ice cream scoop removes pulp faster than the tiny plastic scoop that always looks brave and performs like a wet tortilla.
For advanced designs, try clay loop tools, linoleum cutters, wood-carving gouges, or a rotary tool for etching. Etching removes the outer skin without cutting all the way through, creating glowing shadows and texture. This technique is perfect for wrinkles, scales, scars, eyelids, and sneaky monster expressions.
My 23 Favorite Monster Pumpkins
1. The Predator Pumpkin
This is the heavyweight champion of monster pumpkin carving. Inspired by creature-feature details, the Predator-style pumpkin works best on a large or giant pumpkin because it needs room for mandibles, armor-like ridges, and deep shadows. The trick is to carve in layers instead of simply cutting holes. Shave the surface for skin texture, cut deeper around the mouth, and use the pumpkin’s natural curves to build a face that feels alive.
2. The Swamp Troll
A squat, bumpy pumpkin is perfect for a swamp troll. Give it a heavy brow, one crooked eye, a wide nose, and a mouth full of uneven teeth. This design is forgiving because trolls are not known for facial symmetry. Add moss, leaves, or twigs around the base for a creature that looks like it crawled out of a pond and immediately demanded snacks.
3. The Vampire Gourd
The vampire pumpkin is a classic, but the monster version is all about drama. Carve sharp cheekbones, narrow eyes, and fangs that extend over the lower lip. For extra effect, etch the gums instead of cutting them all the way through. Place a red LED light inside and suddenly your pumpkin looks like it has been invited to a very exclusive midnight dinner.
4. The One-Eyed Porch Cyclops
A cyclops pumpkin is one of the best designs for beginners who want maximum impact. Instead of worrying about two matching eyes, carve one huge eye in the center. Add a thick brow, a wrinkled nose, and a mouth that suggests the creature has just smelled your Halloween candy and found it disappointing.
5. The Zombie Jack-O’-Lantern
The zombie pumpkin is a crowd favorite because messiness becomes an asset. Cut one eye larger than the other, carve torn-looking cheeks, and make the teeth broken and uneven. If part of the pumpkin cracks, congratulations: that is now decomposition. A little greenish lighting inside makes the zombie effect even better.
6. The Werewolf Pumpkin
For a werewolf design, focus on the snout and eyes. A long pumpkin works especially well. Cut pointed ears from leftover pumpkin pieces and attach them with toothpicks. Etch fur lines around the brow and cheeks, then carve a snarling mouth. This pumpkin looks best when lit from below so the shadows stretch upward.
7. The Goblin Banker
This is a personal favorite because it is creepy and weirdly specific. Carve a long nose, thin lips, sharp little teeth, and suspicious eyes. Add tiny wire-rim glasses made from craft wire if you want the goblin to look like it charges interest on haunted treasure. It is a funny pumpkin carving idea that still feels spooky.
8. The Classic Tooth Monster
Sometimes all you need is a huge mouth. Carve an oversized grin and fill it with individually shaped teeth. The more uneven, the better. This design is excellent for kids to help plan because they can draw wild tooth shapes while adults handle the cutting. It is simple, bold, and hilarious from the sidewalk.
9. The Mummy Pumpkin
Instead of carving a full face, cut narrow horizontal bands across the pumpkin to suggest wrapping. Leave small gaps for glowing eyes. You can deepen the illusion by etching some bands and fully cutting others. This design lasts fairly well because it does not require removing giant chunks from the pumpkin wall.
10. The Demon Cat Pumpkin
A cat pumpkin can be cute, but a demon cat pumpkin has attitude. Use a tall pumpkin for long ears, carve sharp almond eyes, and create a tiny but menacing mouth. Add whisker holes with a drill or skewer. The result is perfect for anyone whose real cat already behaves like a tiny landlord with claws.
11. The Haunted Tree Face
This monster pumpkin turns the pumpkin into a living tree spirit. Etch bark-like lines across the surface, carve deep-set eyes, and shape the mouth like a hollow in an old trunk. Place it beside branches, leaves, and small pumpkins to create a haunted forest display.
12. The Alien Egg Pumpkin
For this design, the pumpkin itself is not the monsterit is the thing the monster came from. Cut jagged cracks around the top and carve glowing slits down the sides. Add a small creature head or tentacle shape emerging from the opening. It is creepy, creative, and excellent for sci-fi Halloween fans.
13. The Skull-Faced Pumpkin
A skull pumpkin is timeless. The best version uses a mix of cut-through carving and etching. Cut the eye sockets and nose deeply, then etch cracks, cheek hollows, and teeth lines. A white or pale orange pumpkin can make the skull effect even stronger.
14. The Witch’s Familiar
This monster pumpkin looks like a small magical creature that sits beside a witch’s cauldron. Give it big round eyes, tiny horns, and a mischievous grin. Add a small hat made from black paper or felt. It is less terrifying than adorable, but it still looks like it knows where the cursed objects are buried.
15. The Pumpkin-Eating Pumpkin
This design always gets attention. Carve a large pumpkin with a huge mouth, then place a smaller carved pumpkin halfway inside as if it is being eaten. The little pumpkin should look alarmed. This is Halloween comedy at its finest: vegetable-on-vegetable horror.
16. The Gargoyle Pumpkin
A gargoyle design works beautifully on gray, green, or muted orange pumpkins. Carve a heavy brow, wide nose, and grimacing mouth. Use leftover rind pieces for horns or ears. Place it on a porch column or step so it looks like it is guarding your home from evil spirits, salespeople, and possibly HOA letters.
17. The Sea Monster Pumpkin
Use a round pumpkin for the head and smaller gourds for tentacles. Carve sleepy, ancient eyes and a wide mouth with little peg teeth. Etch scales or suction cups for texture. Blue or green lighting turns the whole design into a creature from the haunted deep.
18. The Frankenstein Pumpkin
This is one of the easiest monster pumpkins to recognize. Choose a tall, blocky pumpkin if possible. Carve a flat forehead, heavy eyelids, and a stitched mouth. Add bolts with painted corks, bottle caps, or small wooden plugs. Keep the expression tired rather than angry; Frankenstein’s monster always looks like he needs better customer service.
19. The Bat-Faced Pumpkin
For a bat monster, carve a wide mouth with tiny fangs and sharp triangular eyes. Attach paper, felt, or carved pumpkin wings to the sides. This design works especially well as part of a group display with several smaller pumpkins arranged like a bat colony.
20. The Dragon Pumpkin
A dragon pumpkin is ambitious, but it is worth the effort. Focus on the snout, nostrils, and scales. Etch overlapping scale patterns rather than cutting them all out. Use small gourds or carved scraps as horns. A warm flickering LED inside makes the mouth look like it is holding fire.
21. The Mad Scientist Pumpkin
This pumpkin has wild eyes, raised eyebrows, and a grin that says, “The experiment is going perfectly, except for the screaming.” Add craft foam goggles, yarn hair, or a tiny lab coat collar. It is a great option for families who want a funny Halloween pumpkin that still feels theatrical.
22. The Spider-Mouth Pumpkin
Carve a large mouth opening, then add pipe cleaner legs, plastic spiders, or carved spider shapes crawling out. The pumpkin becomes a monster nest. This one is simple but very effective, especially if you place it near porch railings where the spider legs can stretch outward.
23. The Ancient Pumpkin King
The Ancient Pumpkin King is less of a monster and more of a seasonal monarch who has ruled over leaf piles since the dawn of sweaters. Carve deep wrinkles, a stern mouth, and glowing eyes. Add a crown made from twigs, dried leaves, or carved rind. This is the pumpkin that judges all other pumpkins, and frankly, most of them deserve it.
Design Tips for Better Monster Pumpkin Faces
Monster pumpkins depend on expression. Before cutting, sketch several faces on paper. Try changing the angle of the eyebrows, the size of the eyes, and the shape of the mouth. Tiny changes can turn a pumpkin from sleepy to furious, confused, hungry, or mildly disappointed in your life choices.
When carving, start with the most important features: eyes, nose, and mouth. Work from the center outward so the pumpkin stays stable. For advanced carving, use depth to create detail. A fully cut hole glows brightly, a shallow etched area glows softly, and untouched rind stays dark. That contrast is what makes a monster face look dimensional.
How to Make Carved Pumpkins Last Longer
Carved pumpkins are temporary art, which is a poetic way of saying they start plotting against you the moment you cut them open. To slow the decline, clean the pumpkin thoroughly before carving, remove as much pulp as possible, and thin the wall behind the design to about half an inch to one inch where needed.
After carving, keep the pumpkin cool, shaded, and dry. Direct sun and heat speed up shriveling. Many carvers seal cut edges with petroleum jelly or a thin layer of vegetable oil to reduce moisture loss. A diluted bleach solution or vinegar solution may help discourage mold, but always handle cleaning solutions carefully and keep them away from children and pets.
Battery-operated candles, LED lights, and glow sticks are safer than open flames and also help your pumpkin last longer because they do not cook the inside. If you do use a candle, keep the pumpkin far from dry leaves, fabric, paper decorations, and busy walkways. Never leave a flame unattended. A monster pumpkin should scare people, not the local fire department.
Beginner-Friendly Monster Pumpkin Ideas
If you are new to carving, start with designs that use bold shapes. The cyclops, tooth monster, mummy, and pumpkin-eating pumpkin are all beginner-friendly because they rely on big visual ideas rather than tiny details. Use washable marker to sketch the face first. If you make a mistake, wipe it off and redraw. Pumpkins are patient. Mostly.
Templates and stencils can help, but do not feel trapped by them. If your stencil slips, adapt the design. If a tooth breaks, make the whole mouth more jagged. If the eye gets too large, congratulationsyou are now carving a startled goblin.
Advanced Monster Pumpkin Techniques
For more dramatic pumpkins, try sculpting rather than simple cut-through carving. Sculpting means removing layers of rind and flesh to create cheekbones, wrinkles, lips, eyelids, and texture. It takes longer, but the results can look astonishing, especially on large pumpkins with thick walls.
Use reference images for creature anatomy. Look at skulls, reptiles, wolves, bats, old tree trunks, movie monsters, and even grumpy pets. Study where shadows fall. Great pumpkin carving is not just about cutting holes; it is about controlling light.
Porch Display Ideas for Monster Pumpkins
A single monster pumpkin is fun. A group of monster pumpkins becomes a scene. Arrange large pumpkins in the back and smaller ones in front. Mix carved pumpkins with uncarved gourds, dried leaves, hay bales, branches, and safe lighting. Try giving each pumpkin a different expression so they look like a dysfunctional monster family reunion.
For a dramatic display, use varied light colors. Warm white gives a classic Halloween glow. Green feels toxic and swampy. Red looks vampiric. Purple gives a magical haunted-house effect. Avoid making the display too bright; monsters enjoy a little mystery.
Common Pumpkin Carving Mistakes to Avoid
The first mistake is carving too early. A carved pumpkin may only look fresh for a few days, especially in warm weather. If you want your monster to peak on Halloween night, carve close to the event.
The second mistake is leaving too much pulp inside. Seeds and stringy flesh hold moisture and encourage decay. Scrape the interior until it feels clean and relatively smooth. The third mistake is using too much force. Controlled cuts are safer and cleaner than aggressive sawing. Let the tool do the work, not your entire upper body and unresolved October stress.
My 10-Year Pumpkin Carving Experience: What I Learned the Sticky Way
After carving pumpkins for more than 10 years, I can confidently say that every pumpkin teaches you something, usually while covering your table in orange slime. My first pumpkins were simple triangle-eyed jack-o’-lanterns. I loved them, but they looked less like spooky decorations and more like confused traffic cones. Over time, I learned that the secret to better pumpkin carving is not just better tools. It is better observation.
The pumpkin tells you what it wants to become. A tall pumpkin might want to be a vampire, a skeleton, or a haunted tree. A wide pumpkin might become a troll, a dragon, or a giant laughing mouth. A scarred pumpkin should never be rejected too quickly. Some of my best monster pumpkins started as the “ugly” ones nobody wanted. Their bumps and dents gave them character before I made the first cut.
I also learned that carving from the bottom is often easier than carving from the top. It preserves the stem, helps the pumpkin sit neatly over a light, and makes cleanup simpler. Scooping is still the least glamorous part of the process. There is no elegant way to remove pumpkin guts. You just accept your fate, grab a metal spoon, and become the goblin you were meant to be.
The biggest improvement in my carving came when I stopped cutting everything all the way through. Etching changed the game. By scraping only the outer skin, I could create shadows, wrinkles, and glowing textures. Suddenly my pumpkins had eyelids, cheekbones, scars, scales, and expressions. A monster does not need huge holes everywhere. Sometimes a shallow scrape creates the most dramatic glow.
Planning matters, but flexibility matters more. I have had designs collapse, teeth snap off, lids shrink, and one pumpkin roll off a workbench with the confidence of a stunt performer. When something goes wrong, turn it into the design. A broken tooth becomes a battle scar. A crack becomes lightning. A lopsided eye becomes personality. Pumpkins are temporary, so perfection is not the goal. The goal is delight.
Lighting is another lesson learned through trial and error. Real candles look beautiful, but LEDs are safer, cleaner, and easier to manage. They also let you experiment with color. A green light can turn a basic face into a swamp creature. A red light can make a vampire pumpkin look genuinely unsettling. A flickering LED gives you the old-fashioned jack-o’-lantern feeling without the fire risk.
Finally, I learned that monster pumpkins are best when shared. People stop to look. Kids point. Adults laugh. Neighbors ask how long it took, then immediately ask whether I am okay. A carved pumpkin is not meant to last forever, and that is part of its charm. For a few nights, it glows, grins, snarls, and becomes part of the season. Then it softens, sags, and returns to the earth like a dramatic little compost celebrity.
That is why I keep carving. Every October offers a new batch of strange orange faces waiting to be discovered. Some become classics. Some become disasters. Some become monsters so wonderful that I remember them years later. And every time I light one up on the porch, I feel the same ridiculous joy I felt with my first pumpkin: proud, sticky, and just a little bit spooky.
Conclusion
Monster pumpkin carving is one of the best Halloween traditions because it rewards creativity more than perfection. You can start with a simple grin or spend days sculpting a giant creature with layered shadows and terrifying teeth. Either way, the magic is in turning an ordinary pumpkin into something with a personality.
Choose a firm pumpkin, sketch a bold design, carve safely, use smart lighting, and let the pumpkin’s natural shape guide you. Whether your favorite is the Predator pumpkin, the swamp troll, the zombie jack-o’-lantern, or the Ancient Pumpkin King, the best monster pumpkin is the one that makes people stop, smile, and maybe take one cautious step backward.
Note: This article synthesizes practical pumpkin carving, Halloween safety, preservation, and design guidance from reputable U.S. home, food, safety, and university extension resources, while rewriting the content in an original, publishing-ready style.
