Somewhere between the leaf blower, the half-empty paint cans, the mysterious box labeled “misc,” and the bicycle nobody has ridden since flip phones were cool, your shed or garage may have quietly become a museum of good intentions. The good news? You do not need a luxury renovation, a professional crew, or a personality transplant to fix it. You need a practical plan, a few smart garage storage ideas, and the courage to admit that twelve rusty screwdrivers may be eleven too many.
Getting your shed or garage organized is not just about making the space look pretty for five minutes before real life barges in again. A well-organized garage or shed helps protect tools, reduce hazards, save time, preserve floor space, and make everyday projects less annoying. Whether you use the space for lawn equipment, gardening supplies, sports gear, DIY projects, seasonal decorations, or actual car parkingimagine that!the right system can turn clutter chaos into a useful, easy-to-maintain workspace.
This guide walks you through how to declutter, sort, store, label, and maintain your shed or garage without losing your weekend or your sense of humor. Let’s reclaim that square footage.
Why Shed and Garage Organization Matters
Garages and sheds work hard. They often store the items that do not belong inside the house but are too useful, too bulky, or too dirty to toss. That makes them natural homes for tools, extension cords, rakes, ladders, bicycles, camping supplies, fertilizers, motor oil, holiday bins, car-care products, and the occasional object no one can identify but everyone is afraid to throw away.
The problem is that these spaces usually lack the climate control, lighting, and built-in storage found inside the home. Moisture can damage cardboard boxes. Heat can affect paint and certain chemicals. Pests may find pet food or paper products. Poorly stacked items can fall. Flammable products can become dangerous when stored carelessly. Even simple clutter can create trip hazards and make it harder to find what you need.
A good organization system solves three problems at once: it gives every item a home, keeps dangerous materials under control, and makes the space easy to reset after use. The goal is not perfection. The goal is being able to grab the garden gloves without excavating like an archaeologist.
Step 1: Empty the Space Before You Organize It
Trying to organize around clutter is like trying to vacuum while someone is throwing confetti. Start by pulling everything out, or at least emptying one section at a time if your garage or shed is packed. Use your driveway, lawn, or a tarp as a temporary sorting zone.
Once items are out in the open, group them into broad categories:
- Tools and hardware
- Lawn and garden equipment
- Automotive supplies
- Sports and outdoor gear
- Seasonal decorations
- Paint, chemicals, and cleaning products
- Camping, beach, or hobby supplies
- Trash, recycling, donations, and hazardous waste
This sorting step is where the magic begins. You may discover three snow shovels, five bags of potting soil, and a cooler you thought was stolen by raccoons. You will also see what you actually own, which prevents buying duplicates later.
Use the Four-Pile Method
Create four piles: keep, donate, sell, and dispose. Be honest. If the item is broken, unsafe, expired, moldy, or missing important parts, it probably does not deserve premium garage real estate. If you have not used it in years and cannot name a realistic future use, let it go. “Maybe one day” is how garages become storage units with garage doors.
For items like old paint, pesticides, motor oil, batteries, solvents, and other chemicals, do not simply toss them in the trash unless your local rules allow it. Many communities offer household hazardous waste drop-off options. Check local disposal guidelines so you can clean responsibly without creating a bigger problem.
Step 2: Measure Before Buying Storage
Before rushing to buy bins, shelves, hooks, racks, and a label maker powerful enough to label your neighbor’s lawn mower, measure your space. Measure wall width, ceiling height, door clearance, window placement, outlets, studs, and the parking footprint if you keep a vehicle inside.
Also measure bulky items such as lawn mowers, wheelbarrows, ladders, bikes, storage totes, and large tools. This helps you choose garage shelving, overhead racks, pegboards, and wall-mounted systems that fit your actual lifenot the fantasy garage shown in a catalog where nobody owns muddy boots.
A simple sketch works well. Mark zones on paper: tools here, sports gear there, gardening along this wall, chemicals in a locked cabinet, seasonal bins overhead. Planning first prevents the classic mistake of buying storage products that look great but solve absolutely nothing.
Step 3: Create Zones That Match How You Use the Space
Zones are the secret sauce of garage organization and shed organization. Instead of spreading items randomly, group them by activity. This makes your storage system intuitive, which means everyone in the household has a fighting chance of putting things back where they belong.
The Tool Zone
Place frequently used hand tools near a workbench or wall-mounted pegboard. Use hooks for hammers, pliers, clamps, and measuring tapes. Small drawers or divided organizers work well for nails, screws, washers, anchors, and other tiny escape artists. A magnetic strip can hold metal tools you reach for often.
The Lawn and Garden Zone
Store rakes, shovels, brooms, hoes, and pruning tools vertically on wall hooks or a tool rack. Keep gloves, plant ties, seed packets, and small hand tools in labeled bins or a portable caddy. If your shed leaks or gets damp, avoid storing metal tools directly on the floor. Moisture is not a friend; it is rust wearing a trench coat.
The Sports and Outdoor Zone
Balls, helmets, bats, scooters, fishing rods, and camping gear need flexible storage. Use mesh bins for balls, hooks for rackets and helmets, and tall bins for bats or trekking poles. Keep children’s gear low enough for kids to reach, because “I couldn’t put it away” is a lot less convincing when the bin is at eye level.
The Seasonal Zone
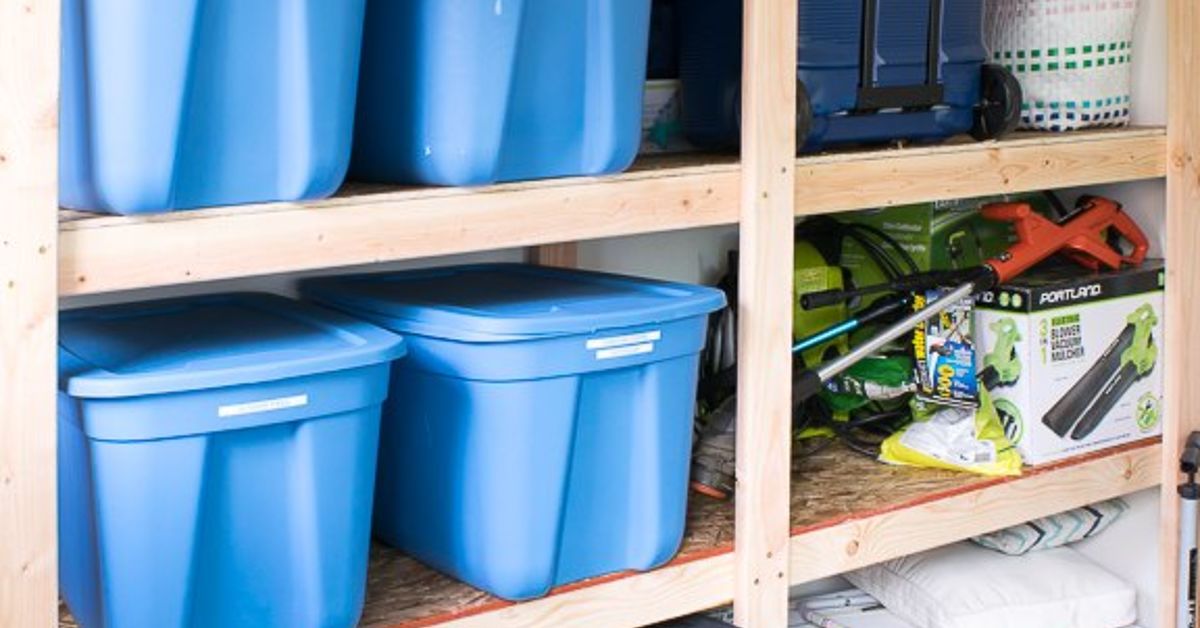
Holiday decorations, camping gear, beach chairs, and off-season equipment can go higher or farther back because you do not need them every day. Use sturdy, latching plastic bins instead of cardboard when possible. Label at least two sides of each bin so you can identify contents no matter how it is stacked.
Step 4: Get Items Off the Floor
Floor space is valuable. The more you can move onto walls, shelves, or ceiling storage, the easier it is to sweep, park, walk, and work. Vertical storage is one of the best ways to organize a garage or shed because it uses space that usually sits empty.
Consider these storage options:
- Heavy-duty shelving: Best for bins, paint supplies, automotive items, and bulky household storage.
- Pegboard: Great for hand tools, small baskets, cords, and frequently used supplies.
- Slatwall or track systems: Flexible for hooks, baskets, shelves, and changing storage needs.
- Ceiling racks: Useful for seasonal bins, camping gear, and lightweight bulky items.
- Wall hooks: Perfect for ladders, bikes, hoses, cords, folding chairs, and garden tools.
- Locking cabinets: Smart for chemicals, sharp tools, and anything children or pets should not access.
Keep heavy items low and lighter items high. Store frequently used items between shoulder and waist height. Put rarely used items up top. This simple rule saves your back and reduces the chance of a falling-bin incident that becomes family legend.
Step 5: Store Hazardous Items Safely
A clean garage is nice. A safe garage is better. Sheds and garages often contain products that require extra caution, including gasoline, propane, pesticides, fertilizers, paints, varnishes, solvents, batteries, and motor oil.
Keep products in their original containers whenever possible so labels, warnings, and instructions remain visible. Never transfer chemicals into beverage bottles or random jars. That is not “repurposing”; that is auditioning for a safety pamphlet.
Store flammable products away from heat sources, appliances, ignition sources, and direct sunlight. Keep oily rags in an airtight metal container until they can be handled properly. Store pesticides and lawn chemicals in a locked cabinet or secured area, away from children, pets, food, and animal feed. Buy only what you expect to use soon so you are not building a chemical archive next to the snow tires.
If your garage is attached to your home, take fire safety seriously. Avoid clutter near water heaters, furnaces, electrical panels, and outlets. Keep exits clear. If you charge tools, batteries, or outdoor equipment, use the proper charger and avoid overloading outlets.
Step 6: Choose Containers That Can Handle Garage Life
Not every container belongs in a garage or shed. Cardboard boxes are cheap, but they absorb moisture, attract pests, weaken over time, and look sad after one humid summer. For long-term garage storage, choose durable plastic bins with tight-fitting lids. Clear bins make contents visible, while opaque bins create a cleaner look when labels are strong.
Use small bins for small categories and large bins for bulky items only. A huge bin full of mixed hardware, extension cords, and holiday lights is not organization; it is a junk drawer with biceps. Keep categories narrow enough that the bin remains useful.
Label every bin, shelf, and drawer. Labels may feel fussy at first, but they are what keep your organizing system alive after the first month. Use simple labels such as “Garden Gloves,” “Car Wash,” “Camping,” “Christmas Lights,” “Sprinkler Parts,” and “Paint Supplies.” Clear beats clever.
Step 7: Build a Workbench That Actually Works
A workbench can become the heart of a garage or shed. It can also become the place where loose screws, unopened mail, broken sunglasses, and three measuring tapes go to mingle. To keep a workbench useful, give it a job and support it with nearby storage.
Mount pegboard, shelves, or a tool cabinet above or beside the bench. Keep daily-use tools within reach. Store safety glasses, gloves, tape, pencils, glue, clamps, and fasteners nearby. Add a small trash can and recycling bin so project debris does not pile up. If you use power tools, include a safe charging station with space around chargers for airflow.
Leave the main work surface mostly clear. A bench that is already covered before the project begins is not a workbench. It is a horizontal closet.
Step 8: Organize the Shed for Seasons
A shed usually serves the yard, garden, and outdoor lifestyle. Because sheds are often smaller than garages, every inch counts. Start by placing tall tools on the wall, bulky equipment along the back, and small supplies near the door.
In spring and summer, keep gardening gloves, pruners, hoses, watering supplies, plant food, and pest-control products easy to reach. In fall, shift leaf bags, rakes, tarps, and outdoor furniture covers forward. In winter, move snow shovels, ice melt, and storm supplies to the easiest-access area.
If your shed has exposed studs, use them. Add hooks, narrow shelves, or strips of wood between studs to hold small containers. A mounted PVC pipe section can corral long-handled tools. A simple shelf above the door can hold lightweight seasonal items. Keep the floor as clear as possible so you can walk in without performing a ballet routine around the weed trimmer.
Step 9: Protect Tools From Damage
Good tools are worth protecting. Before storing garden tools, brush off dirt and let them dry. Wipe metal parts occasionally to reduce rust. Hang sharp tools securely with blades facing away from walkways. Store power tools in cases, drawers, or cabinets where dust and moisture are less likely to settle.
Extension cords should be coiled loosely and hung on wide hooks, not knotted into a modern art installation. Hoses last longer when drained and stored on a reel or hanger. Ladders should be mounted horizontally on strong brackets or stored vertically in a secure position so they cannot slide.
Step 10: Make Maintenance Easy
The best organizing system is the one you can maintain when you are tired, busy, or holding a muddy shovel. Keep it simple. Avoid stacking bins six deep. Avoid hiding daily-use items behind rarely used equipment. Avoid overcomplicated categories that require a family meeting every time someone puts away a screwdriver.
Use the ten-minute reset rule. Once a week, spend ten minutes putting items back, breaking down boxes, sweeping the main walkway, and checking whether anything has landed in the wrong zone. A small reset prevents the dreaded annual cleanout, which is basically garage cardio.
Schedule a deeper review twice a year: once in spring and once in fall. These seasonal checkups help you rotate tools, remove expired products, donate unused gear, and prepare for weather changes.
Common Shed and Garage Organization Mistakes
Buying Storage Before Decluttering
Storage products do not solve clutter by themselves. They can actually make clutter more expensive. Declutter first, then buy what fits the items you are keeping.
Using Cardboard for Long-Term Storage
Cardboard is vulnerable to moisture, insects, rodents, and crushing. Use sealed plastic bins for items you want to protect.
Storing Everything at Eye Level
Prime storage space should go to frequently used items. Seasonal items can live higher or farther back.
Ignoring Safety
Chemicals, sharp tools, fuels, and heavy items need thoughtful storage. Safety should be part of the system, not something you remember after a rake falls dramatically in slow motion.
Skipping Labels
Labels are not just decorative. They tell everyone where things belong, which makes the system easier to maintain.
A Simple Weekend Plan to Get Organized
If the project feels overwhelming, break it into a realistic weekend schedule.
Friday Evening: Prepare
Gather trash bags, donation boxes, markers, gloves, cleaning supplies, and a tape measure. Take “before” photos so you can enjoy the transformation later. Also, so you can prove to yourself that yes, it really was that bad.
Saturday Morning: Empty and Sort
Pull items out by section. Group similar things together. Create keep, donate, sell, dispose, and hazardous waste piles.
Saturday Afternoon: Clean and Measure
Sweep floors, wipe shelves, remove cobwebs, and inspect for leaks, pests, or damage. Measure walls and decide where each zone will go.
Sunday Morning: Install Storage
Add shelves, hooks, pegboards, cabinets, racks, or bins. Anchor tall shelving when appropriate and follow product instructions for weight limits.
Sunday Afternoon: Put Everything Away
Place items by zone. Label containers. Keep walkways clear. Store dangerous products safely. Celebrate by parking the car inside, opening the shed door without fear, or simply standing there and admiring the floor. Floors are underrated.
Real-Life Experience: What Actually Works When Organizing a Shed or Garage
Here is the honest truth: the first time you organize a shed or garage, you may be tempted to make it look like a showroom. Resist that urge. A showroom garage is designed for photos. A real garage has muddy shoes, a lawn mower, half a bag of mulch, sports gear, and someone asking, “Where is the thing for the thing?” A practical system beats a perfect-looking system every single time.
One of the biggest lessons from organizing real-life storage spaces is that visibility matters. If people cannot see something, they forget it exists. Clear bins, open shelves, pegboards, and wall hooks help because they reduce the number of mystery containers. This is especially useful for gardening supplies, small hardware, and seasonal items. A labeled clear bin that says “Sprinkler Parts” can save you from buying another hose connector while the old one sits three feet away, silently judging you.
Another lesson is that heavy items need boring, obvious homes. Bags of soil, car-care products, toolboxes, and power equipment should not live overhead or behind delicate decorations. Put heavy things low, close to where they are used, and on shelving that is rated for the weight. It is not glamorous, but neither is explaining why a bin of tile grout fell onto the beach chairs.
The best systems also respect habits. If the kids throw balls near the garage door, put a ball bin near the garage door. If garden gloves always end up by the potting bench, mount a basket there. If you drop tools on the workbench because the drawer is across the room, move the tool storage closer. Organization works better when it follows behavior instead of fighting it.
It also helps to create a “return zone” near the entrance. This can be a small shelf, bin, or hook rail for items that need to go back to another part of the garage or shed. The return zone prevents random objects from spreading everywhere. The trick is to empty it during the weekly ten-minute reset. Otherwise, congratulations, you have invented a new clutter pile with a nicer name.
Finally, do not underestimate lighting. A dark shed or garage feels more cluttered because shadows hide everything. Better lighting makes it easier to find tools, read labels, avoid tripping, and notice leaks or pests early. Even a simple battery-powered motion light in a shed can make the space feel more usable.
The most successful shed and garage organization projects are not the most expensive. They are the ones that make everyday tasks easier. When the rake has a hook, the batteries have a drawer, the paint is sorted, the bike pump is visible, and the floor is clear enough to walk without side-stepping a cooler, the space starts working for you again. That is the real win.
Conclusion: Turn Clutter Into a Space That Works
Getting your shed or garage organized is less about creating a picture-perfect space and more about building a system that supports your life. Start by decluttering. Sort items into useful zones. Use walls, shelves, hooks, cabinets, and ceiling space wisely. Store hazardous products safely. Choose durable bins, label everything, and build a maintenance habit that keeps the clutter from staging a comeback tour.
Your garage or shed does not have to be a dumping ground for “future projects” and “I’ll deal with that later” energy. With a clear plan and a practical setup, it can become a clean, safe, functional space where tools are easy to find, seasonal gear is protected, and the floor is not a rumor. Get your shed or garage organizedand enjoy the rare household luxury of knowing exactly where the extension cord is.