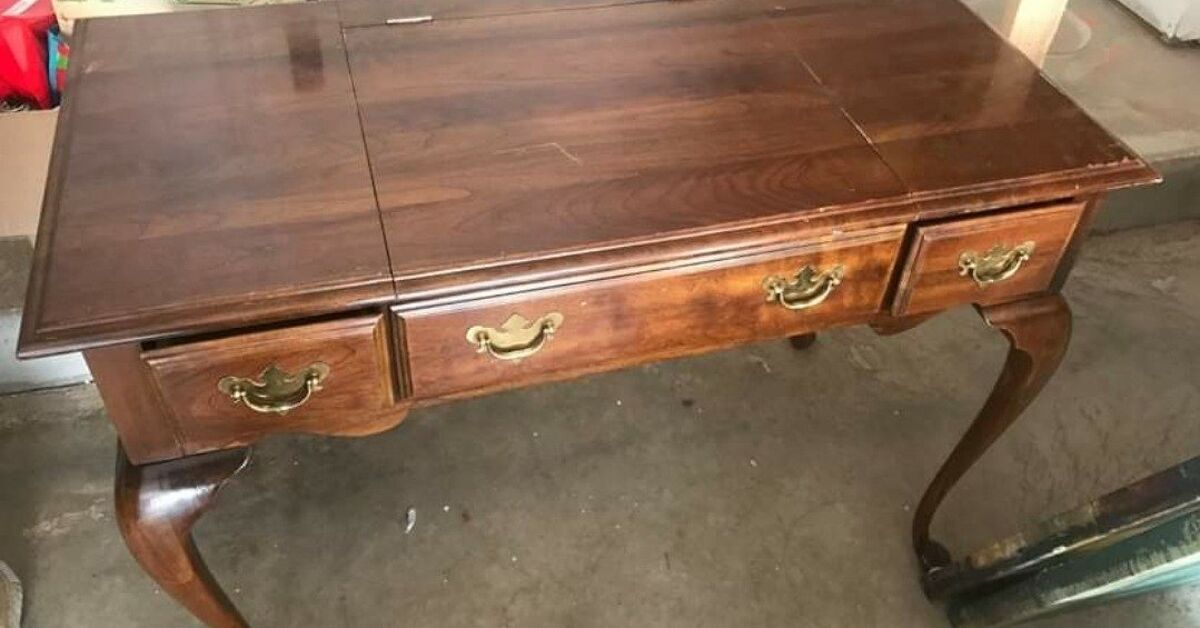
A vintage vanity has something flat-pack furniture cannot manufacture: a past. Its drawers may stick, its mirror may have a few mysterious freckles, and its finish may resemble a sunburn after a long vacation. Nevertheless, beneath the scratches and questionable hardware, there is often a beautifully proportioned piece waiting for a second act.
A thoughtful vintage vanity makeover can restore that character without erasing every sign of age. The secret is deciding what deserves preservation, what needs repair, and what can be changed without turning a charming dressing table into a generic painted box. This guide covers the entire process, from evaluating the furniture and choosing a finish to reviving the mirror, drawers, and hardware.
Inspect the Vanity Before Changing Anything
Resist the urge to attack the vanity with a power sander five minutes after bringing it home. First, photograph the piece from several angles, remove the drawers, and inspect its construction. Look underneath the top and inside the drawer boxes, where original materials and finishes are easier to identify.
Determine Whether It Is Vintage or Truly Valuable
“Vintage” is often used for furniture that is simply several decades old, while an antique is generally understood to be at least 100 years old. Age alone does not determine value. Maker’s marks, labels, hand-cut joinery, original hardware, rare woods, and documented history can all make a vanity worth more than its garage-sale price suggests.
If the piece appears rare, unusually well made, or historically significant, consult an appraiser or furniture conservator before refinishing it. According to National Park Service conservation guidance, aggressive cleaning can remove historically meaningful patina and finish layers. Sometimes the best makeover is careful dusting, minor stabilization, and the heroic decision to leave the paintbrush alone.
Check the Structure and Materials
Test every joint and inspect the legs, mirror supports, drawer bottoms, and back panel. A vanity that wobbles may have loose joints rather than damaged wood. Veneer deserves special attention because its decorative surface can be extremely thin. Aggressive sanding may expose the less glamorous substrate belowand there is no “undo” button for missing walnut veneer.
Also determine whether the piece is solid wood, veneered plywood, laminate, particleboard, or a mixture. Solid wood is usually suitable for staining or painting. Healthy veneer can also be refinished, but it requires a lighter touch. Laminate and glossy manufactured surfaces need an adhesion-promoting primer if they are painted.
Plan the Vintage Vanity Makeover
Before buying supplies, decide what the finished vanity should look like. Consider the room, the condition of the wood, and the features worth emphasizing.
- Restore the wood finish when the grain is attractive and most damage is superficial.
- Paint the vanity when the finish is badly mismatched, previous repairs are visible, or the wood is not especially decorative.
- Combine paint and stain to preserve a beautiful top while giving the base a fresh color.
- Use a distressed finish only where natural wear would occur, such as corners, handles, and drawer edges.
Create a simple mood board with a paint color, hardware finish, fabric swatch, and styling ideas. This prevents the project from drifting from “subtle Art Deco revival” to “every color left in the garage.”
Tools and Materials
The exact shopping list depends on the chosen finish, but most projects require screwdrivers, labeled bags for hardware, mild dish soap, microfiber cloths, wood glue, clamps, wood filler, a plastic scraper, sanding blocks, and sandpaper in several grits. You may also need chemical stripper, stain, primer, furniture paint, clear topcoat, painter’s tape, brushes, a small foam roller, and protective equipment.
Work in a well-ventilated area and follow every product label. Wear suitable gloves, eye protection, and respiratory protection when sanding or using solvents. Protect the floor with a drop cloth and keep ignition sources away from flammable products.
How to Make Over a Vintage Vanity Step by Step
1. Disassemble and Label the Parts
Remove the drawers, knobs, pulls, mirror, and detachable supports. Place screws and hardware from each area in separate labeled bags. Vintage screws are not always interchangeable, even when they look identical from three feet away.
Number the drawers discreetly with painter’s tape. Old drawer openings can vary slightly, and returning each drawer to its original location prevents an unnecessary wooden puzzle later.
2. Clean Before Sanding
Decades of furniture polish, makeup, hand oils, and dust can interfere with paint and stain. Begin with a soft cloth or vacuum fitted with a gentle brush attachment. For a sturdy, intact finish, wipe the surface with a microfiber cloth dampened in warm water and a few drops of dish soap. Avoid saturating the wood, veneer, joints, or drawer bottoms, and dry everything promptly.
Use a compatible degreaser only when necessary, testing it inside the vanity first. Cleaning before sanding keeps grime from being ground into the surface and reveals whether the old finish is truly damaged or merely dirty.
3. Repair Loose Joints and Damaged Areas
Complete structural repairs before cosmetic work. Reglue loose joints with an adhesive appropriate for the existing construction, then clamp them square while they dry. Replace missing drawer stops, secure loose bottoms, and tighten mirror supports.
Fill deep gouges only if the planned finish will hide the repair. Use paintable filler under paint and stainable filler for a natural finish, remembering that “stainable” does not guarantee an invisible color match. Small dents and scratches can sometimes remain; they add history without making the vanity look neglected.
Loose veneer should be stabilized rather than immediately removed. Work adhesive beneath the lifted area, protect the surface with wax paper and a flat block, and apply even pressure. Large bubbles, missing sections, or intricate inlay are good reasons to call a professional.
4. Remove or Scuff the Existing Finish
A damaged coating may need chemical stripping, while a stable finish intended for paint may require only cleaning and scuff-sanding. Chemical stripper is useful around carved details because it reduces the risk of flattening them. Follow the manufacturer’s application, ventilation, dwell-time, and disposal instructions.
When sanding sound wood, work with the grain. A medium grit can level a stripped surface, while finer grits prepare it for stain or paint. On veneer, sand gently by hand and stop as soon as the surface becomes uniformly dull. Rounded edges and raised details lose material faster than flat areas.
Remove all sanding residue with a vacuum and clean cloth. Dust left behind becomes tiny bumps in the finish, where it will remain forever, smugly catching the light.
5. Test the Color in a Hidden Area
Wood species, old coatings, and repairs affect how stain and paint appear. Test the complete finishing systemincluding primer, color, glaze, and topcoaton the back, underside, or inside of a drawer opening. Let the sample dry fully before judging it.
For a traditional result, consider warm walnut, medium oak, or deep espresso stain. Paint colors such as muted sage, smoky blue, warm cream, dusty rose, charcoal, and black can modernize the vanity while complementing its period silhouette. A stained top over a painted base often provides the best balance of old and new.
6. Prime and Apply Thin Coats
Primer improves adhesion, creates an even base, and can block discoloration from tannins or old stains. Choose a primer compatible with the surface and final paint. Shellac-based or stain-blocking primers are especially useful when reddish or yellowish bleed-through appears.
Apply furniture paint in thin coats, working from detailed areas toward larger surfaces. A quality brush handles moldings, while a small foam or fine-nap roller can create a smoother finish on broad panels. Allow each coat to dry as directed and sand lightly between coats when the product instructions recommend it.
For stained wood, apply stain evenly in the direction of the grain and wipe away excess within the specified time. Leaving extra stain on top does not create richer color; it creates a sticky problem with ambitions.
7. Protect the New Finish
A clear protective finish helps the vanity tolerate cosmetics, jewelry, and daily cleaning. Water-based polyurethane generally stays clearer, while many oil-based finishes add an amber tone. Furniture wax produces a soft traditional sheen but usually offers less resistance to spills and abrasion.
Use a compatible topcoat and apply it according to the label. Pay particular attention to the vanity top and drawer fronts. Remember that dry and fully cured are not the same thing. Treat the surface gently until the complete curing period has passed.
Refresh the Mirror, Hardware, and Drawers
Preserve an Aged Mirror When Possible
Dark spots around an old mirror can contribute authentic vintage character. Clean the glass by applying cleaner to a cloth rather than spraying the mirror directly, which helps prevent liquid from reaching the backing around the edges. If the glass is cracked, unstable, or too deteriorated for practical use, have a glass shop cut a replacement and keep the original if it has sentimental or historical value.
The mirror frame may be stained to match the top, painted with the vanity, or given a restrained metallic accent. Mask the glass carefully and use thin coats so decorative details remain crisp.
Revive the Original Hardware
Original knobs and pulls help identify the vanity’s period. Clean them gently before deciding to replace them. Test any metal polish on the back because thin plating can be removed by aggressive scrubbing. If you want to retain an aged patina, polish only the raised portions and leave darker color in the recesses.
When replacement hardware is necessary, measure the distance between existing screw holes. Choosing pulls with the same spacing avoids drilling new holes. Save the original hardware in a labeled bag so a future owner can restore it.
Improve the Drawer Experience
Vacuum drawer interiors and clean them without soaking the wood. Lightly smooth rough edges, repair loose corners, and apply a small amount of paraffin or suitable furniture wax to clean wooden runners if the drawers drag. Avoid painting sliding contact surfaces, where thick paint can cause sticking.
Removable drawer liners add color and protect the interiors. Wallpaper, fabric-backed paper, or archival-quality liner can create a delightful surprise whenever a drawer opens. Choose a removable method if the original wood remains in good condition.
Styling the Finished Vintage Vanity
Let the restored furniture remain the star. A small lamp, shallow tray, glass perfume bottle, jewelry dish, and compact vase are usually enough. Pair the vanity with a stool that fits comfortably beneath it, and echo either the paint color or metal hardware in the upholstery.
Good lighting matters more than a mountain of accessories. Place the vanity near natural light without exposing it to intense, prolonged sunlight, which can fade finishes and fabrics. Add a warm lamp or flattering wall lights near the mirror for practical grooming.
Common Makeover Mistakes
- Skipping the appraisal: Refinishing a collectible piece may reduce its historical and monetary value.
- Painting over grease: Even excellent paint struggles to adhere to polish, oil, and residue.
- Oversanding veneer: Thin decorative wood can disappear surprisingly quickly.
- Using filler everywhere: Excessive patching may look less natural than a few honest marks.
- Applying heavy coats: Thick paint collects around details and takes longer to cure.
- Rushing reassembly: Hardware can dent a finish that feels dry but remains soft underneath.
- Overdistressing: Random bare patches look manufactured; believable wear follows normal touch points.
Conclusion: Keep the Character, Lose the Grime
A successful vintage vanity makeover does not make old furniture pretend it was built yesterday. It strengthens the structure, improves daily function, and brings the best original details forward. Whether you preserve glowing wood, introduce a sophisticated paint color, or combine both finishes, patience during preparation will matter more than any trendy product.
The finished vanity should still have a storyjust one with smoother drawers, safer hardware, and considerably less unidentified stickiness.
500 More Words From the Workbench: What the Makeover Experience Is Really Like
The most memorable part of restoring a vintage vanity is rarely the final coat of paint. It is the moment after cleaning when the furniture begins revealing what it actually is. A dull brown top may turn out to have beautiful book-matched veneer. A drawer that appeared broken may simply contain a lost earring wedged behind its runner. Occasionally, the discovery is less romanticsuch as a fossilized bobby pin attached with enough hairspray to qualify as structural adhesive.
One practical lesson appears again and again: the vanity sets the schedule. A quick weekend project can become a weeklong job when veneer lifts, stain bleeds through primer, or humid weather slows drying. Building extra time into the plan makes the process more enjoyable. It also reduces the temptation to install hardware on paint that is technically dry but still soft enough to record fingerprints for future historians.
Color selection creates another surprisingly emotional stage. A dramatic shade may look perfect on a phone screen but overpower a small bedroom. Testing color on a movable sample board helps because it can be viewed beside the vanity in morning, afternoon, and artificial light. Muted green often feels calm and historic, navy can emphasize brass hardware, and warm white highlights carved details. Black delivers elegance, although it also displays dust with the enthusiasm of a professional informant.
Hardware cleaning can provide the project’s most satisfying transformation. A dark pull may reveal warm brass beneath years of residue, but restraint remains important. Perfectly polished hardware can look strangely new on an aged piece. Leaving darker patina around recessed ornament creates definition and maintains a believable relationship between the metal and wood.
Drawer alignment tends to be the humbling portion. Old furniture was fitted by hand, wood expands and contracts, and floors are not always level. Numbering drawers during disassembly saves time, while rubbing wax on clean wooden runners often improves movement without altering the construction. When a drawer still binds, inspect where it rubs rather than sanding every edge indiscriminately.
The mirror frequently changes the final decision. Slight silvering loss can add atmosphere and prove that the vanity has lived a life. A severely clouded mirror, however, may frustrate anyone trying to use it each morning. Replacing the glass while preserving the original frame offers a practical compromise. Keeping the old mirror safely stored also leaves the makeover reversible.
Finally, a vintage furniture makeover teaches respect for small imperfections. The shallow dent near the center may have come from a dropped perfume bottle. Faded wood beneath an old tray shows how the vanity was arranged for years. Those marks distinguish restoration from replacement. The goal is not to erase the past until the piece becomes anonymous; it is to decide which evidence enriches the design and which damage prevents the furniture from functioning.
When the vanity is reassembled, styled, and placed in its room, it often looks more expensive than the project budget suggests. More importantly, it feels personal. You did not simply buy a color and a set of knobs. You studied an old object, solved its peculiar problems, and gave it a useful future without confiscating its personality. That is why the occasional stubborn drawer and unexpected fourth coat eventually become part of the fun.
Note: Product compatibility, drying times, and safety requirements vary. Test every cleaner and finish in a hidden area, follow manufacturer directions, and seek professional advice before altering potentially valuable or lead-painted furniture.